• ×
    Information
    Windows update impacting certain printer icons and names. Microsoft is working on a solution.
    Click here to learn more
    Information
    Need Windows 11 help?
    Check documents on compatibility, FAQs, upgrade information and available fixes.
    Windows 11 Support Center.
  • post a message
  • ×
    Information
    Windows update impacting certain printer icons and names. Microsoft is working on a solution.
    Click here to learn more
    Information
    Need Windows 11 help?
    Check documents on compatibility, FAQs, upgrade information and available fixes.
    Windows 11 Support Center.
  • post a message
Guidelines
The HP Community is where owners of HP products, like you, volunteer to help each other find solutions.
Archived This topic has been archived. Information and links in this thread may no longer be available or relevant. If you have a question create a new topic by clicking here and select the appropriate board.
HP Recommended
Envy120 eall in one
Mac OS X 10.11 El Capitan

My Envy 120 eAll in one printer will seemingly arbitrarily cut off the top of a line of text.  It is not with regular spacing for lines, i.e. every fourth or fifth line.


I am trying to print out a syllabus for a graduate course and upload it to the University site.


I have aligned print heads, downloaded the latest drivers, and still no luck.


Help please!

1 REPLY 1
HP Recommended

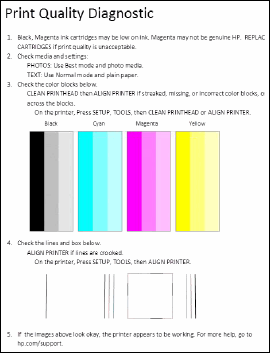
The troubleshooting steps in the document here may help resolve partial lines not printing on your Envy 120 printer.  Is the black section missing a well defined section in the test page?


Figure : Example of a Print Quality Diagnostic report with no defects

Image of a Print Quality Diagnostic report with no defects.


If so then the likely cause is a defective cartridge, or an issue with the electrical connection between the printer and the print cartridge.  In this case I would suggest removing the cartridge and cleaning the electrical contacts on the cartridge and in the printer as shown in Step 3 of the document here (for a different printer, but same principle).


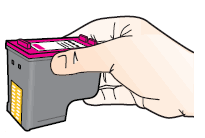
  1. Figure : Hold the cartridge by its sides
    Image: Hold the cartridge by its sides.
  2. Inspect the cartridge contacts for ink and debris buildup.
     CAUTION:
    Do not touch the copper-colored contacts or the ink nozzles. Touching these parts can result in clogs, ink failure, and bad electrical connections.
    Figure : Do not touch the contacts or nozzles
    Image: Do not touch the contacts or nozzles.
  3. Lightly moisten a foam-rubber swab or lint-free cloth with distilled water, and then squeeze any excess water from it.
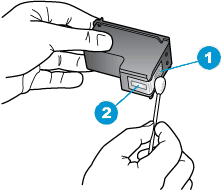
  4. Clean only the copper-colored contacts on the cartridge, and then allow the cartridge to dry for about 10 minutes.
    Figure : Clean the contacts
    Image: Clean the contacts.
    1. Copper-colored contacts
    2. Ink nozzles (do not clean)
  5. Lightly moisten another foam-rubber swab or lint-free cloth with distilled water, and then squeeze any excess water from it.
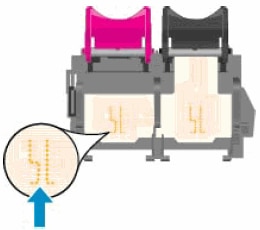
  6. Use the swab or cloth to clean the electrical contacts in the carriage, located inside the printer in the cartridge slots.
    Figure : The electrical contacts in the cartridge slots
    Image: The electrical contacts in the cartridge slots.

Bob Headrick,  HP Expert

I am not an employee of HP, I am a volunteer posting here on my own time.

If your problem is solved please click the "Accept as Solution" button 

If my answer was helpful please click "Yes" to the "Was this post helpful" question.


Archived This topic has been archived. Information and links in this thread may no longer be available or relevant. If you have a question create a new topic by clicking here and select the appropriate board.
† The opinions expressed above are the personal opinions of the authors, not of HP. By using this site, you accept the <a href="https://www8.hp.com/us/en/terms-of-use.html" class="udrlinesmall">Terms of Use</a> and <a href="/t5/custom/page/page-id/hp.rulespage" class="udrlinesmall"> Rules of Participation</a>.