-
×InformationWindows update impacting certain printer icons and names. Microsoft is working on a solution.
Click here to learn moreInformationNeed Windows 11 help?Check documents on compatibility, FAQs, upgrade information and available fixes.
Windows 11 Support Center. -
-
×InformationWindows update impacting certain printer icons and names. Microsoft is working on a solution.
Click here to learn moreInformationNeed Windows 11 help?Check documents on compatibility, FAQs, upgrade information and available fixes.
Windows 11 Support Center. -
- HP Community
- Archived Topics
- Printers Archive
- envy 5660 - Wifi connected but laptop can't find printer

Create an account on the HP Community to personalize your profile and ask a question
Your account also allows you to connect with HP support faster, access a personal dashboard to manage all of your devices in one place, view warranty information, case status and more.
11-10-2015 04:16 PM
 HP Recommended
Product: Envy 5660
Operating System: Microsoft Windows 8 (64-bit)
Printer purchased 10 days ago. Set up was easy and trouble free. Printing was without problem....for about 3 days. Since then, other wifi devices in our home cannot find the printer. Have had no disruption in Wifi service. But....Get message - "printer offline". So, I've turned off Wifi on printer, powered printer off, then re-started Wifi on printer. Still....not found when asking laptop to "find printer". What has changed? Nothing! But printer can't be found.
2 REPLIES 2
11-12-2015 07:20 AM - edited 11-12-2015 07:21 AM
HP Recommended
Hi @Annette63,
Welcome to the HP Forums!
I see that you cannot print wirelessly with your HP Envy 5660 printer, on Windows 8. And, I am happy to help you with this connection issue!
To verify the printer's hardware is functional, what happens when you make a copy with the printer? Copying Documents or Photos.
Do you see any error messages, on the printer's display screen?
in the meantime, please try the following steps:
The default print driver might have changed from the driver you installed to another driver, such as a WSD driver with a very similar name. Change the default print driver to your originally installed driver to continue printing.
- Search Windows for devices, and click Devices and Printers in the list of results.
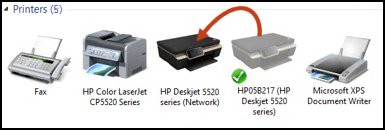
- Find the original print driver that you previously installed. The print driver should be the name of your printer and the picture of the printer should not be gray.Figure : Changing the default printer to the original print driver
- Right-click your printer, and select Set as Default Printer.
If problems persist, continue to the next step.
Step 2: Perform a power reset and check connections
Resetting the power to your printer is a quick way to reset the printing system and prepare for further troubleshooting if necessary.
- If the printer is off, turn on the printer, and then check the status of the printer:
- If the printer starts printing jobs from the print queue, your printer is clearing out queued print jobs and is online. You can stop troubleshooting.
- If the printer goes to an idle state after its startup routine, it might be online.
- If the computer still shows the printer as offline, continue using these steps.
- With the printer turned on, disconnect the power cord from the printer.
- Unplug the printer power cord from the wall outlet.
- If you are using a USB cable or network cable, make sure that the cable has not become disconnected or damaged.
- Wait at least 60 seconds. Restart the computer while you are waiting.
- Plug the power cord back into the wall outlet.
- Reconnect the power cord to the rear of the product.
- If the printer does not turn on by itself, press the Power button to turn it on.
- Try to print.
- If you can print, the printer is online again. Continue to the next step if the printer goes offline again when printing later.
- If the printer cannot print and remains offline, continue to the next step.
HP provides a free tool called HP Print and Scan Doctor to diagnose and resolve printing problems. Download and run HP Print and Scan Doctor  to quickly and automatically perform several troubleshooting tasks known to resolve this issue. When this link is clicked, HP Print and Scan Doctor is downloaded using your Internet browser's download capabilities.
to quickly and automatically perform several troubleshooting tasks known to resolve this issue. When this link is clicked, HP Print and Scan Doctor is downloaded using your Internet browser's download capabilities.If problems persist, continue to the next step.
Step 4: Check the 'Use printer offline' setting
Make sure that the printer's print queue is not set to print offline.
- Search Windows for devices, and then select Devices and Printers in the list of results.The Devices and Printers window opens.
- Right-click your printer and select See what's printing.
- Select Printer, and then click to remove the selection next to Pause Printing and Use Printer Offline, if selected.Figure : Example of the Pause and User Printer Offline selections
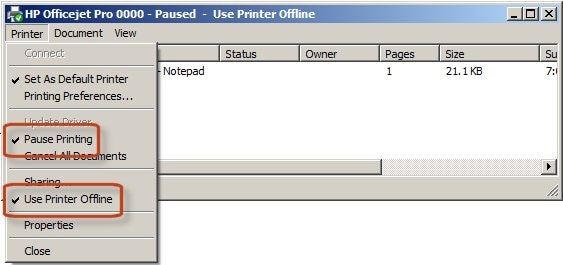
- If you removed a selection, try to print.
- If you can print, the printer is online again. Continue to the next step if the printer goes offline again when printing later.
- If the printer cannot print and remains offline or goes offline intermittently, continue to the next step.
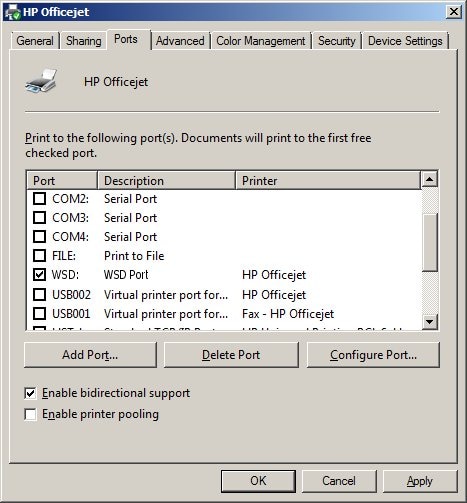
Step 5: Make sure that the correct port is selected
If the driver is using the wrong communication port, the printer remains offline, as the connection cannot be made.
- Search Windows for devices, and then select Devices and Printers in the list of results.The Devices and Printers window opens.
- Right-click the name of your printer, and then select Printer Properties.The Printer Properties window opens.
- Click the Ports tab.
- Look at the list of ports and make sure the port type matches the connection being used by the printer. If the printer is using a USB connection, the port type has USB or DOT4 in the description. If the printer is using a network connection, the port type has WSD, network or IP in the description. If you see multiple listing a for the same port type, change the selection to a different port.Figure : Example of the WSD port selected for a wireless connection
If problems persist, continue to the next step.
The connection to a printer on a network might suddenly change causing the connection to drop. This can happen when configuration changes occur from the DHCP service, the router assigns new IP addresses for security, or other reasons.
To help prevent dropped connections, manually create a new network connection to your printer. A manual connection is a more direct method of communicating to the printer over your network and is less likely to drop data and go offline.
NOTE:These steps require that your printer is already set up on your network. If your printer has never printed successfully over your network, then you must first make sure it has been set up on the network. This involves installing full feature printer software from HP or using the wireless setup wizard from the printer control panel. For more help, see the User Manual, search the HP website, or use the wireless setup wizard from the control panel if available.
- Print a Network Configuration Report or Wireless Test Report page from your printer.
- If your printer has a control panel with a display, print the report from the network settings or network setup menu.
- If your printer does not have a display, print the report using the buttons on the printer control panel. For many HP printers, this is done by pressing and holding the cancel button or a combination of buttons on the control panel until a report prints. For more information on how to print a report for your printer model, see the User Guide or search the HP website for network configuration page and the model of your HP printer.
- On the report, look at the network status for your network connection type (wired or wireless.)Figure : Example of a correctly connected wireless network status

- If status is connected, continue.
- If status is anything other than Connected, such as Off or Disabled, then the printer is disconnected from your network. This is the reason for why your printer is offline. Connect the printer to your network before continuing. For more help on how to set up a connection to your network, see the User Manual, search the HP website for your printer model and wireless or wired network install, or use the wireless setup wizard from the control panel of your printer if available.
- On the report, find the IP Address, subnet mask, and Default Gateway for your active (connected) network connection type. If your report has separate numbers for IPv4 and IPv6, then use the numbers listed in the IPv4 section.Figure : Example of a properly functioning printer IP Address

- From a computer connected to your network, find the URL for the embedded web server (EWS) on the report and enter the URL into your Internet browser. If the Web page appears blank, use a different Internet browser.
- Click the Network or Networking tab, and then open the section or page for your network type - wired or wireless.
- Click Suggest a Manual IP address if available and the Manual IP addresses are automatically filled out for you.If your page does not have a button to suggest a manual IP address, type the IP address, subnet mask, and default gateway using the numbers shown in the report. If possible, when entering the last number for IP address, type a number that is outside the normal operating DHCP range for your router. Consult your router documentation to find the DHCP range.Figure : Example of setting up a Manual IP configuration using an EWS

- Write down these new numbers on a piece of paper. You might need to use them later when adding a second printer device.
- Click Apply, and then wait until the changes are confirmed.
- Continue to the next step.
Step 7: Add a second printer device to Windows (network connections only)
After setting a manual IP address for the printer, add a second printer to Windows that matches this new IP address.
CAUTION:After performing these steps, two printer icons for your printer model display in the Devices and Printers window. Do not attempt to remove the printer icon that was created when you first installed the printer software. Doing so prevents access to the HP Printer Assistant/HP Solution Center software.
CAUTION:If you could not set a manual IP address for your printer and the IP address changes in the future, delete the printer icon created using 'Add a printer' from Devices and Printers, and then re-add the printer. Re-adding the printer updates the print driver with the new printer IP address.
- Search Windows for devices, and then select Devices and Printers in the list of results.The Devices and Printers window opens.
- Click Add Printer, and then click Add a network, wireless or Bluetooth printer. Windows attempts to discover your printer.
NOTE:
If the name of your printer does not display in the window and you are using a wireless network, make sure the printer is turned with wireless enabled and a network cable is not connected to your printer.Figure : Example of the Add Printer screen.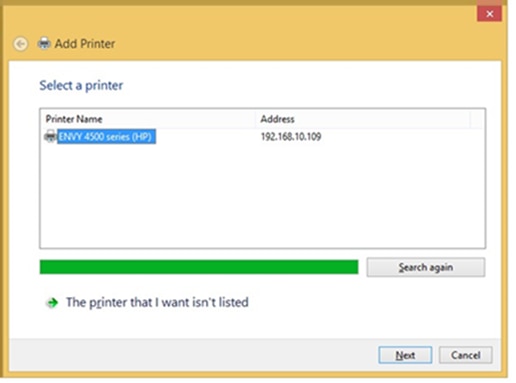
- Click the name of your printer, and then click Next.If more than one printer is listed, select the name of your printer and make sure the name does not include an alphanumeric code such as 'HP647FEA'.The system automatically detects the right driver to use.
- Select Use the driver that is currently installed (recommended), and then click Next.
- If desired, change the name of your printer, and then click Next.
- Select Do not share this printer, and then click Next.
- Select Set as the default printer and then click Finish.
NOTE:
The printer is now using a Windows class driver that provides basic printing. If you have previously installed HP full feature software, open the printer properties for the printer device that you created and select a non-class driver name that matches your printer from the Advanced properties tab. Doing so provides more printing features, such as custom paper sizes.If this, or any of the posts on this thread, has helped you to resolve the issue, please click on "Accept as Solution" on said post. To show that you 'like', or are thankful of my post, kindly click the thumbs up below. If there is anything else I can do to help, please be sure to let me know!Hope these steps help, and hope to hear from you soon!
RnRMusicMan
I work on behalf of HP
Please click “Accept as Solution ” if you feel my post solved your issue, it will help others find the solution.
Click the “Kudos Thumbs Up" to say “Thanks” for helping!
I work on behalf of HP
Please click “Accept as Solution ” if you feel my post solved your issue, it will help others find the solution.
Click the “Kudos Thumbs Up" to say “Thanks” for helping!
09-15-2016 04:29 PM
HP Recommended
I was able to add the 2nd printer, & it looked like it was going to work...until I sent a test page to print. Printer not responding. Looks like I'm stuck in the same boat, w/2 print devices now. I'll update you if anything changes.
BTW, why should I set "do not share this printer" setting at the end? Can other family members print from their devices if the printer is not shared?
† The opinions expressed above are the personal opinions of the authors, not of HP. By using this site, you accept the Terms of Use and Rules of Participation.


Didn't find what you were looking for? Ask the community
† The opinions expressed above are the personal opinions of the authors, not of HP. By using this site, you accept the <a href="https://www8.hp.com/us/en/terms-of-use.html" class="udrlinesmall">Terms of Use</a> and <a href="/t5/custom/page/page-id/hp.rulespage" class="udrlinesmall"> Rules of Participation</a>.