• ×
    Information
    Windows update impacting certain printer icons and names. Microsoft is working on a solution.
    Click here to learn more
    Information
    Need Windows 11 help?
    Check documents on compatibility, FAQs, upgrade information and available fixes.
    Windows 11 Support Center.
  • post a message
  • ×
    Information
    Windows update impacting certain printer icons and names. Microsoft is working on a solution.
    Click here to learn more
    Information
    Need Windows 11 help?
    Check documents on compatibility, FAQs, upgrade information and available fixes.
    Windows 11 Support Center.
  • post a message
Guidelines
The HP Community is where owners of HP products, like you, volunteer to help each other find solutions.
Archived This topic has been archived. Information and links in this thread may no longer be available or relevant. If you have a question create a new topic by clicking here and select the appropriate board.
HP Recommended

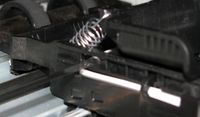
Left Retaining Spring

HP Recommended
Where is this print head position sensor... and where does it need to be set?
HP Recommended

Actually the HP 5510 does have a replaceable print head.  I purchased one online at ebay.  But unfortunately the problems appears to be neither a lack of ink nor a print head issue.  I suspect there is some sort of error in the firmware.

HP Recommended

me too.

I got the printhead reconnected but I don't where the springs go.

HP Recommended

The Springs attach to the printhead transport behind the print head.  There are two small holes with tabs.  The small hook goes on that end.  The other end of the springs attach to the small tabs sticking up on the back side of the printhead.  The two pictures that follow should give you an idea of what to look for.  I used a crochet hook to pull the spring into place.

Spring pic (1)

Spring Pic (2)

HP Recommended

The print head sensor is on the rear of the printhead.  There is a black piece protruding from the rear of the circuit board with a horizontal slot in it.  You have to make sure that you get the sensor strip (a 1/4 inch wide plastic tape/strip the runs from one side of the printer to the other) in the slot.  This is how the printer determines the placement of the print head.  If you fail to thread the tape through the slot, the print head will slam into the right side and give you an error message.

HP Recommended

I just managed to do this and successfully fixed my no black print issue.


Just to add to the instructions provided by Jrss to make things a little clearer.


  1. Open top lid and wait until printhead moves into position to change cartridges
  2. Unplug printer
  3. Remove all cartridges and place aside
  4. Unhook the arm that holds the lid in place on the right side (this will take some force, but shouldn't break if you are careful)
  5. Remove all the visible screws around the outside.
  6. Remove the black HP photosmart 5510 sticker on the front right and remove the screw underneath.
  7. Behind the touchscreen there are two black plastic clips holding the panel in place..these are located on the left and right edge. Reach in behind the screen and push these two clips inwards and towards you to pop the panel out.
  8. Gently pull the ribbon back from the back of the panel...(the square white plastic clip doesn't remove, just the ribbon cable from inside clip) and place panel aside
  9. Remove the two remaining silver screws located where the panel used to be - You should now be able to remove the top cover - place it aside.
  10. Remove the two silver springs from the rear of the print head
  11. Note the clear plastic strip running through the back of the printhead. This will have to be inserted back in the same way.
  12. Lift printhead forward gently and carefully pull the 3 ribbon cables out from the back of the printhead. These cables are the same type as connected to the touch panel.
  13. You should now be able to remove the printhead from the printer to clean it!

I simply used hot water and let the bottom inch or so of the head sit and soak for 10 min then rinsed the entire bottom half with warm water until it was running clear. I left it to dry for an hour or two before re-assembing. 


Once re-assembled, the printer status sheet printed black (a little sketchy) for the first time since failing and a single print head clean resulted in perfect print results.


I had just purchased $140 worth of ink so there was no way I was going to give up on this without a fight...Hope this helps someone!


Jay


HP Recommended

I would just add as prep, the lid to the scanner should be taped down so it doesn't fly back if you raise it to a verticle position. Other than that, thanks for the detailed steps. It made all the difference. I disassembled mine, cleaned the cart carrier and printheads last night, reassembled it this morning and it works again.


I thought I was going to Staples to buy a new printer today. This saved me about a $100 and a trip.


Boy, HP doesn't want you openning this printer. I say that because of 4 things:

1. Hidden screw under printer badge (label).

2. The difficulty of popping the control panel off. Luckily you described what to do. If it hadn't been for your instruction, I probably would have broken it.

3. The difficulty in unhinging the top scanner assembly. I tried hard not to break it, but a small plastic nib broke off the shaft that the hinge was hooked on. Oh well, it wasn't critical. Hinge still works.

4. Hiding 2 more screws under the control panel.


This printer could have been designed better.


Why didn't they just make the printer head like a supply item where it could easily be popped out and replaced. They could have charged $30 for a new printer head and I bet people would pay that rather than buy a new printer. As it is, I thought about switching from HP to Brother had this not worked. HP risked losing a customer just because they think a consumer would just replace the printer with another HP.


HP makes a lot of printers. To me, it creates confusion. I think they need to reduce the number of SKUs considerable and just focus on making a small number of models that last. The days of print are dying. (No pun intended.)

HP Recommended

I followed all of these instructions twice and put everything back together and I still have nothing, not even a speck of black trying to come through, I am so frustated, the printer was working fine all week until I changed the ink cartridges, the printer is barely two years old and I have always used genuine HP cartridges.  HP has suggested that I spend an additional 122.00 to buy another printer so that I don't have to waste the 100.00 that I just spent on ink cartridges. Why would I waste anymore money with HP and their printers when I see thousands of posts pertaining to the lousy performance of their printers? Is there anything else that you can possibly suggest to get the black ink working?

HP Recommended

I feel you on this one... totally frustrated.  I even changed the print head and still no black ink... argggg

Archived This topic has been archived. Information and links in this thread may no longer be available or relevant. If you have a question create a new topic by clicking here and select the appropriate board.
† The opinions expressed above are the personal opinions of the authors, not of HP. By using this site, you accept the <a href="https://www8.hp.com/us/en/terms-of-use.html" class="udrlinesmall">Terms of Use</a> and <a href="/t5/custom/page/page-id/hp.rulespage" class="udrlinesmall"> Rules of Participation</a>.