• ×
    Information
    Windows update impacting certain printer icons and names. Microsoft is working on a solution.
    Click here to learn more
    Information
    Need Windows 11 help?
    Check documents on compatibility, FAQs, upgrade information and available fixes.
    Windows 11 Support Center.
  • post a message
  • ×
    Information
    Windows update impacting certain printer icons and names. Microsoft is working on a solution.
    Click here to learn more
    Information
    Need Windows 11 help?
    Check documents on compatibility, FAQs, upgrade information and available fixes.
    Windows 11 Support Center.
  • post a message
Guidelines
The HP Community is where owners of HP products, like you, volunteer to help each other find solutions.
Archived This topic has been archived. Information and links in this thread may no longer be available or relevant. If you have a question create a new topic by clicking here and select the appropriate board.
HP Recommended
network printer L7780
Microsoft Windows 7 (64-bit)

I am trying to install the network printer driver for my L7780 pro. After I download the software I get the assistant and click on the "network printer driver" option. After that I get an error message that the required USB settings and software are not installed although I do not want to install the printer as a USB printer. Any ideas?

1 REPLY 1
HP Recommended

Hi@Diana60 


First of all uninstall drivers from the PC. 


watch this video that shows uninstalling HP printer. 


https://www.youtube.com/watch?v=nxfG86qYnGw&feature=youtu.be 


Remove the printer from the devices list
To complete the uninstall, remove the printer and any Windows print drivers from the Windows Devices and Printers list.
  1. Make sure the printer is turned on and in a ready state.
  2. If your printer connects to the computer with a USB cable, disconnect the cable from the printer.
  3. Search Windows for devices, then click Devices and Printers in the list of results.
  4. Right-click the icon for your printer , click Remove Device, then follow the on-screen instructions to complete the printer removal.
    If multiple icons exist for your printer, remove them all

Follow these steps. 


Setting Up the Printer for a Wireless Network in Windows for the HP Officejet Pro L7710, L7750, and L7780 All-in-One Printers
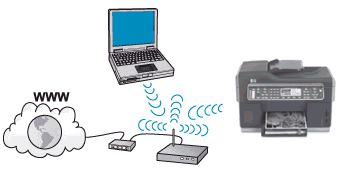
This document contains instructions to install the product in an existing wireless network that uses an access point, such as a router. This type of network is called an infrastructure network. HP recommends the infrastructure type of network for wireless connection to your product.
 NOTE:
You can also use these instructions if you previously installed the software for a USB connection and now want to change to a wireless network connection.
Figure : Wireless network that uses an access point
Wireless network setup
IMPORTANT: Before you can install the product, your wireless network must already be set up. (To set up your network, follow the instructions that came with your particular access point.)
 NOTE:
If you set up device filtering on your access point, and need to find the IP or MAC address of your HP product, see Additional Information at the end of this document.
IMPORTANT: Before you can install the product, you must have the following information about the network:
  • Network name: The network name is the SSID (Service Set Identifier).
  • Password: WEP key or WPA passphrase
 NOTE:
To gather this information, you can ask the person who originally set up your network, see the documentation that came with the access point, or contact the manufacturer. HP cannot set up or change the network SSID, WEP key, or WPA passphrase.
The HP Print and Scan Doctor is a free tool to diagnose and resolve printing problems and to gather network information. To look up your network name and password, download and run the HP Print and Scan Doctor on a computer that has an active wireless connection to the network.
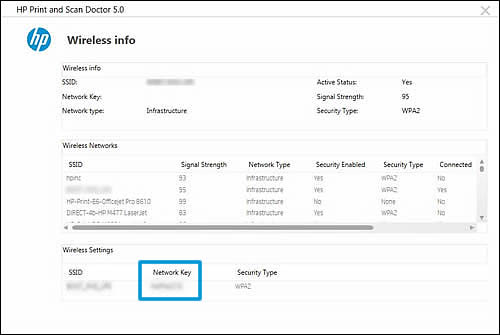
When you click the link, the HP Print and Scan Doctor downloads using your Internet browser download capabilities. After the tool opens, follow these steps to view your network settings.
  1. Click Start on the Welcome screen.
  2. Select your printer, and then click Next.
  3. On the Menu bar, click Network, and then click Show Advanced Info.
  4. Click Show Wireless Info.
  5. In the Wireless Settings section, the SSID column lists the wireless network name, and the Network Key column lists the corresponding wireless network password.
    Figure : Example of the Wireless Info screen with Network Key listed
    Example of the Wireless Info screen with Network Key listed
Step one: Prepare for installation
  1. Make sure that you have the following requirements before you begin:
    • Network name: The network name is the SSID (Service Set Identifier).
    • WEP key or WPA security passphrase
    • A computer that is connected to the wireless network.
    • Internet access. HP recommends broadband Internet access such as cable or DSL.
    • Your wireless-capable HP product. Place it close to the computer during the installation procedure.
    • Administrator privileges or password (Vista)
  2. Make sure the product, access point, and computer are all on, and that the computer is connecting to the wireless network.
  3. Exit all applications running on your computer.
  4. Disconnect any USB or Ethernet cable that is connected to the product.
  5. If you previously installed the software for a USB connection and now want to change to a wireless network connection, follow these instructions to remove the USB installation before continuing.
    1. Go to the Printers folder:
      • Windows XP: Click Start, and then click Printers and Faxes.
      • Windows Vista: Click the Windows icon (), click Control Panel, and then click Printers.
      • Windows 7: Click the Windows icon (), and then click Devices and Printers.
    2. Right-click the icon for HP product, and click Delete to remove it.
Follow these steps to connect the product to your wireless WLAN 802.11 network.
  1. Press the Setup button () on the product control panel.
  2. Press the Down Arrow button () to highlight Network, and then press OK.
  3. Press the Down Arrow button () to highlight Wireless Setup Wizard, and then press OK. The Wireless Setup Wizard searches for networks, and then displays them in a list.
  4. Press the Down Arrow button () to highlight the network name (SSID) that you gathered in the previous step, and then press OK.
    If the network name does not appear in the list, follow these steps:
    1. Press the Down Arrow button () to highlight Enter New Network Name (SSID), and then press OK. The on-screen keyboard displays on the control panel.
    2. Enter the SSID: Use the four-way arrow buttons on the product control panel to highlight a letter or number on the on-screen keyboard, and then press OK to select it.
       NOTE:
      Make sure that you enter the uppercase (capital) and lowercase (small) letters exactly. Otherwise, the wireless connection fails.
    3. When you finish entering the SSID, use the arrow buttons to highlight Done on the on-screen keyboard, and then press OK.
    4. Press the Down Arrow button () to highlight Infrastructure, and then press OK.
    5. Press the Down Arrow button () to highlight WEP encryption or WPA encryption, and then press OK.
       NOTE:
      If you are not using WEP encryption, press the Down Arrow button () to highlight No, my network does not use encryption, and then press OK.
  5. If prompted, enter the WPA or WEP key:
    1. Use the arrow buttons on the product control panel to highlight a letter or number on the on-screen keyboard, and then press OK to select it.
       NOTE:
      Make sure that you enter the uppercase (capital) and lowercase (small) letters exactly. Otherwise, the wireless connection fails.
    2. When you finish entering the key, use the arrow buttons to highlight Done on the on-screen keyboard, and then press OK.
  6. Make sure the product successfully connects to the network before continuing to the next step.
     NOTE:
    If a connection error message displays, make sure that the network name and security key are correct, and then follow the prompts to enter the information again. 
     
    Now download the drivers and install the printer . 


    To simply say thanks, please click the "Thumbs Up" button to give me a Kudos to appreciate my    efforts to help.


    If this helps, please mark this as “Accepted Solution” as it will help several others with the same issue to get it resolved without hassles. 


    Take care now and have a splendid week ahead. 


Archived This topic has been archived. Information and links in this thread may no longer be available or relevant. If you have a question create a new topic by clicking here and select the appropriate board.
† The opinions expressed above are the personal opinions of the authors, not of HP. By using this site, you accept the <a href="https://www8.hp.com/us/en/terms-of-use.html" class="udrlinesmall">Terms of Use</a> and <a href="/t5/custom/page/page-id/hp.rulespage" class="udrlinesmall"> Rules of Participation</a>.