• ×
    Information
    Windows update impacting certain printer icons and names. Microsoft is working on a solution.
    Click here to learn more
    Information
    Need Windows 11 help?
    Check documents on compatibility, FAQs, upgrade information and available fixes.
    Windows 11 Support Center.
  • post a message
  • ×
    Information
    Windows update impacting certain printer icons and names. Microsoft is working on a solution.
    Click here to learn more
    Information
    Need Windows 11 help?
    Check documents on compatibility, FAQs, upgrade information and available fixes.
    Windows 11 Support Center.
  • post a message
Guidelines
We have new content about Hotkey issue, Click here to check it out!
HP Recommended
z620
Linux

Dear Forum,


  I wanted to share some little mod project I was kind of forced to do, in hoping this could be useful to someone... here is my story:


  I ordered a 2nd hand z620 for a little virtualization project. After I ordered a 2nd hand riser card for the 2nd CPU. Unfortunately, the riser card came without CPU heatsink. Given its specificity, I had to either find and order the specific riser card CPU, OoooR consider other options. Coincidentally I had seen a low-cost single-block 3rd party liquid cooling solution that according to reviews was outperforming most of the 2-block ones AND had the water pump outside (as opposed to having it in the very same heatsink, making it very slim... It could fit for almost the same price!

  Of course I wouldn't unbalance the system by having one CPU air and the second CPU water chilled, I had to take 2!


  The first problem was "where" and "how" to install (2) single block chillers. I would have been easier with a custom-made water chill solution, but the prize would have skyrocketed.


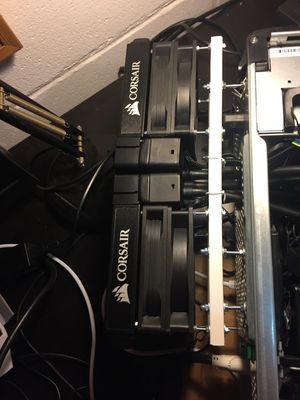
   Only at the back the pipes would reach. But there I would have to leave some space to put the cables. At the same time, some antivibration should be considered. I had some plastic wall-cable holder that could to the trick. Then I bought some screw bars (4mm to the case, 3mm to the fans)...


   IMG_3384.JPG


  I used the same holes existing in the case to put the screws and fix the bars.

IMG_3385.JPG


The distance from the case allows me to plug all usb/network/etc cables at the back.


  I unmounted the rear fans and with a "dremel-like" tool, I cut a frame big enough for the heatsink heads at the top...


  IMG_3025.JPG


  I thought I could have saved the original plastic covers, but, as you can see, due to the stiffness of the pipes I had to chop with the dremel some otherwise now useless plastic parts...

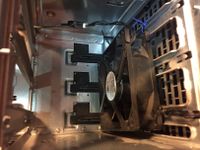
  You can also notice I had to take out one of the rear fans (the upper one) for the external cabling and piping to enter the case.


  After some unrelated problems with QPI (see https://h30434.www3.hp.com/t5/Business-PCs-Workstations-and-Point-of-Sale-Systems/Since-upgrading-Z6...)

   I started to have FUNwith FANS...


   The system is pretty picky if it misses a FAN (i.e. you have to press a key to boot everytime), so the objective was to use every fan connector in a way or another. This is the motherboard schema:

z620_systemboard001.jpg


  Each Chiller came with (2) cables, (1) for their fan with a 4 pin standard, and (1) 3 pin for the pump. It is ok if the pumps work always at 100% as they are not that noisy... for the 4 pin:

4pin_schema.jpg

  on the z620 motherboard the pinout for CPU1 (19) and CPU2 (20) is different...

cpu_fan_pinout.png


  The "Tach1" is for the "sense" as it reads the fan RPMs and the "PWM" is for "Speed Control", so you have to connect the 1-4 pins in order, and you should be ok.


  I planned to plug the pumps with an adapter to the +12v and use CPU1(19) and CPU2(20) for the chiller fans. There is a "problem" however... The z620 expects "more" RPMs from the fans. The original HP fans are smaller and speedier (3600rpms as I checked with a fan control panel), so connecting the slower fans there led to fans at high speeds at all times!


  I wanted the system to speed up when hot using PWM, so this solution wouldn't work! However, the rear fans AND the original CPU1 fan are both 3600rpms!, so then I connected both to CPU1(19) and CPU2(20) using insertion board cables you can buy in an electronics shop:

For CPU1:

IMG_3381.JPG


IMG_3382.JPG


For CPU2:


IMG_3380.JPG


IMG_3379.JPG


  The 2 speedy fans (3600rpms) were now connected to CPU1 and CPU2 connectors, but I still needed to plug the chiller fans!

  The chiller fans are those 4pin connectors above, but I had a connector (24) that controlled the 2x rear fans!, unfortunately the connector is 6 pin, and I need 2x 4pins! so some cable hacking is needed.


P24 is a 6pin connector with the following layout

1 - GND

2 - +12V

3 - Tach1

4 - PWM1

5 - Tach2

6 - PWM2


So, for the 4pin 1st chiller fan we connect:

1 - (1-P24) GND

2 - (2-P24) +12V

3 - (3-P24) Tach1

4 - (4-P24) PWM1


For the 2nd chiller 4pin :

1 - (1-P24) GND

2 - (2-P24) +12V

3 - (5-P24) Tach2

4 - (6-P24) PWM2


IMG_3038.JPG


  This ended the wiring and everything looked like this:


IMG_3383.JPG


18 REPLIES 18
HP Recommended

The final "look and feel" will certainly not win a beauty contest:


IMG_3395.JPG


  But would hopefuly work as expected...


  Setting the fans at the minimum in the BIOS and once closed, the box is pretty silent... I was able to hear the SATA spinning disk inside!


  I wanted PWM to work (i.e., the fans to speed up when CPUs were under stress), and this is the result...


  at idle:

IMG_3391.JPG


  Some Nice stable 29/30°C.


  And then under stress...

IMG_3394.JPG


  Both processors hit 50°C as top temperature even after some minutes!! The system picked up the need for extra cooling and after about 90seconds, all fans started to speed up and then the fan noise was noticeable! Still rock solid! I tested for several minutes and the temperature for E5-2680v2 never went higher than 52!!! 🙂


  So, the system is a bit of a frankenstein, but is is extremely silent in idle, bearable when at top use and CPUs are quite below their max operating temperature!!!


  In hoping this could be of help to somebody...


Cheers,

Javato..

HP Recommended

Congrats on the watercooling, given the space constraints of the Z620 running dual CPU's I think this is a good implementation. 


From a functional perspective, the fact that you are running two seperate loops, one for each CPU also has its advantages, since if it not uncommon that the second element in a single loop gets noticably hotter than the first one.


I am probably not the only one who enjoys looking at these kind of implementations so if anyone has done soemthing similar feel free to post so that others can get some ideas on how to further improve their systems.

HP Recommended

Thanks for your comments MtothaJ!


  You are right, for several years I have been having dual CPUs, and using a single loop circuit has clear disadvantages for the second CPU in upstream. Same goes for CPU-GPU pairings. Even if your cooling capacity is higher (which normally is in custom made cooling systems). I have a dual opteron system too and there I went for the same path.


   Aesthetically single loop systems look also better, but they tend to cost more (time and money-wise)... Here keeping cost low was an objective. And I am *very* impressed by the performance of these new chiller models! way better than the old equivalents and amazing at this prize! Pitty I cannot play a bit with overclocking here!! 😉


   I was not really planning to undertake the project, but one thing broght me to the next and I just wanted to post it, in case it could save some time to others (the PWM thing was a particular tricky matter...).


Regards from Italy,

J.

HP Recommended

Dear Javato, 

You are a technical master - I definetly want to follow your footsteps 😄

What model of single-block cooler did you use?
Looks like an H45, but I want to be super-sure 😄

Thanks in advance,
I'll get back to building a statue for you now...

HP Recommended
Thanks! It took a while to set it up, but in the end it was worth it! With pwm enabled, the workstation is more silent than ever! I barely hear it when it is on, and Cpus iddle at 29 degrees Celsius...

Yes, a pair of H45 indeed. Best bang for buck at the time and probably still today!

Good luck with your mod. Hope you had all the info needed!

Cheers,
J.
HP Recommended

Javato,  

As I'm getting more serious about this, I have a few extra questions related to the fan wirings.
I want to make sure I understood where PUMP 1 and PUMP 2 go...

Are you running them like this:
CPU1:
Pin 1,2,4 - PUMP1
Pin 1,2,3,4,5 - HP Speedy Fan to give Tach readings properly (the rear fan)
--- I estimate you use Tach1 and Tach2 linked to the single Tach from the HP speedy fan

CPU2:
Pin 1,2,4 - PUMP2
Pin 1,2,3,4,5 - Speedy Fan to give Tach readings properly (the old CPU fan, placed in the HDD rack)
--- I estimate you use Tach1 and Tach2 linked to the single Tach from the HP speedy fan

REAR FAN drives both CHILLERS (you explained it clearly in your original post).

From what I can understand, you run CHILLERS on BIOS preset speed (1/6 or 2/6 lines) and you run pump speed on CPU's PWM...

This way you regulate external noise - by setting the chillers speed on boot, and you regulate temp by controlling the pump speed.


Thanks for your pacience, I really don't want to mess this up 😄

HP Recommended
Hi levelsandmaps,

Nope, sorry for the confusion, the chillers go to p24 with a wiring as explained at the end of the post. CpU1 and CPU2 pins are used to power the back fans. One of those 2x fans (the one up, needs to be repositioned to allow the water pipes in) and I put it at the 3.5 drive bays. Not that I needed it, but to avoid boot time error messages

The pumps do not have speed control, they run at full all the time. So, in brief:
- chiller fans -> p24 (decoupled as explained above in my post)
- rear fans 1 and 2 (to cpu1 and cpu2 connectors, rear fan 1 you have to relocate somewhere for the pipes)
- water pups (all time on with an adaptor or something, they do not and should not be speed regulated)

I think this is how it is, sorry I ain't got my workstation close these days... I think the only trade-off is not seeing if the pump goes belly up, but for this you shall always monitor temps, plus pumps rarely fail (low rpms)

Hoping this helps,
J.
HP Recommended

Thanks for clarifying Javato!

But then here's another question - how do you get PWM on P24?

As far as I know, there's no way I can make P24 have runtime PWM. All it does is respond to BIOS setting...

HP Recommended

very nice, but there are a few things you might want to consider for the future


1. i would run a plastic hose split open, along the edges of the metal where you cut out for the hoses or at least tape the edges


2. the rear fan connectors, instead of hard wiring i would recomend using 2 of the pwm connections so future fan replacements can be easely disconnected/reconnected


4. reroute the PWM/Tach lines from the fans connector, to the desired motherboard  fan header, this will allow you to use any fan header or pwr supply molex for the power, also the bios only checks the tach line for a working fan at bootup and if this line is active no bios warning  will appear


† The opinions expressed above are the personal opinions of the authors, not of HP. By using this site, you accept the <a href="https://www8.hp.com/us/en/terms-of-use.html" class="udrlinesmall">Terms of Use</a> and <a href="/t5/custom/page/page-id/hp.rulespage" class="udrlinesmall"> Rules of Participation</a>.