-
×InformationWindows update impacting certain printer icons and names. Microsoft is working on a solution.
Click here to learn moreInformationNeed Windows 11 help?Check documents on compatibility, FAQs, upgrade information and available fixes.
Windows 11 Support Center. -
-
×InformationWindows update impacting certain printer icons and names. Microsoft is working on a solution.
Click here to learn moreInformationNeed Windows 11 help?Check documents on compatibility, FAQs, upgrade information and available fixes.
Windows 11 Support Center. -
- HP Community
- Desktops
- Desktop Boot and Lockup
- Re: get error cpu fan not detected F1 boot ..but fan running...

Create an account on the HP Community to personalize your profile and ask a question
Your account also allows you to connect with HP support faster, access a personal dashboard to manage all of your devices in one place, view warranty information, case status and more.

It has been a while since anyone has replied. Simply ask a new question if you would like to start the discussion again.
05-20-2018
06:46 AM
- last edited on
05-20-2018
10:48 AM
by
![]() Cheron-Z
Cheron-Z
 HP Recommended
Can somebody please help. I have a HP Pavilion[edit} The error message is F1:Boot. Rear chassis fan not detected. The PC will not turn on. Pressing F1 on the keyboard does nothing. (PC only 15 months old)
Solved! Go to Solution.
1 ACCEPTED SOLUTION
Accepted Solutions
05-21-2018 02:03 PM
HP Recommended
Thank you for joining HP Forums.
This is a great place to get support, find answers to your technical queries.
I understand that you are getting the CPU Fan error on the PC, need not worry I'll be glad to assist you.
Please follow the below steps that could resolve the issue.
HP and Compaq Desktop PCs - Error: CPU Fan Failed
This document pertains to HP and Compaq desktop computers.
One of the following errors, or similar errors, appear when the computer is turned on:
CPU Fan Failed. Press F2 to continue to boot. Otherwise, the system will power down in five seconds. Have system serviced immediately.
or
"ERROR: CPU Fan Has Failed! PC will automatically power down in a few seconds. Service the PC immediately to prevent damage to the PC."
Use one of the following sections, depending on when the error occurs:
Error occurs first time the computer is started or happens unexpectedly
Error occurs immediately after installing a BIOS update
Error occurs first time computer is started or happens unexpectedly
Use the following steps to resolve the error:
CAUTION:
This product contains components that can be damaged by electrostatic discharge (ESD). To reduce the chance of ESD damage, work over a noncarpeted floor, use a static dissipative work surface (such as a conductive foam pad), and wear an ESD wrist strap connected to a grounded surface.
NOTE:
HP provides basic support for software that comes with the computer. For in-depth feature assistance, refer to the help section in the software or on the software vendor's Web site.
-
Remove the side panel from the computer and inspect the system fan configuration as follows:
-
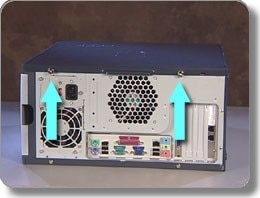
Unplug all cables from the computer (note the location of each cable for easier reassembly).
-
Remove the side panel retaining screws. There are usually one or two screws on the back of the left side.
-
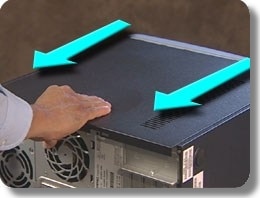
Slide the panel off to expose the inside of the PC.
-
-
Look at the processor to determine if it has a fan or not.
If the computer does not have a CPU fan, skip to step 6.
-
Check the following:
-
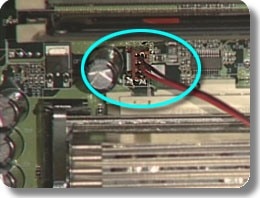
Make sure the fan power cable is connected firmly to the motherboard.
-
Check for any objects that might stop the fan.
-
With the power off and the power cable disconnected, gently spin the fan with your fingers to make sure the fan is not stuck. If the fan blades do not move or resist movement, replace the fan.
-
-
Leave the side panel open, connect the power cable, and turn on the computer.
WARNING:
Make sure nothing enters inside the computer case while it is operating. Do not perform this step while children or pets are nearby.
-
Look inside to make sure the fan is spinning and is not making noise.
-
If the fan is not working or is making a loud noise, the fan should be replaced. System fan replacement instructions may exist for your computer model. To find instructions, search for "[computer model number] replace fan."
-
If the fan spins and is not making noise, turn the computer off by pressing the power button on the front of the computer for 5 seconds.
-
-
Replace the side panel, and reconnect keyboard, mouse and monitor cables.
-
Turn on the computer.
-
If your computer was built in 2006 or later (Windows 7 or Vista), immediately press the F10 key. You might need to press the key repeatedly, about once every second, until a BIOS Setup utility screen opens.
-
If your computer was built before 2006 (Windows XP or earlier), immediately press the F1 key.
-
-
Use the left and right arrow keys to select Advanced menu.
-
Use the up and down arrow keys to select Hardware Monitor, and press Enter.
If the error is not resolved, the fan should be replaced. System fan replacement instructions may exist for your computer model. To find instructions, type the following into the Question or keywords field at the top of this page and then press Enter:
[computer model number] replace fan
-
Select CPU Fan Check and press Enter.
-
Use the following list to determine the CPU Fan Check value for your computer configuration:
-
Active heat sink; cooling fins directly on processor with a fan sitting on top of the fins.
hardware monitor/CPU fan check = ENABLED
-
Passive heat sink; cooling fins on processor without a fan directly on top.
hardware monitor/CPU fan check = DISABLED
-
Fan duct leading to a fan sitting on or directly over the processor cooling fins.
hardware monitor/system fan check = ENABLED
-
Fan duct without any fan
hardware monitor/system fan check = DISABLED
-
-
If the value is different than what is currently set, change the value as follows:
-
Select CPU Fan Check and press Enter.
-
Select the correct value (ENABLED or DISABLED) and press Enter.
-
-
Save the settings and exit. The computer restarts.
If the error is not resolved, the fan should be replaced. System fan replacement instructions may exist for your computer model. To find instructions, type the following into the Question or keywords field at the top of this page and then press Enter:
[computer model number] replace fan
Error occurs immediately after installing a BIOS update
If the fan failure error appears immediately after downloading and installing a BIOS update, use the following steps to download and install an updated BIOS from HP:
CAUTION:
Do not attempt these steps if the processor fan is not working properly (not spinning or is unusually noisy). Doing so could cause heat related damage to the central processing unit.
-
Turn on the computer.
-
If your computer was built in 2006 or later (Windows 7 or Vista), immediately press the F10 key. You might need to press the key repeatedly, about once every second, until a BIOS Setup utility screen opens.
-
If your computer was built before 2006 (Windows XP or earlier), immediately press the F1 key.
-
-
Use the left and right arrow keys to select Advanced menu.
-
Use the up and down arrow keys to select Hardware Monitor, and press Enter.
NOTE:
If the BIOS menu does not have a Hardware Monitor or CPU Fan Check option, download and install the BIOS update from HP again. For more information, refer to the HP support document Updating the BIOS.
-
Select CPU Fan Check and press Enter.
-
Select Disabled and then press Enter
-
Press the Down Arrow key to select System fan check and then press Enter.
-
Select Disabled and then press Enter
-
Save the settings and exit. The computer restarts.
-
Once the Windows desktop opens, download and install the BIOS update from HP again. For more information, refer to the HP support document Updating the BIOS.
If thee issue persists, I would personally suggest you contact our HP phone support for one on one interaction.
If your product is out of warranty, then remember to choose the paid options to get the tech support number.
They might have multiple options to help you on this.
Please use the following link to create yourself a case number, then call and it may help speed up the call process:
Step 1. Open link: www.hp.com/contacthp
Step 2. Sign in / sign in as a guest
Step 3. Enter the product number or select to auto detect
Step 4. Scroll down to "Still need help? Complete the form to select your contact options"
Step 5. Scroll down and click: HP contact options - click on Get phone number and phone number appear.
Keep me posted on further assistance. Hope that helps!
If the information I've provided was helpful, give us some reinforcement by clicking the Accepted Solution and Kudos buttons, that'll help us and others see that we've got the answers!
Have a great day ahead!
Cheers:)
Raj1788
I am an HP Employee
3 REPLIES 3
05-21-2018 02:03 PM
HP Recommended
Thank you for joining HP Forums.
This is a great place to get support, find answers to your technical queries.
I understand that you are getting the CPU Fan error on the PC, need not worry I'll be glad to assist you.
Please follow the below steps that could resolve the issue.
HP and Compaq Desktop PCs - Error: CPU Fan Failed
This document pertains to HP and Compaq desktop computers.
One of the following errors, or similar errors, appear when the computer is turned on:
CPU Fan Failed. Press F2 to continue to boot. Otherwise, the system will power down in five seconds. Have system serviced immediately.
or
"ERROR: CPU Fan Has Failed! PC will automatically power down in a few seconds. Service the PC immediately to prevent damage to the PC."
Use one of the following sections, depending on when the error occurs:
Error occurs first time the computer is started or happens unexpectedly
Error occurs immediately after installing a BIOS update
Error occurs first time computer is started or happens unexpectedly
Use the following steps to resolve the error:
CAUTION:
This product contains components that can be damaged by electrostatic discharge (ESD). To reduce the chance of ESD damage, work over a noncarpeted floor, use a static dissipative work surface (such as a conductive foam pad), and wear an ESD wrist strap connected to a grounded surface.
NOTE:
HP provides basic support for software that comes with the computer. For in-depth feature assistance, refer to the help section in the software or on the software vendor's Web site.
-
Remove the side panel from the computer and inspect the system fan configuration as follows:
-
Unplug all cables from the computer (note the location of each cable for easier reassembly).
-
Remove the side panel retaining screws. There are usually one or two screws on the back of the left side.
-
Slide the panel off to expose the inside of the PC.
-
-
Look at the processor to determine if it has a fan or not.
If the computer does not have a CPU fan, skip to step 6.
-
Check the following:
-
Make sure the fan power cable is connected firmly to the motherboard.
-
Check for any objects that might stop the fan.
-
With the power off and the power cable disconnected, gently spin the fan with your fingers to make sure the fan is not stuck. If the fan blades do not move or resist movement, replace the fan.
-
-
Leave the side panel open, connect the power cable, and turn on the computer.
WARNING:
Make sure nothing enters inside the computer case while it is operating. Do not perform this step while children or pets are nearby.
-
Look inside to make sure the fan is spinning and is not making noise.
-
If the fan is not working or is making a loud noise, the fan should be replaced. System fan replacement instructions may exist for your computer model. To find instructions, search for "[computer model number] replace fan."
-
If the fan spins and is not making noise, turn the computer off by pressing the power button on the front of the computer for 5 seconds.
-
-
Replace the side panel, and reconnect keyboard, mouse and monitor cables.
-
Turn on the computer.
-
If your computer was built in 2006 or later (Windows 7 or Vista), immediately press the F10 key. You might need to press the key repeatedly, about once every second, until a BIOS Setup utility screen opens.
-
If your computer was built before 2006 (Windows XP or earlier), immediately press the F1 key.
-
-
Use the left and right arrow keys to select Advanced menu.
-
Use the up and down arrow keys to select Hardware Monitor, and press Enter.
If the error is not resolved, the fan should be replaced. System fan replacement instructions may exist for your computer model. To find instructions, type the following into the Question or keywords field at the top of this page and then press Enter:
[computer model number] replace fan
-
Select CPU Fan Check and press Enter.
-
Use the following list to determine the CPU Fan Check value for your computer configuration:
-
Active heat sink; cooling fins directly on processor with a fan sitting on top of the fins.
hardware monitor/CPU fan check = ENABLED
-
Passive heat sink; cooling fins on processor without a fan directly on top.
hardware monitor/CPU fan check = DISABLED
-
Fan duct leading to a fan sitting on or directly over the processor cooling fins.
hardware monitor/system fan check = ENABLED
-
Fan duct without any fan
hardware monitor/system fan check = DISABLED
-
-
If the value is different than what is currently set, change the value as follows:
-
Select CPU Fan Check and press Enter.
-
Select the correct value (ENABLED or DISABLED) and press Enter.
-
-
Save the settings and exit. The computer restarts.
If the error is not resolved, the fan should be replaced. System fan replacement instructions may exist for your computer model. To find instructions, type the following into the Question or keywords field at the top of this page and then press Enter:
[computer model number] replace fan
Error occurs immediately after installing a BIOS update
If the fan failure error appears immediately after downloading and installing a BIOS update, use the following steps to download and install an updated BIOS from HP:
CAUTION:
Do not attempt these steps if the processor fan is not working properly (not spinning or is unusually noisy). Doing so could cause heat related damage to the central processing unit.
-
Turn on the computer.
-
If your computer was built in 2006 or later (Windows 7 or Vista), immediately press the F10 key. You might need to press the key repeatedly, about once every second, until a BIOS Setup utility screen opens.
-
If your computer was built before 2006 (Windows XP or earlier), immediately press the F1 key.
-
-
Use the left and right arrow keys to select Advanced menu.
-
Use the up and down arrow keys to select Hardware Monitor, and press Enter.
NOTE:
If the BIOS menu does not have a Hardware Monitor or CPU Fan Check option, download and install the BIOS update from HP again. For more information, refer to the HP support document Updating the BIOS.
-
Select CPU Fan Check and press Enter.
-
Select Disabled and then press Enter
-
Press the Down Arrow key to select System fan check and then press Enter.
-
Select Disabled and then press Enter
-
Save the settings and exit. The computer restarts.
-
Once the Windows desktop opens, download and install the BIOS update from HP again. For more information, refer to the HP support document Updating the BIOS.
If thee issue persists, I would personally suggest you contact our HP phone support for one on one interaction.
If your product is out of warranty, then remember to choose the paid options to get the tech support number.
They might have multiple options to help you on this.
Please use the following link to create yourself a case number, then call and it may help speed up the call process:
Step 1. Open link: www.hp.com/contacthp
Step 2. Sign in / sign in as a guest
Step 3. Enter the product number or select to auto detect
Step 4. Scroll down to "Still need help? Complete the form to select your contact options"
Step 5. Scroll down and click: HP contact options - click on Get phone number and phone number appear.
Keep me posted on further assistance. Hope that helps!
If the information I've provided was helpful, give us some reinforcement by clicking the Accepted Solution and Kudos buttons, that'll help us and others see that we've got the answers!
Have a great day ahead!
Cheers:)
Raj1788
I am an HP Employee
05-22-2018 01:37 PM
HP Recommended
I am really happy for you that the issue is resolved. As @Raj1788 is out for the day, I am responding on his behalf. Please reach out for an issue regarding your HP product and we will gladly assist you.
Take care and have a blessed week ahead. 🙂
DavidSMP
I am an HP Employee
Be alert for scammers posting fake support phone numbers and/or email addresses on the community.
If you think you have received a fake HP Support message, please report it to us by clicking on "Flag Post".
† The opinions expressed above are the personal opinions of the authors, not of HP. By using this site, you accept the Terms of Use and Rules of Participation.


Didn't find what you were looking for? Ask the community
† The opinions expressed above are the personal opinions of the authors, not of HP. By using this site, you accept the <a href="https://www8.hp.com/us/en/terms-of-use.html" class="udrlinesmall">Terms of Use</a> and <a href="/t5/custom/page/page-id/hp.rulespage" class="udrlinesmall"> Rules of Participation</a>.