• ×
    Information
    Windows update impacting certain printer icons and names. Microsoft is working on a solution.
    Click here to learn more
    Information
    Need Windows 11 help?
    Check documents on compatibility, FAQs, upgrade information and available fixes.
    Windows 11 Support Center.
  • post a message
  • ×
    Information
    Windows update impacting certain printer icons and names. Microsoft is working on a solution.
    Click here to learn more
    Information
    Need Windows 11 help?
    Check documents on compatibility, FAQs, upgrade information and available fixes.
    Windows 11 Support Center.
  • post a message
Guidelines
The HP Community is where owners of HP products, like you, volunteer to help each other find solutions.
HP Recommended
OMEN 15-dc1088nr
Microsoft Windows 10 (64-bit)

Battery health in Hp support Assistant shows OK, btw full capacity charge is set at 87%, battery report shows Full charge capacity gradually decreasing from 66,916 mWh to 61269 mWh.

All I was doing recently was turning Battery mode(on battery and on ac) to 'Battery Saver' and excessively using the laptop (while charging too), but haven't been gaming recently. IDK if this problem will persist.c2020-09-01 090345.png

2 REPLIES 2
HP Recommended

Hi @helloworld4,


I'd like to help!


Try the below suggestions-


Let's try reinstalling the Microsoft ACPI-Compliant Control Method Battery 


1) In the search box, type, and open “Device Manager”. 

2) Expand “Batteries”. 

3) Right-click the "Microsoft ACPI-Compliant Control Method Battery" that is listed there. 

4) Click on “Uninstall”. 

5) At the prompt put a check in the box to remove the current driver 

6) Shutdown the computer. 

7) Remove the battery for a minute and then put it back in. 

😎 When the computer comes back up it should automatically find the driver. 

9) Go to Device Manager. 

10) Expand Batteries. 

11) Right-click the "Microsoft ACPI-Compliant Control Method Battery" that is listed there. 

12) Click "Search automatically for updated driver software". Do the same thing with Microsoft ACPI-Compliant Embedded Controller. 


Calibrate the battery manually


manually calibrating the battery requires four steps: fully charge the battery, discharge or drain the battery, recharge the battery, and then run the battery test. Calibrating the battery improves the accuracy of the battery gauge software so that it more accurately displays the current level of charge. The following instructions work with most battery types.


Step 1: Charge the battery

Use the power cord to charge the battery to a full charge.

  1. Plug in the power cord.

  2. Charge the battery to a full charge, 99% to 100%. To check the battery charge, mouse over the battery icon in the system tray on the Desktop.

  3. When the battery is fully charged, proceed to the next step.

Step 2: Discharge the battery

After the battery fully charges, use HP PC Hardware Diagnostics to discharge the battery.

  1. Unplug the power cord.

  2. Press and hold the Power button for at least five seconds to turn off the computer.

  3. Turn on the computer and immediately press the F2 key repeatedly, about once every second until the HP PC Hardware Diagnostics UEFI menu displays.

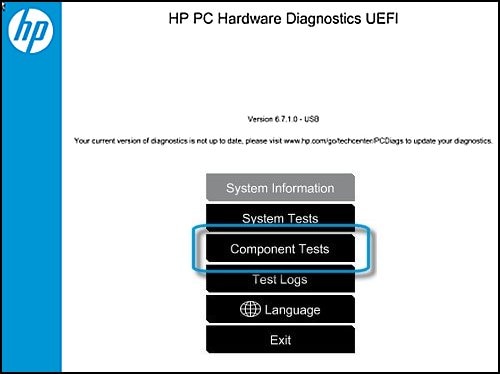
  4. Click Component Tests in the main menu.

    NOTE: 

    The purpose is to drain or discharge the battery, not get the results of the test. The battery discharges and the computer turns off before the test results display.

    Selecting Component Tests in HP PC Hardware Diagnostic UEFI

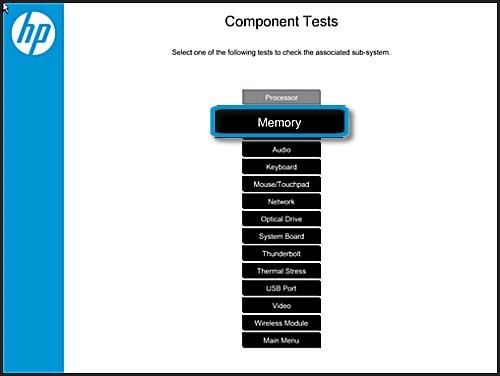
  5. In the list of Component Tests, click Memory.

    Selecting Memory in Component Tests

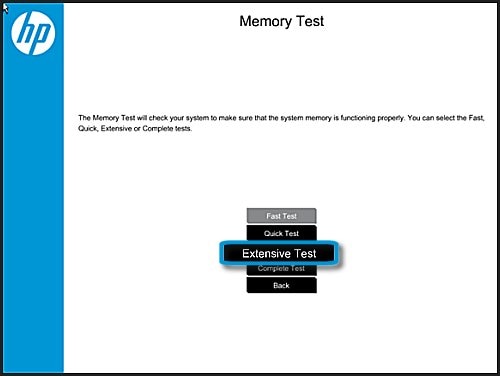
  6. Click Extensive Test.

    Selecting Extensive Test  in Memory Test

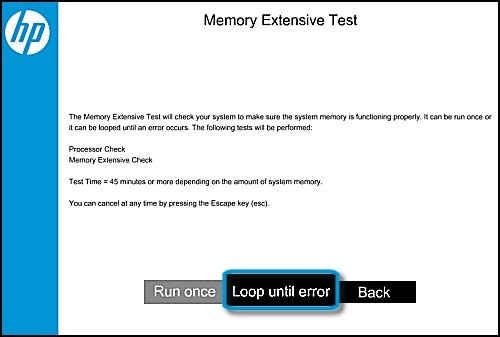
  7. Click Loop until error to start the test. Let the test continue until the battery is completely discharged and the computer shuts down.

    NOTE: 

    This test only discharges the battery and does not impact the memory.

Step 3: Recharge the battery

Recharge the battery fully before you calibrate the battery.

NOTE: 

If you run the HP Battery Check before the battery charges fully, you might get a false battery failure result.

  1. Plug in the power cord to charge the battery.

  2. Charge the battery to a full charge, 99% to 100%. To make sure the computer reaches a full charge, keep the computer attached to the power cord for at least 3 hours.

    NOTE: 

    The battery continues to charge with the computer on or off.

 Let's Run a battery test using F2 (during restart), if the test failed: Check with an alternate battery. 


Hope this helps! Keep me posted. 


And, Welcome to the HP Support Community. 


Please click “Accept as Solution” if you feel my post solved your issue, it will help others find the solution.

Click the “Kudos, Thumbs Up" on the bottom right to say “Thanks” for helping

HP Recommended

@Jay_G24 wrote:

Hi @tell pizza hut


I'd like to help!


Try the below suggestions-


Let's try reinstalling the Microsoft ACPI-Compliant Control Method Battery 


1) In the search box, type, and open “Device Manager”. 

2) Expand “Batteries”. 

3) Right-click the "Microsoft ACPI-Compliant Control Method Battery" that is listed there. 

4) Click on “Uninstall”. 

5) At the prompt put a check in the box to remove the current driver 

6) Shutdown the computer. 

7) Remove the battery for a minute and then put it back in. 

😎When the computer comes back up it should automatically find the driver. 

9) Go to Device Manager. 

10) Expand Batteries. 

11) Right-click the "Microsoft ACPI-Compliant Control Method Battery" that is listed there. 

12) Click "Search automatically for updated driver software". Do the same thing with Microsoft ACPI-Compliant Embedded Controller. 


Calibrate the battery manually


manually calibrating the battery requires four steps: fully charge the battery, discharge or drain the battery, recharge the battery, and then run the battery test. Calibrating the battery improves the accuracy of the battery gauge software so that it more accurately displays the current level of charge. The following instructions work with most battery types.


Step 1: Charge the battery

Use the power cord to charge the battery to a full charge.

  1. Plug in the power cord.

  2. Charge the battery to a full charge, 99% to 100%. To check the battery charge, mouse over the battery icon in the system tray on the Desktop.

  3. When the battery is fully charged, proceed to the next step.

Step 2: Discharge the battery

After the battery fully charges, use HP PC Hardware Diagnostics to discharge the battery.

  1. Unplug the power cord.

  2. Press and hold the Power button for at least five seconds to turn off the computer.

  3. Turn on the computer and immediately press the F2 key repeatedly, about once every second until the HP PC Hardware Diagnostics UEFI menu displays.

  4. Click Component Tests in the main menu.

    NOTE: 

    The purpose is to drain or discharge the battery, not get the results of the test. The battery discharges and the computer turns off before the test results display.

    Selecting Component Tests in HP PC Hardware Diagnostic UEFI

  5. In the list of Component Tests, click Memory.

    Selecting Memory in Component Tests

  6. Click Extensive Test.

    Selecting Extensive Test  in Memory Test

  7. Click Loop until error to start the test. Let the test continue until the battery is completely discharged and the computer shuts down.

    NOTE: 

    This test only discharges the battery and does not impact the memory.

Step 3: Recharge the battery

Recharge the battery fully before you calibrate the battery.

NOTE: 

If you run the HP Battery Check before the battery charges fully, you might get a false battery failure result.

  1. Plug in the power cord to charge the battery.

  2. Charge the battery to a full charge, 99% to 100%. To make sure the computer reaches a full charge, keep the computer attached to the power cord for at least 3 hours.

    NOTE: 

    The battery continues to charge with the computer on or off.

 Let's Run a battery test using F2 (during restart), if the test failed: Check with an alternate battery. 


Hope this helps! Keep me posted. 


And, Welcome to the HP Support Community. 


Please click “Accept as Solution” if you feel my post solved your issue, it will help others find the solution.

Click the “Kudos, Thumbs Up" on the bottom right to say “Thanks” for helping


Your article is so useful for us,thanks for sharing. Good stuff!

† The opinions expressed above are the personal opinions of the authors, not of HP. By using this site, you accept the <a href="https://www8.hp.com/us/en/terms-of-use.html" class="udrlinesmall">Terms of Use</a> and <a href="/t5/custom/page/page-id/hp.rulespage" class="udrlinesmall"> Rules of Participation</a>.