• ×
    Information
    Windows update impacting certain printer icons and names. Microsoft is working on a solution.
    Click here to learn more
    Information
    Need Windows 11 help?
    Check documents on compatibility, FAQs, upgrade information and available fixes.
    Windows 11 Support Center.
  • post a message
  • ×
    Information
    Windows update impacting certain printer icons and names. Microsoft is working on a solution.
    Click here to learn more
    Information
    Need Windows 11 help?
    Check documents on compatibility, FAQs, upgrade information and available fixes.
    Windows 11 Support Center.
  • post a message
Guidelines
The HP Community is where owners of HP products, like you, volunteer to help each other find solutions.
Common problems for INSTANT INK, HP+ PLANS: INK AND TONER
We would like to share some of the most frequently asked questions about Instant Ink. Check out this link: HP INSTANT INK, HP+ PLANS: INK AND TONER. .
HP Recommended
DeskJet 2655
FreeDOS

The color ink doesn’t work on this new printer, what do I do? I made sure not to touch the copper part as the video said

2 REPLIES 2
HP Recommended

I’ve spent around 2 and a half hours attempting to fix it or contact a agent to no avail. The black in is fine but apparently you need both cartridges to print a black letter in order to test if it even works. 

HP Recommended

@SocketYellow


Welcome to HP support community.


  1. Gather the following materials:

    • A clean, lint-free cloth or a clean, dry cotton swab

    • Distilled or bottled water

         CAUTION: 

      Do not use tap water because it might contain contaminants that can damage the printhead.

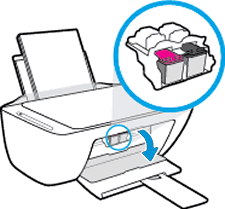
  2. Open the ink cartridge access door.

    The carriage moves to the center of the printer.

    Figure : Opening the ink cartridge access door

    Open the ink cartridge acesss door
  3. Wait until the printer is idle and silent before you continue.

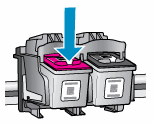
  4. Lightly press down on one of the ink cartridges to release it, and then pull the ink cartridge toward you out of its slot.

    Figure : Removing the ink cartridge

    Pressing down to remove the ink cartridge
       CAUTION: 

    Do not remove both ink cartridges at the same time. Remove and then clean each ink cartridge one at a time. Do not leave an ink cartridge outside the printer for more than 30 minutes.

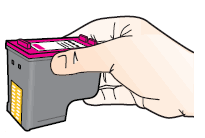
  5. Hold the ink cartridge by its sides.

    Figure : Holding the ink cartridge by its sides

    Holding the ink cartridge by its sides.
  6. Lightly dampen a clean, lint-free cloth or swab with bottled or distilled water.

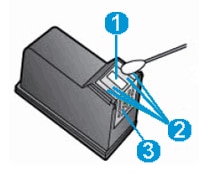
  7. Clean the face and edges around the ink nozzle with the cloth or swab.

       CAUTION: 

    Do not clean the ink nozzle plate.

    Figure : Cleaning the area around the ink nozzle

    1.  

      Cleaning the area around the ink nozzle

      Nozzle plate - Do not clean
    2. Area surrounding ink nozzle - Do clean

    3. Ink cartridge contacts - Do not clean

  8. Wait 10 minutes for the cleaned area to dry before you continue.

  9. Hold the ink cartridge by its sides with the contacts toward the printer, insert the ink cartridge into its slot, and then gently push the ink cartridge until it snaps into place.

    Figure : Snapping the ink cartridge into place

  10. Repeat these steps to clean around the nozzles on the other ink cartridge.

  11. Close the ink cartridge access door.

You can refer this HP document for more assistance:- Click here


Let me know how it goes.

To thank me for my efforts to help you, please mark my post as an accepted solution so that it benefits several others.

Cheers.

Sandytechy20
I am an HP Employee

† The opinions expressed above are the personal opinions of the authors, not of HP. By using this site, you accept the <a href="https://www8.hp.com/us/en/terms-of-use.html" class="udrlinesmall">Terms of Use</a> and <a href="/t5/custom/page/page-id/hp.rulespage" class="udrlinesmall"> Rules of Participation</a>.