-
×InformationWindows update impacting certain printer icons and names. Microsoft is working on a solution.
Click here to learn moreInformationNeed Windows 11 help?Check documents on compatibility, FAQs, upgrade information and available fixes.
Windows 11 Support Center. -
-
×InformationWindows update impacting certain printer icons and names. Microsoft is working on a solution.
Click here to learn moreInformationNeed Windows 11 help?Check documents on compatibility, FAQs, upgrade information and available fixes.
Windows 11 Support Center. -
- HP Community
- Apps, Services & Software
- HP Instant Ink
- Re: Poor quality printing from black ink

Create an account on the HP Community to personalize your profile and ask a question
Your account also allows you to connect with HP support faster, access a personal dashboard to manage all of your devices in one place, view warranty information, case status and more.
Common problems for INSTANT INK, HP+ PLANS: INK AND TONER
We would like to share some of the most frequently asked questions about Instant Ink. Check out this link: HP INSTANT INK, HP+ PLANS: INK AND TONER. .

It has been a while since anyone has replied. Simply ask a new question if you would like to start the discussion again.
08-14-2019 03:13 AM
 HP Recommended
Product: HP DeskJet 2630
Operating System: Chrome OS
The print quality from the black ink is very poor - I printed off some printer info pages & could hardly read them.
The colour seems ok
Solved! Go to Solution.
1 ACCEPTED SOLUTION
Accepted Solutions
08-16-2019 11:12 AM
HP Recommended
Welcome to HP support community.
Did yo u maker a copy and c heck if that prints fine?
If copy does not come out fine, follow the below steps to fix this issue:
Manually clean the area around the ink nozzles
-
Gather the following materials:
-
A clean, lint-free cloth or a clean, dry cotton swab
-
Distilled or bottled water
CAUTION:
Do not use tap water because it might contain contaminants that can damage the printhead.
-
-
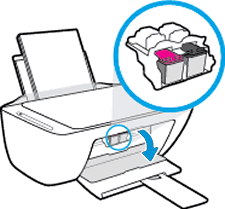
Open the ink cartridge access door.
The carriage moves to the center of the printer.
Figure : Opening the ink cartridge access door
-
Wait until the printer is idle and silent before you continue.
-
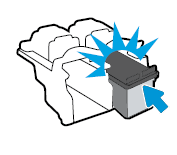
Lightly press down on one of the ink cartridges to release it, and then pull the ink cartridge toward you out of its slot.
Figure : Removing the ink cartridge
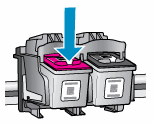
CAUTION:
Do not remove both ink cartridges at the same time. Remove and then clean each ink cartridge one at a time. Do not leave an ink cartridge outside the printer for more than 30 minutes.
-
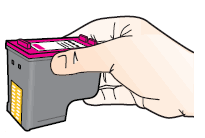
Hold the ink cartridge by its sides.
Figure : Holding the ink cartridge by its sides
-
Lightly dampen a clean, lint-free cloth or swab with bottled or distilled water.
-
Clean the face and edges around the ink nozzle with the cloth or swab.
CAUTION:
Do not clean the ink nozzle plate.
Figure : Cleaning the area around the ink nozzle
-
-
Nozzle plate - Do not clean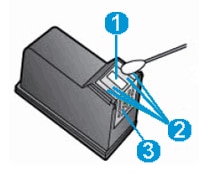
-
Area surrounding ink nozzle - Do clean
-
Ink cartridge contacts - Do not clean
-
-
Wait 10 minutes for the cleaned area to dry before you continue.
-
Hold the ink cartridge by its sides with the contacts toward the printer, insert the ink cartridge into its slot, and then gently push the ink cartridge until it snaps into place.
Figure : Snapping the ink cartridge into place
-
Repeat these steps to clean around the nozzles on the other ink cartridge.
-
Close the ink cartridge access door.
You can refer this HP document for more assistance:- Click here
Let me know how it goes.
To thank me for my efforts to help you, please mark my post as an accepted solution so that it benefits several others and please give the same post a Kudos.
Cheers.
Sandytechy20
I am an HP Employee
5 REPLIES 5
08-16-2019 11:12 AM
HP Recommended
Welcome to HP support community.
Did yo u maker a copy and c heck if that prints fine?
If copy does not come out fine, follow the below steps to fix this issue:
Manually clean the area around the ink nozzles
-
Gather the following materials:
-
A clean, lint-free cloth or a clean, dry cotton swab
-
Distilled or bottled water
CAUTION:
Do not use tap water because it might contain contaminants that can damage the printhead.
-
-
Open the ink cartridge access door.
The carriage moves to the center of the printer.
Figure : Opening the ink cartridge access door
-
Wait until the printer is idle and silent before you continue.
-
Lightly press down on one of the ink cartridges to release it, and then pull the ink cartridge toward you out of its slot.
Figure : Removing the ink cartridge
CAUTION:
Do not remove both ink cartridges at the same time. Remove and then clean each ink cartridge one at a time. Do not leave an ink cartridge outside the printer for more than 30 minutes.
-
Hold the ink cartridge by its sides.
Figure : Holding the ink cartridge by its sides
-
Lightly dampen a clean, lint-free cloth or swab with bottled or distilled water.
-
Clean the face and edges around the ink nozzle with the cloth or swab.
CAUTION:
Do not clean the ink nozzle plate.
Figure : Cleaning the area around the ink nozzle
-
-
Nozzle plate - Do not clean -
Area surrounding ink nozzle - Do clean
-
Ink cartridge contacts - Do not clean
-
-
Wait 10 minutes for the cleaned area to dry before you continue.
-
Hold the ink cartridge by its sides with the contacts toward the printer, insert the ink cartridge into its slot, and then gently push the ink cartridge until it snaps into place.
Figure : Snapping the ink cartridge into place
-
Repeat these steps to clean around the nozzles on the other ink cartridge.
-
Close the ink cartridge access door.
You can refer this HP document for more assistance:- Click here
Let me know how it goes.
To thank me for my efforts to help you, please mark my post as an accepted solution so that it benefits several others and please give the same post a Kudos.
Cheers.
Sandytechy20
I am an HP Employee
08-17-2019 12:19 PM
HP Recommended
Hi Sandytechy20
Thanks for the advice.
I have made a copy of a page with black print & that is very clear.
I tried printing again & that is better but some of it changed to blue.
Would you still advise cleaning the cartridge please?
08-30-2019 08:33 AM
HP Recommended
Hi Sandytechy20
I cleaned the cartridges as per your instructions & the black print is now very much improved , just slightly smudged in places.
I assume that it would also be advisable to use better quality print paper.
Thank you for your advice!
08-30-2019 11:55 AM
HP Recommended
Clean the cartridge again it should work fine.
To thank me for my efforts to help you, please mark my post as an accepted solution so that it benefits several others.
Cheers.
Sandytechy20
I am an HP Employee
Be alert for scammers posting fake support phone numbers and/or email addresses on the community.
If you think you have received a fake HP Support message, please report it to us by clicking on "Flag Post".
† The opinions expressed above are the personal opinions of the authors, not of HP. By using this site, you accept the Terms of Use and Rules of Participation.


Didn't find what you were looking for?
Ask the community
or
 Ask the Virtual Agent
† The opinions expressed above are the personal opinions of the authors, not of HP. By using this site, you accept the <a href="https://www8.hp.com/us/en/terms-of-use.html" class="udrlinesmall">Terms of Use</a> and <a href="/t5/custom/page/page-id/hp.rulespage" class="udrlinesmall"> Rules of Participation</a>.