• ×
    Information
    Windows update impacting certain printer icons and names. Microsoft is working on a solution.
    Click here to learn more
    Information
    Need Windows 11 help?
    Check documents on compatibility, FAQs, upgrade information and available fixes.
    Windows 11 Support Center.
  • post a message
  • ×
    Information
    Windows update impacting certain printer icons and names. Microsoft is working on a solution.
    Click here to learn more
    Information
    Need Windows 11 help?
    Check documents on compatibility, FAQs, upgrade information and available fixes.
    Windows 11 Support Center.
  • post a message
Guidelines
The HP Community is where owners of HP products, like you, volunteer to help each other find solutions.
Common problems for INSTANT INK, HP+ PLANS: INK AND TONER
We would like to share some of the most frequently asked questions about Instant Ink. Check out this link: HP INSTANT INK, HP+ PLANS: INK AND TONER. .
HP Recommended
HP Envy 4502
macOS 10.14 Mojave

I keep trying to sign up for the Instant Ink subscription through HP Smart and I keep getting a pop up saying

There is no application set to open the URL hpsmartmac://callback?action=enroll. What do I do?

1 REPLY 1
HP Recommended

Hi @ Mimiiemia3,


I'd like to help!


Follow the below instructions to enroll in instant ink


Step 1: Check HP Instant Ink requirements

Before you sign up your printer with HP Instant Ink, make sure you meet the following requirements.

  • A printer eligible for HP Instant Ink: Go to HP Instant Ink, then scroll down to and click the Check to see if your HP printer works with Instant Ink link to find a list of eligible HP printers.

  • A printer with an active Internet connection: The printer must be set up on a wired or wireless network and Web Services must be turned on. This connection is required so that HP Instant Ink can securely monitor your printer’s ink status. A daily connection between your printer and the Internet is not required, but HP recommends that you allow your printer to remain connected as often as possible. After your printer has been disconnected for a few days, you receive reminders to connect. If you fail to connect, eventually your HP Instant Ink cartridges stop printing.

    For more information about connecting your printer to your network, go to HP Customer Support. Type your printer model, and then search for the document on setting up your printer on a network

    NOTE: 

    A USB cable connection does not provide the required Internet access for HP Instant Ink.

  • An email address: A valid email address (Gmail, Hotmail, Yahoo, etc.) is required to sign up for the HP Instant Ink service.

  • A valid credit or debit card: A list of accepted credit and debit cards displays when you sign up for the HP Instant Ink service.

Step 2: Sign up and use the printer claim code to add your printer to HP Instant Ink

Create an HP Instant Ink account, and then add your printer using the printer code.

  1. Go to HP Instant Ink and click Sign Up Now to get started.

    Signing up on HP Instant Ink

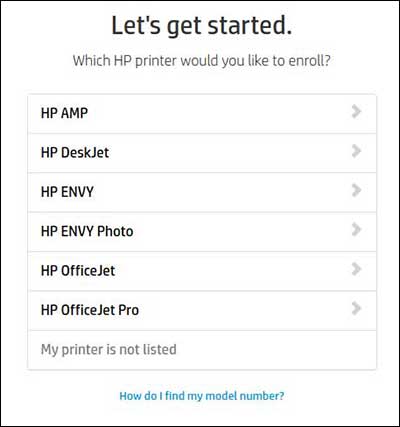
  2. Select your printer from the list.

    Selecting printer

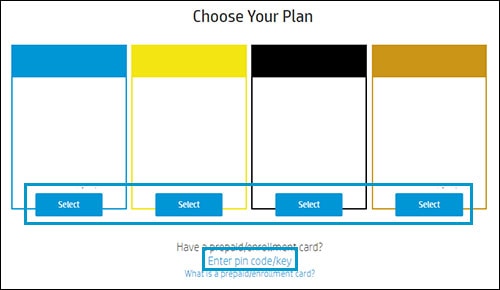
  3. Choose a plan or click Enter pin code/key to enter an enrollment/prepaid key.

    • If you purchased an enrollment card or a prepaid card from a participating retailer, click Enter pin code/key and then type the key found under the scratch-off portion of the enrollment or prepaid card.

      Make sure you type the code/pin exactly as it displays on the card, or the enrollment cannot complete.

    • If you have not purchased an enrollment card, select from the available plans.

    Selecting a plan

    Entering an enrollment/prepaid key after clicking Enter Key

  4. Fill in the information to create an HP Connected account, or if you already have one, click Sign In and then Enroll Another Printer on your account page. An HP Connected account is required for HP Instant Ink.

    Creating an HP Connected account

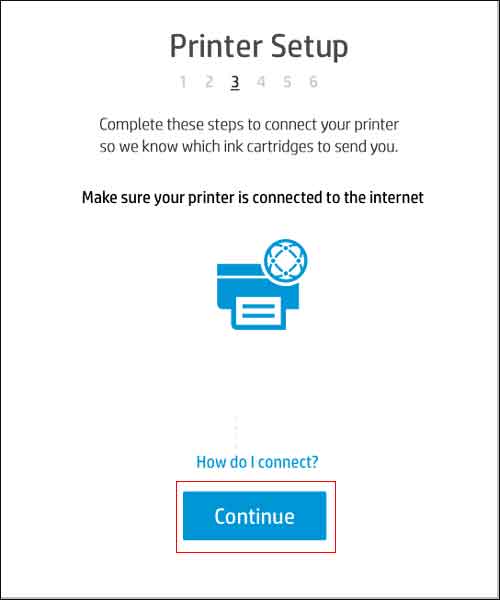
  5. Make sure your printer is connected to the Internet. For help, click How do I connect? When the printer is connected, click Continue.

    Connecting the printer to the Internet

  6. To use HP Instant Ink, Web Services must be turned on. Follow the onscreen instructions for your printer to enable Web Services. If prompted, install any printer firmware updates.

  7. After you turn on Web Services, wait for the printer to print an information page containing the printer claim code. After the page prints, click Continue. If the page does not contain a code, click My page doesn't contain a code.

  8. Locate the printer claim code on the information sheet.

    Example of the printer claim code from the information page.

    If the information page lists an email such as abc234vbn3434@hpeprint.com, then the printer claim code is the number and characters before @hpeprint.com. For example, abc234vbn3434 would be the printer claim code.

    Deskjet 3630 series: If the page does not contain an email address or printer claim code, follow the instructions on the page to enable Web Services. After you enable Web Services, another page prints with the email address and printer claim code.

  9. Type the printer claim code exactly as it is displays on the information page, and then click Apply. If you have trouble with this step, click the 'Having trouble locating or entering your claim code?' link.

    Typing the printer claim code

Step 3: Add your shipping and billing information

Add your shipping address, credit or debit card information, and then review your order to complete the enrollment.

  1. On the Shipping page, enter the address which you would like HP to ship your Instant Ink cartridges to, then click Save & Continue.

  2. On the Billing Information page, enter a prepaid key and your payment card information, and then click Continue (If you entered a prepaid card earlier, just enter your payment card here).

  3. On the Submit Order page, review your information. If you have a promotional or refer-a-friend code, type it into the Special Offers box and click Apply. Check the box to agree to the Terms of Service, and then click Enroll.

    HP Instant Ink sends a welcome email with information about your account. Continue to the next step.

    Submitting order

Step 4: Review HP Instant Ink account features

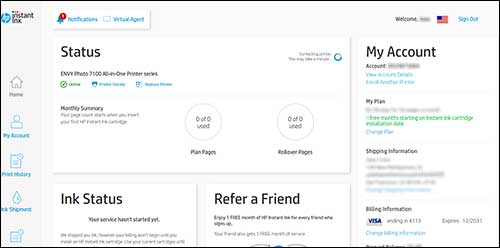
After you complete enrollment, click the View Account button to go to your HP Instant Ink account. Make sure to bookmark your HP Instant Ink account page. The page contains many tools and features:

  • View plan and rollover pages: View the total number of plan and rollover pages printed for the month. Click Print History for more information.

  • Change your password: Click My Account, then Account Settings, and then Update my email and password on HP Connected, and then follow the on-screen instructions.

  • Check ink shipments: Find the current status of all cartridges in the Ink Status section. Find previous and next shipments in the Ink Shipment section, and click tracking numbers to see where a shipment is.

  • Change your plan: Click My Account, then My Plan to make any changes or cancel enrollment.

  • Change your shipping, credit, or debit card information, or add a prepaid card: Click Change Shipping Information or Change Billing Information in the My Account section..

  • Get more help: See the Help Center for answers to frequently asked questions, helpful videos, and support forums. Click Virtual Agent at the top of your account page to contact support (Virtual Agent/Chat is not available in all countries).

Account page


Hope this helps! Keep me posted. 


And, Welcome to the HP Support Community. 


Please click “Accept as Solution” if you feel my post solved your issue, it will help others find the solution.

Click the “Kudos, Thumbs Up" on the bottom right to say “Thanks” for helping

† The opinions expressed above are the personal opinions of the authors, not of HP. By using this site, you accept the <a href="https://www8.hp.com/us/en/terms-of-use.html" class="udrlinesmall">Terms of Use</a> and <a href="/t5/custom/page/page-id/hp.rulespage" class="udrlinesmall"> Rules of Participation</a>.