• ×
    Information
    Windows update impacting certain printer icons and names. Microsoft is working on a solution.
    Click here to learn more
    Information
    Need Windows 11 help?
    Check documents on compatibility, FAQs, upgrade information and available fixes.
    Windows 11 Support Center.
  • post a message
  • ×
    Information
    Windows update impacting certain printer icons and names. Microsoft is working on a solution.
    Click here to learn more
    Information
    Need Windows 11 help?
    Check documents on compatibility, FAQs, upgrade information and available fixes.
    Windows 11 Support Center.
  • post a message
Guidelines
The HP Community is where owners of HP products, like you, volunteer to help each other find solutions.
HP Recommended
HP Photosmart 7520
Unknown

Hi. Just looking for any ideas of what I could do. Trying to print photos and it is taking the HP photo paper all together toward the back then placing it back in front and says out of paper. I replaced it with more new photo paper from the box and it still does the same thing. Tried with just one single sheet too. 

1 REPLY 1
HP Recommended

@V8GirlinDallas


Welcome to the HP Support Community.


What is the size of the Photo Paper? Were you able to print photos earlier? Does this happen only while printing photos or with all documents?


Follow these steps to clean the paper feed rollers.

  1. Gather the following materials:

    • A clean, lint-free cloth, or any cloth that does not come apart or leave fibers

    • Distilled, filtered, or bottled water (tap water might damage the printer)

  2. Disconnect the USB cable from the rear of the printer if your printer is connected with a USB cable.

  3. Press the Power button () to turn off the printer.

  4. Disconnect the power cord from the rear of the printer.

  5. Remove the two-sided printing accessory (duplexer) from the rear of the printer. Push the right side of the duplexer to the left, and then pull out the duplexer to remove it. Set the duplexer aside.

    Figure : Remove the duplexer

    1. Push the duplexer to the left

    2. Pull out the duplexer

  6. Lightly dampen a clean, lint-free cloth with bottled or distilled water, and then squeeze any excess liquid from the cloth.

  7. Press the cloth against the rollers, and then rotate the rollers upward with your fingers. Apply a moderate amount of pressure to remove any dust or dirt buildup.

    Figure : Clean the rollers in the rear of the printer

    Image: Clean the rollers in the rear of the printer.
  8. Allow the rollers to dry for 10 or 15 minutes.

  9. Check the rollers on the duplexer. Make sure that the rollers are not missing, that they turn easily, and that they are springy when you press them. If the rollers are damaged, replace the duplexer.

    Figure : Check the rollers on the duplexer

    Image: Check the rollers on the duplexer.
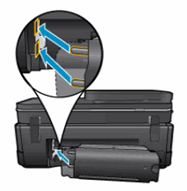
  10. Reattach the duplexer to the rear of the printer. Insert the two pegs on the left side of the duplexer into the left side of the printer, and then gently push the duplexer into place. Make sure that the duplexer is firmly attached.

    Figure : Reattach the duplexer

    Image: Reattach the duplexer
  11. Reconnect the power cord to the rear of the printer.

  12. If the printer does not turn on automatically, press the Power button () to turn it on.

Let's try to reset the Printer here:


Turn the printer on, if it is not already on.

  1. Wait until the printer is idle and silent before you continue.
  2. With the printer turned on, disconnect the power cord from the rear of the printer.
  3. Unplug the power cord from the wall outlet.
  4. Wait at least 60 seconds.
  5. Plug the power cord back into the wall outlet.
  6. NOTE: HP recommends connecting the printer power cord directly to the wall outlet.
  7. Reconnect the power cord to the rear of the printer.
  8. Turn on the printer, if it does not automatically turn on.
  9. Wait until the printer is idle and silent before you proceed.

Also, try connecting the Printer to a different wall outlet directly.


If the issue persists, please perform the remaining steps from this document: https://support.hp.com/us-en/product/hp-photosmart-7520-e-all-in-one-printer-series/5199461/model/51...


Let me know if this helps.


If the information I've provided was helpful, give us some reinforcement by clicking the Accepted Solution button, that'll help us and others see that we've got the answers!


Thanks!

Have a great day!


I am an HP Employee

† The opinions expressed above are the personal opinions of the authors, not of HP. By using this site, you accept the <a href="https://www8.hp.com/us/en/terms-of-use.html" class="udrlinesmall">Terms of Use</a> and <a href="/t5/custom/page/page-id/hp.rulespage" class="udrlinesmall"> Rules of Participation</a>.