-
×InformationWindows update impacting certain printer icons and names. Microsoft is working on a solution.
Click here to learn moreInformationNeed Windows 11 help?Check documents on compatibility, FAQs, upgrade information and available fixes.
Windows 11 Support Center. -
-
×InformationWindows update impacting certain printer icons and names. Microsoft is working on a solution.
Click here to learn moreInformationNeed Windows 11 help?Check documents on compatibility, FAQs, upgrade information and available fixes.
Windows 11 Support Center. -
- HP Community
- Printers
- Printing Errors or Lights & Stuck Print Jobs
- Re: DJ 3752 E3 error

Create an account on the HP Community to personalize your profile and ask a question
Your account also allows you to connect with HP support faster, access a personal dashboard to manage all of your devices in one place, view warranty information, case status and more.
Check some of the most frequent questions about Instant Ink: HP INSTANT INK, HP+ PLANS: INK AND TONER.
Check out our Black or Color Ink Not Printing, Other Print Quality Issues info about: Print quality and Cartridge Issues.

It has been a while since anyone has replied. Simply ask a new question if you would like to start the discussion again.
5 REPLIES 5
03-23-2020 04:36 PM
 HP Recommended
Welcome to the HP Support Community. I'd be happy to assist you with the "E3" error.
Try the steps below to resolve the error-
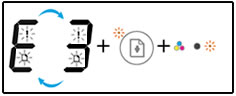
An E3 error indicates a printer carriage jam.
Figure : The Number of Copies icon alternates between 'E' and '3,' and the Error icon, Paper Error icon, Resume light, and Ink Alert light are blinking
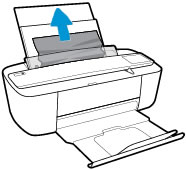
Step 1: Clear all paper from the input tray
Remove all loose and jammed paper from the input tray area.
CAUTION:Remove all paper or objects from the input tray before removing paper or objects from any other areas of the printer. Damage to the printer can occur if the input tray is not cleared first.
You need a flashlight to complete some of these steps.
Figure : Flashlight
-
Remove all paper from the input tray, including both loose and jammed paper.
-
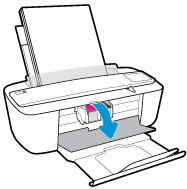
Check for any jammed paper or objects in the input tray area, and then remove any jammed paper or objects you find.
To avoid tearing any whole sheets of paper, pull the paper with both hands.
NOTE:
The input tray shield prevents foreign debris from falling into the paper path and causing paper jams. Do not remove the input tray shield.
-
Press the Cancel button
 .
.The printer tries to clear the jam automatically.
After removing all paper or objects from the input tray area, continue to the next step to remove any additional jammed paper from the output tray.
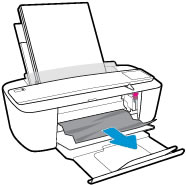
Step 2: Clear jammed paper from the output tray
Remove any loose or jammed paper that is accessible from the output tray.
Check for any jammed paper or objects in the output tray area, and then remove any jammed paper or objects you find.
To avoid tearing any whole sheets of paper, pull the paper with both hands.

After removing jammed paper or objects from the output tray, continue to the next step to remove jammed paper from the ink cartridge access area and make sure the carriage moves freely.
Step 3: Make sure the carriage can move freely
Remove any loose or jammed paper from the ink cartridge access area, and then make sure the carriage moves freely.
-
Open the ink cartridge access door.
-
Wait until the carriage is idle and silent before you continue.
-
With the printer turned on, disconnect the power cord and any other cables from the rear of the printer.
WARNING:
You must unplug the power cord to move the carriage by hand and reset the paper feed mechanism without the risk of electrical shock.
-
Check for any paper or objects in the ink cartridge access area, and then remove any paper or objects you find.
To avoid tearing any whole sheets of paper, pull the paper with both hands.
-
Firmly push the carriage to the right, and then remove any paper or objects blocking the carriage path.
-
Close the ink cartridge access door.

-
Reconnect the power cord and any other cables, and then turn on the printer.
Try to print. If the issue persists, continue to the next step.
Step 4: Make sure the ink cartridges are correctly installed
Improper placement or installation of the ink cartridges might cause the printer to indicate a carriage jam error. Remove and reinstall the ink cartridges, and then try to print again.
-
Open the ink cartridge access door.
The carriage moves to the center of the printer.
Figure : Opening the ink cartridge access door
-
Wait until the carriage is idle and silent before you continue.
-
Gently press down on one ink cartridge to release it, and then pull the ink cartridge out of its slot.
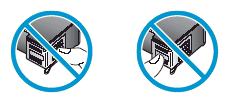
CAUTION:
Do not touch the copper-colored contacts or the ink nozzles. Touching these parts can result in clogs, ink failure, and bad electrical connections.
Figure : Removing the ink cartridge

Figure : Do not touch the contacts or nozzles
-
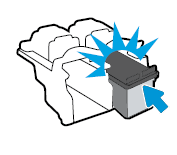
Hold the ink cartridge by its sides with the contacts toward the printer, reinsert the ink cartridge into its slot, and then gently push the ink cartridge until it snaps into place.
NOTE:
Install the color ink cartridge on the left and the black ink cartridge on the right.
Figure : Snapping the ink cartridge into place
-
Repeat these steps for the other ink cartridge.
-
Close the ink cartridge access door.
Figure : Closing the ink cartridge access door
Try to print. If the error persists, continue to the next step.
Step 5: Plug the printer directly into a wall outlet
Plug the printer directly into an electrical outlet to make sure the power source functions correctly.
-
Disconnect the power cord from the rear of the printer.
-
Unplug the power cord from any power strips or surge suppressors.
-
Plug the power cord directly into an electrical outlet.
-
Reconnect the power cord to the rear of the printer.
-
Turn on the printer.
Try to print. If the error persists, continue to the next step.
Step 6: Reset the printer
Sometimes, the printer can display an error message even after the issue has been resolved. Reset the printer to clear the error.
-
Turn on the printer, if it is not already on.
-
Wait until the printer is idle and silent before you continue.
-
With the printer turned on, disconnect the power cord from the rear of the printer.
-
Wait at least 10 seconds.
-
Reconnect the power cord to the rear of the printer.
-
Turn on the printer, if it does not automatically turn on.
The printer might go through a warm-up period. The printer lights might flash, and the carriage might move.
-
Wait until the warm-up period finishes and your printer is idle and silent before you continue.
Try to print.
Refer to the document -Blinking lights
Hope this helps! Keep me posted.
Please click “Accept as Solution” if you feel my post solved your issue, it will help others find the solution.
Click the “Kudos, Thumbs Up" on the bottom right to say “Thanks” for helping!
Have a great day!
03-24-2020 04:27 AM
HP Recommended
hi i have a different printer to you, however i have a e3 message aswell happened when i got a paper jammed.
e3 error still remains on my printer which i think is a hardware issue, having said that i can remove the error by taking one ink cartridge out. this allows me to print in either just black or just colour. get back at me if this helps you aswell
03-24-2020 08:03 AM
HP Recommended
Let's try a rest without the ink cartridges.
Reset the product
- With the printer turned on, remove both the ink cartridges
- disconnect the power cord from the rear of the printer
- Unplug the power cord from the wall outlet
- Wait at least 60 seconds.
- Plug the power cord back into the wall outlet.
- Reconnect the power cord to the printer.
- Turn the printer on. HP recommends plugging the printer directly into a wall outlet.
- insert the ink cartridges and then try and make a copy on the printer
Keep me posted!
Be alert for scammers posting fake support phone numbers and/or email addresses on the community.
If you think you have received a fake HP Support message, please report it to us by clicking on "Flag Post".
† The opinions expressed above are the personal opinions of the authors, not of HP. By using this site, you accept the Terms of Use and Rules of Participation.


Didn't find what you were looking for? Ask the community
† The opinions expressed above are the personal opinions of the authors, not of HP. By using this site, you accept the <a href="https://www8.hp.com/us/en/terms-of-use.html" class="udrlinesmall">Terms of Use</a> and <a href="/t5/custom/page/page-id/hp.rulespage" class="udrlinesmall"> Rules of Participation</a>.