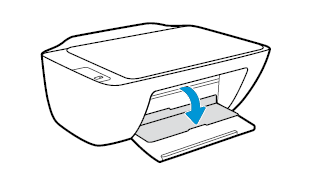
• ×
    Information
    Windows update impacting certain printer icons and names. Microsoft is working on a solution.
    Click here to learn more
    Information
    Need Windows 11 help?
    Check documents on compatibility, FAQs, upgrade information and available fixes.
    Windows 11 Support Center.
  • post a message
  • ×
    Information
    Windows update impacting certain printer icons and names. Microsoft is working on a solution.
    Click here to learn more
    Information
    Need Windows 11 help?
    Check documents on compatibility, FAQs, upgrade information and available fixes.
    Windows 11 Support Center.
  • post a message
Guidelines
Experiencing 'Printer Blocked' or 'Printer Error' message? Click here for more information.
Check some of the most frequent questions about Instant Ink: HP INSTANT INK, HP+ PLANS: INK AND TONER.


Check out our Black or Color Ink Not Printing, Other Print Quality Issues info about: Print quality and Cartridge Issues.
HP Recommended
Deskjet 2131
Microsoft Windows 10 (64-bit)

Hi,


Received Deskjet2131 today.

Ran the HP print and scan doctor as I was getting error while printing. 

Not a single page is copied or printed, but I am seeing the black ink alert light glowing.

When I ran print and scan doctor, It shows HP DJ 2130 series, Device Error Detected; Device Status appears red with "Cartridge or Printhead Problem".

Took help of virtual agent. Shockingly, on entering the serial number of the product, I received the message on virtual agent window as following - however the printer is bought on 17-07-2019

HP DeskJet 2130 All-in-One Printer series


Out of Warranty: Ended on May 07, 2016


Model number:

F5S42D

Because of that-Device is in error status and not even printing the test page.


Not able to understand what to do.


Thank you

-Manohar

3 REPLIES 3
HP Recommended

@Manohar5

Thank you for joining the HP Community


I suggest you do a Hard Reset on the printer


(1) Turn the printer on, if it is not already on. (Remove the cartridges)

(2) Wait until the printer is idle and silent before you continue.

(3) With the printer turned on, disconnect the power cord from the rear of the printer.

(4) Unplug the power cord from the wall outlet.

(5) Wait at least 60 seconds.

(6) Plug the power cord back into the wall outlet.

NOTE: HP recommends connecting the printer power cord directly to the wall outlet.

(7) Reconnect the power cord to the rear of the printer.

(8) Turn on the printer, if it does not automatically turn on.


The printer might go through a warm-up period. The printer lights might flash, and the carriage might move.

Wait until the warm-up period finishes and your printer is idle and silent before you install the cartridge.


  1. Turn on the printer.

  2. Lower the output tray.

  3. Reach inside the printer, grasp the handle, and lower the ink cartridge access door.

    The carriage moves to the center of the printer.

    Image: Open the ink cartridge acesss door

  4. Wait until the carriage stops moving before you continue.

  5. Lightly press down on the ink cartridge to release it, and then pull the ink cartridge out of its slot.

    Image: Remove the ink cartridge

  6. Remove the new ink cartridge from its package, and then remove the plastic tape.

       CAUTION: 

    Do not try to remove the copper electrical strip.


    Do not touch the copper-colored contacts or the ink nozzles. Do not replace the protective tape on the contacts. Handling these parts can result in clogs, ink failure, and bad electrical connections.

    Image: Remove the plastic tape

  7. Hold the ink cartridge by its sides with the nozzles toward the printer, and then insert the ink cartridge into its correct slot.

    • Insert the black ink cartridge  
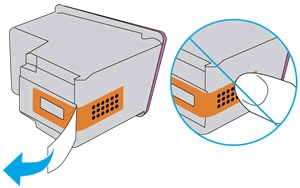
into the right slot.

    • Insert the tri-color ink cartridge  into the left slot.

  8. Slide the new ink cartridge at a slight upward angle into the empty slot, and then gently push the ink cartridge until it snaps into place.

    Image: Push the ink cartridge into its slot until it snaps into place

  9. Repeat these steps to install the other ink cartridge, if necessary.

  10. Close the ink cartridge access door.

    The printer automatically prints an alignment page.

  11. Lift the scanner lid.

  12. Place the alignment page with the print side down on the scanner glass, and then position it according to the engraved guides around the glass.

    Image: Place the alignment page on the scanner glass

  13. Close the scanner lid.

  14. Press the Start Copy Black button  or the Start Copy Color button  on the control panel of the printer.

    The printer aligns the ink cartridges.

Try to print.


Refer to this document: https://support.hp.com/us-en/product/hp-deskjet-2130-all-in-one-printer-series/7174550/model/7521801... for Blinking Lights.


Keep me posted, how it goes!

If the information I've provided was helpful, give us some reinforcement by clicking the Accepted Solution and Kudos buttons, that'll help us and others see that we've got the answers!

Have a great day!

Cheers:)

Raj1788
I am an HP Employee 

HP Recommended

I did troubleshoot with HP support. Printer working fine only when black cartridge is removed from it. Conclusion was simple-Black cartridge is faulty. Obviously it is HP's quality fault as this a new printer and not a single page is printed using black cartridge. Whats very disappointing is, adding to customer's misery (waste of time in trying to first fix my self and then troubleshooting with technician on phone), HP makes them to take the cartridge to the service center along with other documents. I could not understand, why should a customer waste his money and time to visit service center when cartridge shipped by HP is faulty. 

HP Recommended

Hi @Manohar5


I have brought your issue to the attention of an appropriate team within HP. They will likely request information from you in order to look up your case details or product serial number. Please look for a private message from an identified HP contact. Additionally, keep in mind not to publicly post personal information (serial numbers and case details).


Thank you for visiting the HP Support Community. 


Please click “Accept as Solution” if you feel my post solved your issue, it will help others find the solution.

Click the “Kudos, Thumbs Up" on the bottom right to say “Thanks” for helping!


Have a great day! 

Asmita
I am an HP Employee

† The opinions expressed above are the personal opinions of the authors, not of HP. By using this site, you accept the <a href="https://www8.hp.com/us/en/terms-of-use.html" class="udrlinesmall">Terms of Use</a> and <a href="/t5/custom/page/page-id/hp.rulespage" class="udrlinesmall"> Rules of Participation</a>.