-
×InformationWindows update impacting certain printer icons and names. Microsoft is working on a solution.
Click here to learn moreInformationNeed Windows 11 help?Check documents on compatibility, FAQs, upgrade information and available fixes.
Windows 11 Support Center. -
-
×InformationWindows update impacting certain printer icons and names. Microsoft is working on a solution.
Click here to learn moreInformationNeed Windows 11 help?Check documents on compatibility, FAQs, upgrade information and available fixes.
Windows 11 Support Center. -
- HP Community
- Printers
- Printing Errors or Lights & Stuck Print Jobs
- Re: Envy 4507 printing problems

Create an account on the HP Community to personalize your profile and ask a question
Your account also allows you to connect with HP support faster, access a personal dashboard to manage all of your devices in one place, view warranty information, case status and more.
Check some of the most frequent questions about Instant Ink: HP INSTANT INK, HP+ PLANS: INK AND TONER.
Check out our Black or Color Ink Not Printing, Other Print Quality Issues info about: Print quality and Cartridge Issues.

It has been a while since anyone has replied. Simply ask a new question if you would like to start the discussion again.
07-29-2020 02:24 AM
 HP Recommended
Product: Envy 4507
Operating System: Microsoft Windows 10 (64-bit)
I have just replaced my old Envy 4502 with a new Envy 4507 and have some printing problems which I cannot seem to sort out (I am very elderly but usually quite tech savvy!)
I set it up online plugged in via usb lead as I never use wifi. It seemed to set up and shows as my default printer ok. It printed a test page -ok. Then I put a document on the glass and it printed that -ok.
I then opened a web page in Edge and clicked on 3 dots and print and that printed ok as per my old printer. The problem is now this:
When I try to print a photo from 'my docs' nothing happens. I open it (in windows picture viewer) and click on the printer icon at top of page but it does not print and the little icon does not appear in my task bar like before. Is this something to do with how I have saved the file as it was ok on my last laptop and I transferred the files from that.
Finally - on my last Envy I was having problems with not being able to print on photo paper - it ALWAYS jammed before it packed up. The same thing is now happening this new printer.
Please help! Thank you
Moggie
Solved! Go to Solution.
1 ACCEPTED SOLUTION
Accepted Solutions
07-31-2020 01:50 PM
HP Recommended
@moggie1 Welcome to HP Community!
I understand that you are facing printing issue.
Please refer to the below link specification of your printer. In that, you can check the media support. Please use that media only.
Please perform the below steps and check.
Step 1: Look for jammed paper
Paper jams can occur in multiple areas of the printer. If you cannot find the paper jam in one area, continue to the next area until you locate the jam.
Clear jammed paper from the rear of the printer
Remove any jammed paper that is accessible from the rear of the printer.
-
With the printer turned on, disconnect the power cord from the rear of the printer.
WARNING:
You must disconnect the power cord before reaching inside the printer to avoid the risk of injuries or electric shock.
-
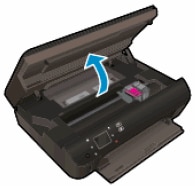
Open the cartridge access door.
-
Remove any jammed paper from the cartridge access area, located toward the front of the printer. To avoid tearing any whole sheets of paper, pull the paper with both hands.

-
Use a flashlight to thoroughly check for torn pieces of paper that might remain inside the printer. If any torn pieces of paper remain inside the printer, more jams might occur.
-
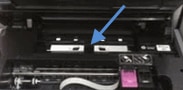
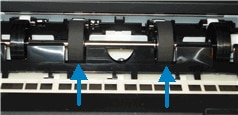
Locate the paper path cover in the area behind the cartridge access area.
-
To remove the paper path cover, pinch the tabs together, and then lift up.
-
Pinch the tabs together
-
Lift up
-
-
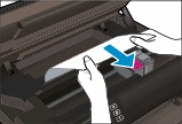
Gently remove any jammed paper and bits of torn paper from the rear roller. To avoid tearing any whole sheets of paper, pull the paper with both hands.
NOTE:
Use a flashlight to thoroughly check for torn pieces of paper that might remain inside the printer. If any torn pieces of paper remain inside the printer, more jams might occur.
-
Locate the duplexer path cover, directly underneath the paper path cover.
-
Insert your finger into the opening at the rear of the cover, and then lift up. Lift until you hear the duplexer path cover click into the upright position.
-
Gently remove any jammed paper and bits of torn paper. To avoid tearing any whole sheets of paper, pull the paper with both hands.
NOTE:
Use a flashlight to thoroughly check for torn pieces of paper that might remain inside the printer. If any torn pieces of paper remain inside the printer, more jams might occur.
-
Lift the duplexer path cover
-
Remove any jammed paper
-
-
Gently push the duplexer path cover down until you hear it click into place.
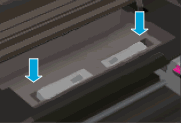
- Replace the paper path cover with the spring-loaded tabs facing toward the front of the printer. Gently press the cover down at the left and right edges. The cover clicks into place.
NOTE:
Make sure that both edges of the paper path cover are in place.
-
Close the cartridge access door.
Try to print. If the error persists, check for jammed paper in another area of the printer.
Clear jammed paper from the input tray
Step 2: Make sure the printer is placed on a flat surface
-
Gently turn the printer onto its right side.

-
Check the surface directly under and around where the printer sits for the following:
-
Pieces of paper trapped in the input tray
-
Small, hard objects, such as cables, pens, pencils, and books
-
Soft or uneven surfaces, such as placemats or carpet-like material
-
-
Remove any obstructions that might remain.
-
Turn the printer to its normal position.
-
Reconnect the power cord to the rear of the printer, and then turn on the printer.
-
Touch OK to clear any messages on the printer control panel.
Try to print. If the error persists, continue to the next step.
Step 3: Clean the paper rollers behind the ink cartridge access area
Dust, paper fiber, and other debris might accumulate on the paper feed rollers and cause paper jams and paper feed issues. Clean the rollers inside the printer, and then try to print again.
-
Press the Power button to turn off the printer, if it is not off already.
-
Disconnect the power cord from the rear of the printer.
WARNING:
You must disconnect the power cord before reaching inside the printer to avoid risk of injuries or electric shock.
-
Open the cartridge access door.
-
Locate the paper path cover in the area behind the cartridge access area.
-
To remove the paper path cover, pinch the tabs together, and then lift up.
-
Pinch the tabs together
-
Lift up
-
-
Lightly dampen the swab with the water, and then squeeze any excess liquid from the swab.
-
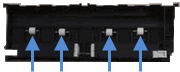
Press the swab against the rollers inside the printer, and then rotate the rollers upwards with your fingers. Apply a moderate amount of pressure to remove any dust or dirt buildup.
-
Allow the rollers to dry for 10 to 15 minutes.
-
Check the rollers on the underside of the paper path cover. Make sure that the rollers are not missing, that they turn easily, and that they are springy when you press them. If the rollers are damaged, replace the paper path cover with a new one.
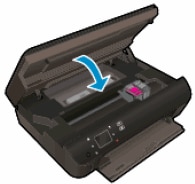
- Replace the paper path cover with the spring-loaded tabs facing toward the front of the printer. Gently press the cover down at the left and right edges. The cover clicks into place.
NOTE:
Make sure that both edges of the paper path cover are in place.
Figure : Replace the paper path cover
-
Close the cartridge access door.
-
Reconnect the power cord to the rear of the printer, and then turn on the printer.
-
Press OK to clear any messages on the printer control panel.
Keep us posted,
If you would like to thank us for our efforts to help you,
Give us a virtual high-five by clicking the 'Thumbs Up' icon below, followed by clicking on the "Accept as solution" on this post,
Have a great day!
3 REPLIES 3
07-31-2020 01:50 PM
HP Recommended
@moggie1 Welcome to HP Community!
I understand that you are facing printing issue.
Please refer to the below link specification of your printer. In that, you can check the media support. Please use that media only.
Please perform the below steps and check.
Step 1: Look for jammed paper
Paper jams can occur in multiple areas of the printer. If you cannot find the paper jam in one area, continue to the next area until you locate the jam.
Clear jammed paper from the rear of the printer
Remove any jammed paper that is accessible from the rear of the printer.
-
With the printer turned on, disconnect the power cord from the rear of the printer.
WARNING:
You must disconnect the power cord before reaching inside the printer to avoid the risk of injuries or electric shock.
-
Open the cartridge access door.
-
Remove any jammed paper from the cartridge access area, located toward the front of the printer. To avoid tearing any whole sheets of paper, pull the paper with both hands.
-
Use a flashlight to thoroughly check for torn pieces of paper that might remain inside the printer. If any torn pieces of paper remain inside the printer, more jams might occur.
-
Locate the paper path cover in the area behind the cartridge access area.
-
To remove the paper path cover, pinch the tabs together, and then lift up.
-
Pinch the tabs together
-
Lift up
-
-
Gently remove any jammed paper and bits of torn paper from the rear roller. To avoid tearing any whole sheets of paper, pull the paper with both hands.
NOTE:
Use a flashlight to thoroughly check for torn pieces of paper that might remain inside the printer. If any torn pieces of paper remain inside the printer, more jams might occur.
-
Locate the duplexer path cover, directly underneath the paper path cover.
-
Insert your finger into the opening at the rear of the cover, and then lift up. Lift until you hear the duplexer path cover click into the upright position.
-
Gently remove any jammed paper and bits of torn paper. To avoid tearing any whole sheets of paper, pull the paper with both hands.
NOTE:
Use a flashlight to thoroughly check for torn pieces of paper that might remain inside the printer. If any torn pieces of paper remain inside the printer, more jams might occur.
-
Lift the duplexer path cover
-
Remove any jammed paper
-
-
Gently push the duplexer path cover down until you hear it click into place.
- Replace the paper path cover with the spring-loaded tabs facing toward the front of the printer. Gently press the cover down at the left and right edges. The cover clicks into place.
NOTE:
Make sure that both edges of the paper path cover are in place.
-
Close the cartridge access door.
Try to print. If the error persists, check for jammed paper in another area of the printer.
Clear jammed paper from the input tray
Step 2: Make sure the printer is placed on a flat surface
-
Gently turn the printer onto its right side.
-
Check the surface directly under and around where the printer sits for the following:
-
Pieces of paper trapped in the input tray
-
Small, hard objects, such as cables, pens, pencils, and books
-
Soft or uneven surfaces, such as placemats or carpet-like material
-
-
Remove any obstructions that might remain.
-
Turn the printer to its normal position.
-
Reconnect the power cord to the rear of the printer, and then turn on the printer.
-
Touch OK to clear any messages on the printer control panel.
Try to print. If the error persists, continue to the next step.
Step 3: Clean the paper rollers behind the ink cartridge access area
Dust, paper fiber, and other debris might accumulate on the paper feed rollers and cause paper jams and paper feed issues. Clean the rollers inside the printer, and then try to print again.
-
Press the Power button to turn off the printer, if it is not off already.
-
Disconnect the power cord from the rear of the printer.
WARNING:
You must disconnect the power cord before reaching inside the printer to avoid risk of injuries or electric shock.
-
Open the cartridge access door.
-
Locate the paper path cover in the area behind the cartridge access area.
-
To remove the paper path cover, pinch the tabs together, and then lift up.
-
Pinch the tabs together
-
Lift up
-
-
Lightly dampen the swab with the water, and then squeeze any excess liquid from the swab.
-
Press the swab against the rollers inside the printer, and then rotate the rollers upwards with your fingers. Apply a moderate amount of pressure to remove any dust or dirt buildup.
-
Allow the rollers to dry for 10 to 15 minutes.
-
Check the rollers on the underside of the paper path cover. Make sure that the rollers are not missing, that they turn easily, and that they are springy when you press them. If the rollers are damaged, replace the paper path cover with a new one.
- Replace the paper path cover with the spring-loaded tabs facing toward the front of the printer. Gently press the cover down at the left and right edges. The cover clicks into place.
NOTE:
Make sure that both edges of the paper path cover are in place.
Figure : Replace the paper path cover
-
Close the cartridge access door.
-
Reconnect the power cord to the rear of the printer, and then turn on the printer.
-
Press OK to clear any messages on the printer control panel.
Keep us posted,
If you would like to thank us for our efforts to help you,
Give us a virtual high-five by clicking the 'Thumbs Up' icon below, followed by clicking on the "Accept as solution" on this post,
Have a great day!
Be alert for scammers posting fake support phone numbers and/or email addresses on the community.
If you think you have received a fake HP Support message, please report it to us by clicking on "Flag Post".
† The opinions expressed above are the personal opinions of the authors, not of HP. By using this site, you accept the Terms of Use and Rules of Participation.


Didn't find what you were looking for? Ask the community
† The opinions expressed above are the personal opinions of the authors, not of HP. By using this site, you accept the <a href="https://www8.hp.com/us/en/terms-of-use.html" class="udrlinesmall">Terms of Use</a> and <a href="/t5/custom/page/page-id/hp.rulespage" class="udrlinesmall"> Rules of Participation</a>.