• ×
    Information
    Windows update impacting certain printer icons and names. Microsoft is working on a solution.
    Click here to learn more
    Information
    Need Windows 11 help?
    Check documents on compatibility, FAQs, upgrade information and available fixes.
    Windows 11 Support Center.
  • post a message
  • ×
    Information
    Windows update impacting certain printer icons and names. Microsoft is working on a solution.
    Click here to learn more
    Information
    Need Windows 11 help?
    Check documents on compatibility, FAQs, upgrade information and available fixes.
    Windows 11 Support Center.
  • post a message
Guidelines
Experiencing 'Printer Blocked' or 'Printer Error' message? Click here for more information.
Check some of the most frequent questions about Instant Ink: HP INSTANT INK, HP+ PLANS: INK AND TONER.


Check out our Black or Color Ink Not Printing, Other Print Quality Issues info about: Print quality and Cartridge Issues.
HP Recommended
HP Ink Tank Printer 419
Microsoft Windows 10 (32-bit)

Every time I switch my printer on, it says incompatible tricolor cartridge. I have to remove the tricolor printhead and replace it again to make the printer work. Sometimes I have to remove and replace it 10 times and still it does not recognise the printhead cartridge. I am fed up of this uncertainty. What I want is to switch the printer on and be able to print without messing with the hardware every time. This is a great product ruined by this perpetual 'incompatible cartridge' error.

4 REPLIES 4
HP Recommended

@Kedardunakhe

Welcome to the HP Community


Let's follow the below steps that could resolve the issue.


Step 1: Remove, inspect, and then reseat the printheads


The printer might display an error if the printheads are not correctly installed. Perform the following steps for the printhead(s) indicated by the Printhead icons  on the printer control panel.

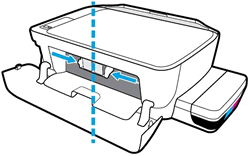
  1. Close the output tray extender, and then rotate the output tray left to stow it in the printer.

  2. Open the exterior door, and then open the printhead access door.

  3. If the carriage is not visible, press and hold the Black Color Copy button for 3 seconds.

    The carriage moves to the center of the printer.

    Access the print carriage

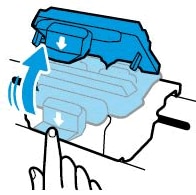
  4. Gently push down on the blue carriage latch.

    The blue carriage latch opens.

    Open the printhead carriage latch

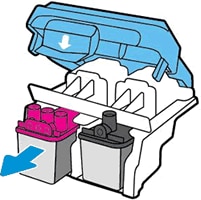
  5. Lightly press down on the printhead to release it, and then pull the printhead out of its slot.

    Removing the printheads

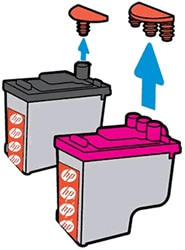
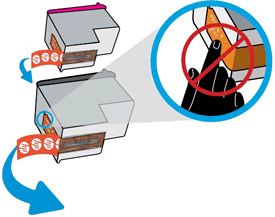
  6. Make sure the plugs on top of the printhead have been removed.

    Pull the orange plugs

  7. Make sure the tape from the printhead contacts has been removed.

       CAUTION: 

    Do not touch the copper-colored contacts or the ink nozzles. Do not replace the protective tape on the contacts. Handling these parts can result in clogs, ink failure, and bad electrical connections.

    Remove the tape

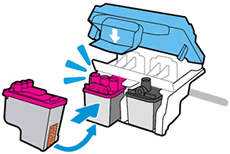
  8. Slide the printhead at a slight upward angle into the empty slot, and then gently push up on the printhead until it snaps into place.

    Insert the printheads

    • Insert the tri-color printhead into the left slot.

    • Insert the black printhead into the right slot.

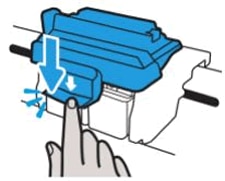
  9. Close the blue carriage latch by pushing down firmly until the latch snaps into place.

    Image: Close the latch

  10. Close the printhead access door.

  11. Close the exterior door.

    The priming process continues.

If the error persists, and the printer did not prime, continue to the next step.


Step 2: Reset the printer


Resetting the printer can sometimes resolve a printhead error.

  1. Turn the printer on, if it is not already on.

  2. Wait until the printer is idle and silent before you continue.

  3. With the printer turned on, disconnect the power cord from the rear of the printer.

  4. Unplug the power cord from the wall outlet.

  5. Wait at least 60 seconds.

  6. Plug the power cord back into the wall outlet.

    NOTE: 

    HP recommends connecting the printer power cord directly to the wall outlet.

  7. Reconnect the power cord to the rear of the printer.

  8. Turn on the printer, if it does not automatically turn on.

  9. Wait until the printer is idle and silent before you proceed.

Try to print.


Refer to this document: https://support.hp.com/in-en/product/hp-ink-tank-wireless-410-series/16180953/model/18160985/documen... for 'Incompatible' Error Message Displays.


Keep me posted, how it goes!

If the information I've provided was helpful, give us some reinforcement by clicking the Accepted Solution and Kudos buttons, that'll help us and others see that we've got the answers!

Have a great day!

Cheers:)

Raj1788
I am an HP Employee 

HP Recommended

Thanks for your response but incidentally the print head had gone faulty. I lodged a complaint with HP and they promptly resolved it within 24 hours. I would like to close this issue as resolved but don't know how.

HP Recommended

@Kedardunakhe


I'm glad to hear you found the solution you were looking for.


Take care now and do have a great week ahead.

:)Cheers:)

Raj1788
I am an HP Employee 

HP Recommended

I opened the blue printhead cover latch and now I can no longer close it. Can you help?


† The opinions expressed above are the personal opinions of the authors, not of HP. By using this site, you accept the <a href="https://www8.hp.com/us/en/terms-of-use.html" class="udrlinesmall">Terms of Use</a> and <a href="/t5/custom/page/page-id/hp.rulespage" class="udrlinesmall"> Rules of Participation</a>.