-
×InformationWindows update impacting certain printer icons and names. Microsoft is working on a solution.
Click here to learn moreInformationNeed Windows 11 help?Check documents on compatibility, FAQs, upgrade information and available fixes.
Windows 11 Support Center. -
-
×InformationWindows update impacting certain printer icons and names. Microsoft is working on a solution.
Click here to learn moreInformationNeed Windows 11 help?Check documents on compatibility, FAQs, upgrade information and available fixes.
Windows 11 Support Center. -
- HP Community
- Printers
- Printing Errors or Lights & Stuck Print Jobs
- Re: Ink cartridges

Create an account on the HP Community to personalize your profile and ask a question
Your account also allows you to connect with HP support faster, access a personal dashboard to manage all of your devices in one place, view warranty information, case status and more.
Check some of the most frequent questions about Instant Ink: HP INSTANT INK, HP+ PLANS: INK AND TONER.
Check out our Black or Color Ink Not Printing, Other Print Quality Issues info about: Print quality and Cartridge Issues.

It has been a while since anyone has replied. Simply ask a new question if you would like to start the discussion again.
03-12-2019 04:41 PM
 HP Recommended
Product: IJ 3630
Operating System: Microsoft Windows 10 (32-bit)
ALWAYS had problems with ink cartridges! Yesterday paid a lot for black and colour pack. Colour not recognised. Replaced pack today. Colour ok but black shows as empty! Sick of this. What can one do? Incidentally, NEVER been able to connect to wi-fi.
6 REPLIES 6
03-12-2019 06:26 PM
HP Recommended
Welcome to HP support community.
Make sure the ink cartridges are correctly installed.
-
If the printer is off, press the Power button to turn on the printer.
-
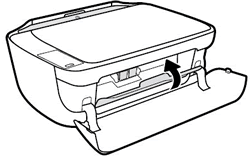
Open the exterior door.
Figure : Open the exterior door
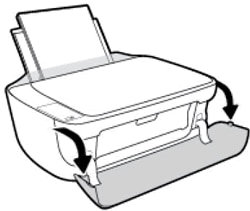
-
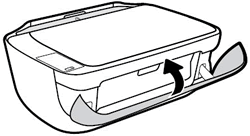
Open the ink cartridge access door.
The carriage moves to the center of the printer. Wait until the carriage is idle and silent before continuing.
Figure : Open the ink cartridge access door
-
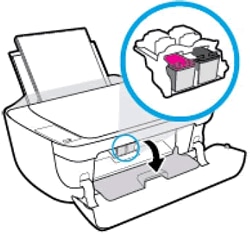
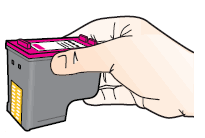
Press down on the ink cartridge to release it, and then pull the ink cartridge out to remove it from its slot.
Figure : Remove the ink cartridge

CAUTION:
Do not touch the copper-colored contacts or the ink nozzles. Touching these parts can result in clogs, ink failure, and bad electrical connections.
-
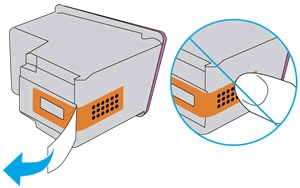
Remove any protective tape that still might be on the nozzles.
CAUTION:
Do not try to remove the copper electrical strip.
Figure : Remove the plastic tape
-
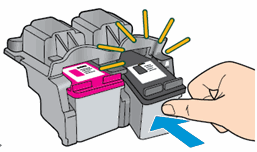
Hold the ink cartridge by its sides with the nozzles toward the printer, and then insert the ink cartridge into its slot. Make sure that the ink cartridge is inserted in the correct slot.
-
The tri-color ink cartridge (
 ) goes in the slot on the left.
 -
The black ink cartridge (
 ) goes in the slot on the right.
Figure : Reinsert the ink cartridge
-
-
Push the ink cartridge forward into its slot until it snaps into place.
-
Repeat these steps to replace the other ink cartridge, if necessary.
-
Close the ink cartridge access door.
Figure : Close the ink cartridge access door
-
Close the exterior door.
Figure : Close the exterior door
Clean the ink cartridge contacts
-
Gather the following materials:
-
Dry foam-rubber swabs, lint-free cloth, or any soft material that does not come apart or leave fibers (coffee filters work well)
-
Distilled, filtered, or bottled water (tap water might contain contaminants that can damage the ink cartridges)
CAUTION:
Do not use platen cleaners or alcohol to clean the ink cartridge contacts. These can damage the ink cartridge or the printer.
-
-
Press the Power button to turn on the printer.
-
Open the exterior door.
Figure : Open the exterior door
-
Open the ink cartridge access door.
The carriage moves to the center of the printer. Wait until the carriage is idle and silent before continuing.
Figure : Open the ink cartridge access door
-
Disconnect the power cord from the rear of the printer.
-
Disconnect the USB cable, unless your printer is connected to a wireless network.
-
Press down on the ink cartridge to release it, and then pull the ink cartridge out to remove it from its slot.
Figure : Remove the ink cartridge
CAUTION:
Do not remove both ink cartridges at the same time. Remove and then clean each ink cartridge one at a time. Do not leave an ink cartridge outside the printer for more than 30 minutes.
-
Hold the ink cartridge by its sides.
Figure : Hold the ink cartridge by its sides
-
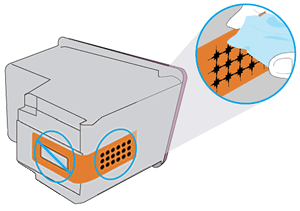
Inspect the contacts for ink and debris buildup.
-
Wipe the contacts with a dry swab or other lint-free material until no debris remains on them.
CAUTION:
Be careful to wipe only the contacts. Do not smear any ink or debris elsewhere on the ink cartridge.
-
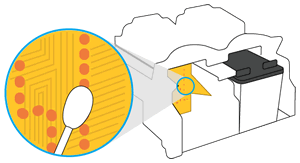
Dip a clean foam-rubber swab or lint-free cloth into distilled water, and then squeeze any excess water from it.
-
Clean only the copper-colored contacts, and then allow the ink cartridge to dry for approximately 10 minutes.
Figure : Clean the contacts
-
Lightly moisten another foam-rubber swab with distilled water, and then squeeze any excess water from the swab.
-
Use the swab to clean the electrical contacts in the carriage, located inside the printer.
-
Clean the contacts in the carriage.
Figure : The carriage contacts
-
Either let the ink cartridge sit for 10 minutes to allow the cleaned area to dry, or use a new swab to dry it.
NOTE:
Make sure that the ink cartridge is not left out of the printer for more than 30 minutes.
-
Hold the ink cartridge by its sides with the nozzles toward the printer, and then insert the ink cartridge into its slot. Make sure that the ink cartridge is inserted in the correct slot.
Figure : Insert the ink cartridge into the slot
-
Push the ink cartridge forward into its slot until it snaps into place.
-
Repeat these steps to clean and then reinsert the other ink cartridge.
-
Close the ink cartridge access door.
Figure : Close the ink cartridge access door
-
Close the exterior door.
Figure : Close the exterior door
-
Reconnect the power cord to the rear of the printer.
-
Reconnect the USB cable, unless your printer is connected to a wireless network.
-
Press the Power button to turn on the printer if it does not turn on automatically.
You can refer this HP document for more assistance:- Click here
Use WPS to connect the printer to your wireless network.
-
Locate the WPS button on your router, but do not press it yet.
If your router does not support WPS, skip to the next step to connect the printer with the HP Smart app.
-
Turn on the printer. If the printer is in sleep mode, press the Cancel button on the control panel.
-
On the printer control panel, press and hold the Wireless button
 for at least 3 seconds or until the wireless light starts to flash.
NOTE:
HP Tango printers: Press and hold the Wireless and Power buttons on the back of the printer for 5 seconds. The Edge lighting flashes blue to indicate the printer is in WPS mode.
-
On the router, press and hold the WPS button for 3 to 5 seconds or until it shows that the WPS connection process has started.
NOTE:
The printer stops searching for a WPS connection two minutes after the wireless button is pressed. If you were unable to press the WPS button within that timeframe, attempt these steps again.
Once the printer connects to the wireless network, the blue Wireless light on the control panel turns on solid.
Let me know if that helps.
To thank me for my efforts to help you, please mark my post as an accepted solution so that it benefits several others.
Cheers.
Sandytechy20
I am an HP Employee
03-12-2019 06:34 PM
HP Recommended
Thanks but I have changed plenty cartridges.
The problem was, as I said, of two cartridges purchsed, colour one was nor recognised. Replacements exchanged. This time, colour ok but black shows as empty!
No button on router. I have tried for months to connect to wi-fi. I thought worked today but no, still never worked.
03-12-2019 06:45 PM
HP Recommended
This looks like a hardware issue.
I request you to talk to HP support.
They might have multiple options to help you with this.
1) Click on this link - www.hp.com/contacthp/
2) Click on "Continue as guest".
3) Enter the serial of your device.
4) Select the country from the drop-down.
5) Click on "Show Options".
Fill the web-form. A case number and phone number will now populate for you.
To thank me for my efforts to help you, please mark my post as an accepted solution so that it benefits several others.
Cheers.
Sandytechy20
I am an HP Employee
03-13-2019 07:55 AM
HP Recommended
i clicked link but no way to sign in as guest. Attempting to chat to human just goes around and around. I'm disabled so can't get serial number. Usual tool to find. It does not even recognise when searching for ink! Last time I will buy an HP. Why is there no direct way to contact without being ripped off with charges?!
03-13-2019 12:01 PM
HP Recommended
I have brought your issue to the attention of an appropriate team within HP. They will likely request information from you in order to look up your case details or product serial number. Please look for a private message from an identified HP contact. Additionally, keep in mind not to publicly post personal information (serial numbers and case details).
If you are unfamiliar with how the Community's private message capability works, you can learn about that here.
Thank you for visiting the HP Support Community.
Cheers.
Sandytechy20
I am an HP Employee
Be alert for scammers posting fake support phone numbers and/or email addresses on the community.
If you think you have received a fake HP Support message, please report it to us by clicking on "Flag Post".
† The opinions expressed above are the personal opinions of the authors, not of HP. By using this site, you accept the Terms of Use and Rules of Participation.


Didn't find what you were looking for? Ask the community
† The opinions expressed above are the personal opinions of the authors, not of HP. By using this site, you accept the <a href="https://www8.hp.com/us/en/terms-of-use.html" class="udrlinesmall">Terms of Use</a> and <a href="/t5/custom/page/page-id/hp.rulespage" class="udrlinesmall"> Rules of Participation</a>.