-
×InformationWindows update impacting certain printer icons and names. Microsoft is working on a solution.
Click here to learn moreInformationNeed Windows 11 help?Check documents on compatibility, FAQs, upgrade information and available fixes.
Windows 11 Support Center. -
-
×InformationWindows update impacting certain printer icons and names. Microsoft is working on a solution.
Click here to learn moreInformationNeed Windows 11 help?Check documents on compatibility, FAQs, upgrade information and available fixes.
Windows 11 Support Center. -
- HP Community
- Archived Topics
- Printers Archive
- Re: Instalação do Cartucho, o carrinho não move.

Create an account on the HP Community to personalize your profile and ask a question
Your account also allows you to connect with HP support faster, access a personal dashboard to manage all of your devices in one place, view warranty information, case status and more.
05-24-2017 08:49 AM
 HP Recommended
Product: HP DESKJET Ink Advantage 3787
Operating System: Microsoft Windows XP
Comprei uma impressora HP DESKJET Ink Advantage 3787, e não consigo nem instalar os cartuchos, o carrinho não se move, o que fazer?
Poderiam me ajudar?
3 REPLIES 3
05-24-2017 08:57 AM
HP Recommended
Hi!, @lenize :
In the future, please write, in this Forum in English Language.
You can see ... https://support.hp.com/in-en/product/hp-deskjet-3700-all-in-one-printer-series/8954253/document/c050...
Pode escrever, na ... https://h30487.www3.hp.com/t5/Impressoras-jato-de-tinta-e-laser/ct-p/Impressoras
Kind Regards !.
Have a nice day !.
@Maké (Technical Advisor Premium - HP Program Top Contributor).
Provost in HP Spanish Public Forum ... https://h30467.www3.hp.com/
Have a nice day !.
@Maké (Technical Advisor Premium - HP Program Top Contributor).
Provost in HP Spanish Public Forum ... https://h30467.www3.hp.com/
05-24-2017 04:58 PM
HP Recommended
HP DeskJet 3700 Printers - Ink Cartridge Errors 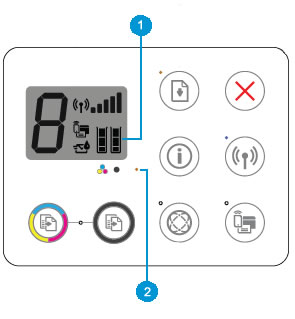
This document is for the HP DeskJet 3720, 3730, 3732, 3733, 3752, 3755, 3758, and DeskJet Ink Advantage 3775, 3776, 3778, 3785, 3786, 3787, and 3788 All-in-One printers.
The printer does not print, and one of the following error messages displays on the computer screen:
- Incompatible Cartridges
- Cartridges Missing
One or both of the Ink Level icons on the printer control panel are blinking, and the Ink Alert light is on or blinking.
Figure : Control panel Ink Level icons and Ink Alert light
- Ink Level icons
- Ink Alert light
Step 1: Make sure the ink cartridges are compatible
An ink cartridge error displays if the wrong ink cartridge is installed.
Visit HP SureSupply to check ink or toner cartridge compatibility or purchase replacement cartridges and other supplies.
- Go to HP SureSupply.
- If necessary, select your country/region.Figure : Country/region selector

- Follow the on-screen instructions to order new supplies or check cartridge compatibility with your printer.
You can also purchase genuine HP cartridges and supplies from other retailers.
To purchase ink cartridges through other retailers, make note of the following ink cartridges that work with your printer.
HP DeskJet 3720, 3730, 3732, 3733, 3752, 3755, and 3758 All-in-One printers.
Ink cartridge description | North America and Asia Pacific (excluding India, China, Japan, and Indonesia) | Western Europe | Middle East, Africa, Latin America, Japan, and CIS | China, India, and Indonesia |
Black ink cartridge | HP 65 Black HP 65XL Black | HP 304 Black HP 304XL Black | HP 123 Black HP 123XL Black | HP 803 Black HP 803XL Black |
Color ink cartridge | HP 65 Tri-color HP 65XL Tri-color | HP 304 Tri-color HP 304XL Tri-color | HP 123 Tri-color HP 123XL Tri-color | HP 803 Tri-color HP 803XL Tri-color |
HP DeskJet Ink Advantage 3775, 3778, 3776, 3785, 3786, 3787, and 3788 All-in-One printers.
Ink cartridge description | Latin America | Asia Pacific | Europe, Middle East, and Africa |
Black ink cartridge | HP 664 Black | HP 680 Black | HP 652 Black |
Color ink cartridge | HP 664 Tri-color | HP 680 Tri-color | HP 652 Tri-color |
If installing compatible genuine HP ink cartridges did not resolve the issue, continue to the next step.
Step 2: Make sure the ink cartridges are correctly installed
The printer might display an error if the ink cartridges are not correctly installed. Remove the ink cartridges, check them for any plastic tape, reinstall the ink cartridges, and then try to print again.
- Turn on the printer.
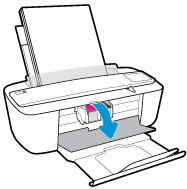
- Open the ink cartridge access door.The carriage moves to the center of the printer.Figure : Opening the ink cartridge access door
- Wait until the printer is idle and silent before you continue.
- Gently press down on the ink cartridge to release it, and then pull the ink cartridge out of its slot.Figure : Removing the ink cartridge

CAUTION:
Do not touch the copper-colored contacts or the ink nozzles. Touching these parts can result in clogs, ink failure, and bad electrical connections.Figure : Do not touch the contacts or nozzles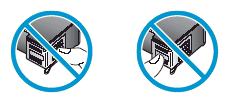
- Inspect for and remove any protective tape from the contacts.
CAUTION:
Do not try to remove the copper electrical strip.Figure : Removing the plastic tape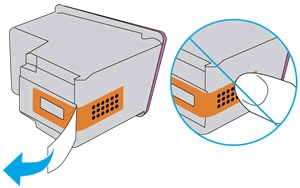
- Hold the ink cartridge by its sides with the contacts toward the printer, insert the ink cartridge into its slot, and then gently push the ink cartridge until it snaps into place.
NOTE:
Install the color ink cartridge on the left and the black ink cartridge on the right.Figure : Snapping the ink cartridge into place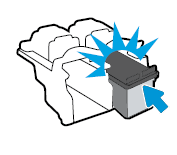
- Repeat these steps for the other ink cartridge, if necessary.
- Close the ink cartridge access door.Figure : Closing the ink cartridge access door

Try to print. If the error persists, continue to the next step.
Step 3: Clean the electrical contacts
The printer might display an ink cartridge error if the ink cartridge contacts are dirty. Unplug any cords or cables, remove the ink cartridges, and then clean the electrical contacts on the ink cartridges and print carriage.
- Gather the following materials:
- Clean, dry foam-rubber swabs or a clean, lint-free cloth
- Distilled or bottled water (tap water might damage the ink cartridge or the printer)
- Open the ink cartridge access door.The carriage moves to the center of the printer.Figure : Opening the ink cartridge access door
- Wait until the printer is idle and silent before you continue.
- Disconnect any cords connected to the printer, such as the power cord and USB cable.
- Press down on the ink cartridge to release it, and then pull the ink cartridge toward you to remove it from its slot.Figure : Removing the ink cartridge
CAUTION:
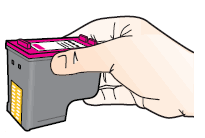
Do not remove both ink cartridges at the same time. Remove and then clean each ink cartridge one at a time. Do not leave an ink cartridge outside the printer for more than 30 minutes. - Hold the ink cartridge by its sides.Figure : Holding the ink cartridge by its sides
- Inspect the copper-colored contacts for ink and debris buildup.
- Gently wipe the contacts with a dry swab or lint-free cloth until they are free of debris.
CAUTION:
Be careful to wipe only the contacts. Do not smear any ink or debris elsewhere on the ink cartridge.Figure : Cleaning the contacts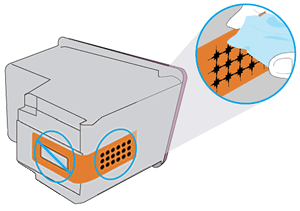
- Lightly dampen a clean foam-rubber swab or lint-free cloth with distilled water, and then clean the contacts.
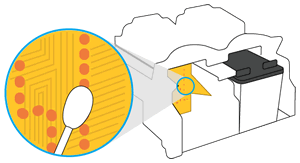
- Lightly dampen another clean foam-rubber swab or lint-free cloth with distilled water, and then clean the electrical contacts in the carriage, located inside the printer.Figure : Cleaning the carriage contacts
- Wait for the ink cartridge and carriage contacts to dry before you continue (approximately 10 minutes).
- Hold the ink cartridge by its sides with the contacts toward the printer, insert the ink cartridge into its slot, and then gently push the ink cartridge until it snaps into place.Figure : Snapping the ink cartridge into place
- Repeat these steps to clean and then reinsert the other ink cartridge.
- Close the ink cartridge access door.Figure : Closing the ink cartridge access door
- Reconnect the power cord or USB cable to the printer, if needed.
- Turn on the printer if it does not turn on automatically.
Try to print. If the error persists, continue to the next step.
Step 4: Remove and reinsert the ink cartridges again
Repeat the steps you performed earlier in this document to remove and then reinsert the ink cartridges.
NOTE:Make sure the ink cartridges snap firmly into place.
Try to print. If the error persists, continue to the next step.
Step 5: Clean the ink cartridge contacts again
Cleaning the ink cartridge contacts again can help resolve the issue. Repeat the steps you performed earlier in this document to clean the contacts.
Try to print. If the error persists, continue to the next step.
Step 6: Reset the printer
Restarting the printer can resolve an ink cartridge error.
- Turn on the printer, if it is not already on.
- Wait until the printer is idle and silent before you continue.
- With the printer turned on, disconnect the power cord from the rear of the printer.
- Wait at least 10 seconds.
- Reconnect the power cord to the rear of the printer.
- Turn on the printer, if it does not automatically turn on.The printer might go through a warm-up period. The printer lights might flash, and the carriage might move.
- Wait until the warm-up period finishes and your printer is idle and silent before you continue.
Try to print. If the error persists, continue to the next step.
Step 7: Install a new ink cartridge
Replace one or both ink cartridges indicated by the blinking Ink Level icon on the printer control panel.
If you have a defective cartridge or printhead, it might be under warranty. To check the warranty on your ink or toner supplies, go to hp.com/go/learnaboutsupplies, and then review the limited warranty information for your supplies.
- Turn on the printer.
- Open the ink cartridge access door.The carriage moves to the center of the printer.Figure : Opening the ink cartridge access door
- Wait until the printer is idle and silent before you continue.
- Gently press down on the ink cartridge to release it, and then pull the ink cartridge out of its slot.Figure : Removing the ink cartridge
- Remove the new ink cartridge from its package. Be careful to only touch the black plastic on the ink cartridge.Figure : Removing the ink cartridge from its package
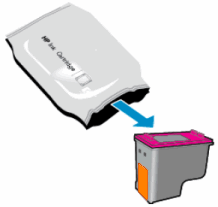
- Remove the plastic tape from the ink cartridge.
CAUTION:
Do not touch the copper-colored contacts or the ink nozzles. Do not replace the protective tape on the contacts. Handling these parts can result in clogs, ink failure, and bad electrical connections.Figure : Removing the plastic tape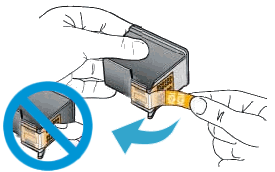
- Hold the ink cartridge by its sides with the contacts toward the printer, insert the ink cartridge into its slot, and then gently push the ink cartridge until it snaps into place.
NOTE:
Install the color ink cartridge on the left and the black ink cartridge on the right.Figure : Snapping the ink cartridge into place - Repeat these steps for the other ink cartridge, if necessary.
- Close the ink cartridge access door.Figure : Closing the ink cartridge access door
- If the error persists after replacing the ink cartridge, service the printer.
- If the error is resolved after replacing the ink cartridge, continue to the next step to align the ink cartridges.
Step 8: Align the ink cartridges
For best print quality, select your operating system to align the ink cartridges.
After aligning the ink cartridges, the printer is ready to print, copy, and scan.
Step 9: Service the printer
If the previous steps did not resolve the ink cartridge error, service the printer.
Service or replace your HP product if you completed all preceding steps.
To see if your product is still under warranty, go to the warranty check website http://www.support.hp.com/checkwarranty. Contact HP Support to schedule a repair or replacement. If you are in Asia Pacific, Contact HP Support to find a local service center in your area.
Repair fees might apply for out-of-warranty products.
Kind Regards !.
Have a nice day !.
@Maké (Technical Advisor Premium - HP Program Top Contributor).
Provost in HP Spanish Public Forum ... https://h30467.www3.hp.com/
Have a nice day !.
@Maké (Technical Advisor Premium - HP Program Top Contributor).
Provost in HP Spanish Public Forum ... https://h30467.www3.hp.com/
† The opinions expressed above are the personal opinions of the authors, not of HP. By using this site, you accept the Terms of Use and Rules of Participation.


Didn't find what you were looking for? Ask the community
† The opinions expressed above are the personal opinions of the authors, not of HP. By using this site, you accept the <a href="https://www8.hp.com/us/en/terms-of-use.html" class="udrlinesmall">Terms of Use</a> and <a href="/t5/custom/page/page-id/hp.rulespage" class="udrlinesmall"> Rules of Participation</a>.