-
×InformationWindows update impacting certain printer icons and names. Microsoft is working on a solution.
Click here to learn moreInformationNeed Windows 11 help?Check documents on compatibility, FAQs, upgrade information and available fixes.
Windows 11 Support Center. -
-
×InformationWindows update impacting certain printer icons and names. Microsoft is working on a solution.
Click here to learn moreInformationNeed Windows 11 help?Check documents on compatibility, FAQs, upgrade information and available fixes.
Windows 11 Support Center. -
- HP Community
- Printers
- Printing Errors or Lights & Stuck Print Jobs
- Re: MacBook Air is unable to verify the printer on my networ...

Create an account on the HP Community to personalize your profile and ask a question
Your account also allows you to connect with HP support faster, access a personal dashboard to manage all of your devices in one place, view warranty information, case status and more.
Check some of the most frequent questions about Instant Ink: HP INSTANT INK, HP+ PLANS: INK AND TONER.
Check out our Black or Color Ink Not Printing, Other Print Quality Issues info about: Print quality and Cartridge Issues.

It has been a while since anyone has replied. Simply ask a new question if you would like to start the discussion again.
07-09-2018 02:08 PM
 HP Recommended
Product: HP Officejet Pro 8600
Operating System: macOS 10.13 High Sierra
I have tried everything and when I say everything I mean EVERYTHING! I have followed all the steps (restoring, removing, restarting) on this forum and my printer still will not work. I keep receiving the following message:
Unable to verify the printer on your network.
Unable to connect to 'Officejet Pro 8600
[3848BB]._ipp._tcp.local.' due to an error. Would you
still like to create the printer?
Please HELP!
6 REPLIES 6
07-10-2018 05:22 PM - edited 07-14-2018 06:23 PM
HP Recommended
Good Day. A warm welcome to the HP community.
I reviewed the case regarding issues with the printer. I will be delighted to assist you here.
Superb description, brilliant troubleshooting and terrific observations made before posting. Kudos to you for that. 😉
Let's try a few steps given below:
Step 1: Reset the printer
Resetting power to the printer forces the printer to reset stored values in the firmware. A power reset can help when the printer is not accepting communication from the Mac.
Make sure the printer is idle, not making any sounds, before continuing.
With the printer turned on, disconnect the power cord from the rear of the printer.
Unplug the power cord from the wall outlet.
Wait at least 60 seconds.
Plug the power cord back into the wall outlet.
Reconnect the power cord to the rear of the printer.
If the printer does not turn on by itself, press the Power button
 to turn it on.
Try printing again and note what happens.
If the printer prints, you can stop troubleshooting.
If the print job becomes stuck again, continue to the next step.
Step 2: Remove multiple printers from the printer list
Check for multiple devices in the Printers list, and then remove any extra entries other than one in idle status.
Search the Mac for Print, and then click Print & Fax, Print & Scan, or Printers & Scanners in the list of results.
Find the printer names that match your printer from the list of devices.
Figure : Printers and Scanner window with multiple names of a printer in the list

If you see multiple printer queues for the same printer, remove all extra printers by selecting them one at a time, and then clicking the minus button
 at the bottom of the list. Leave one 'idle' printer in the list that matches your printer if available and use this printer as the Default printer.
Try printing again.
If the printer prints, you can stop troubleshooting.
If the printer remains offline or displays an error, continue to the next step.
Step 3: Delete the existing print queue and add the printer
Remove the printer queue from the list of printers, and then add it again. Doing so creates a new printing session.
Make sure your Mac is connected to the Internet.
In the Printers list, click your HP printer, and then click the Minus button
to delete it.Click the Add button
 .
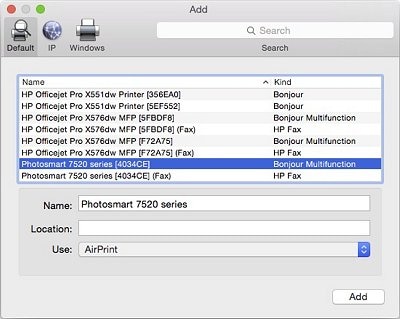
.Find and select the name of your printer from the Printer list, and then click Add to add your printer. Do not select an HP Fax driver.
note:
If your printer does not display in the list, make sure the printer is connected, turned on, has power, and is ready to print.
Figure : Example of the printer selection list
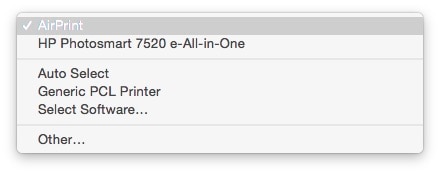
Click Print Using or Use.
Select AirPrint.
Figure : Menu showing AirPrint selected
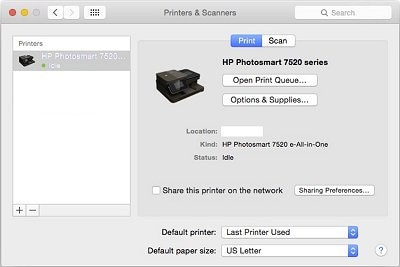
Your new printer queue displays in the Printers list in an Idle status
 .
.Figure : Example of a newly added printer in the Printers & Scanners list
Try printing again.
This should do the trick for you.Please perform all these steps patiently as it is critical to resolving the issue.
The trick is to remain patient, Going by your technical expertise and competence I am sure you will be able to perform these steps without breaking a sweat. 🙂
Hope this helps. Let me know how it goes. 😉
Barachiel
I am an HP Employee
07-14-2018 06:43 AM
HP Recommended
I did get the printer to work before your responsded by restoring the printer to default setting. It worked for a few days but it stopped again today with the message "printer not responding". So I went back to your response and tried the steps you gave. I followed the steps above but when I tried to add the printer during Step 3 I receive the following error message:
Unable to verify the printer on your network.
Unable to connect to ‘Officejet Pro 8600 [3848BB]._ipp._tcp.local.’ due to an error. Would you still like to create the printer?
Please help!
07-14-2018 06:49 PM
HP Recommended
Thank you for responding,
It's great to have you back 😉
First, follow these steps to reset the printer.
Turn the printer on, if it is not already on.
Wait until the printer is idle and silent before you continue.
With the printer turned on, disconnect the power cord from the rear of the printer.
Unplug the power cord from the wall outlet.
Wait at least 60 seconds.
Plug the power cord back into the wall outlet.
NOTE:
HP recommends connecting the printer power cord directly to the wall outlet.
Reconnect the power cord to the rear of the printer.
Turn on the printer, if it does not automatically turn on.
The printer might go through a warm-up period. The printer lights might flash, and the carriage might move.
Wait until the warm-up period finishes and your printer is idle and silent before you proceed.
Once done, try the steps again.
Keep me posted. 🙂
Barachiel
I am an HP Employee
07-15-2018 06:13 PM
HP Recommended
Thanks for your reply.
As @Barachiel is out of the office today, I'm replying to you.
I understand that the printer is not found when trying to add it and message appears saying "Unable to verify the printer on your network."
Let us attempt the following steps:
Make sure your network is working correctly and that the printer is ready for the AirPrint setup.
-
On the printer, open the Wireless network or Settings menu to make sure the wireless signal is turned on and enabled. Make sure the Wireless icon
 light is on and steady.
 -
On the Mac, click the network icon
 in the menu bar to view the network name and status of the connection.
-
If the selected network is not yours (for instance, if you connected to a neighbor's or a guest network), you must connect to your own network to complete the printer setup.
-
If the network signal strength is weak, move the computer and printer closer to the router, position the devices away from large metal objects such as bookcases, and move away from devices that emit radio signals such as microwaves and cordless phones.
-
If the network status is not connected, confirm that your network is working correctly, then check the status again. Make sure a check mark displays next to the network name.
-
-
If you are using a wireless router, review the router’s documentation or support site to confirm the following requirements and updates:
-
Check the router band: Many routers can operate in both 2.4 GHz and 5.0 GHz frequency bands, but not all HP printers support both bands. Make sure the 2.4 GHz router band is enabled and broadcasting. If the router broadcasts separate network names (SSIDs) for each band, connect the printer to the 2.4 GHz band SSID.
-
Bonjour support: HP recommends routers that support Bonjour, Apple's network discovery software. Connecting with Bonjour is the best way to find the printer and support wireless printing.
-
Check for updated router firmware: Outdated router firmware can impact performance and security, or prevent the router from accessing the Internet.
-
-
Add the AirPrint printer to the Mac.
If the printer is not found, continue to the next step.
Step 2: Check for Mac updates and the latest printer firmware
Update the Mac and the printer firmware to ensure the latest features are available.
-
On the Mac, click the Apple menu, click About this Mac, click Software Update, select any available updates, and then click Update All.
NOTE: You might need to refresh the page to view the latest updates. Click Store in the top menu bar, and then click Reload Page to update the list. If no updates display, the Mac is up to date.
-
Go to Updating Firmware on the Printer for steps to download and install any new version of the printer firmware.
Try to print. If the issue persists, continue to the next step.
Step 3: Restart the computer, printer, and router
Restart the computer, printer, and router to resolve any network or communication error states.
NOTE: These steps temporarily disconnect network and Internet connections and require restarting your computer. Complete any tasks or downloads in progress before continuing.
-
Disconnect the power cord from the router.
-
Turn off the printer.
-
Close all running programs on your computer, including the HP software installation window, and then shut down the computer.
-
Reconnect the power cord to the router, and then wait for the Internet activity light to display a normal connected status.
-
Turn on the printer.
-
Turn on the computer.
-
Try adding the AirPrint printer to the Mac.
Step 4: Reset the printing system
Resetting the Mac printing system can be useful for resolving printer connection and installation problems.
CAUTION: This process removes all printers and scanners from the printers queue and clears all print jobs and print settings from the system, including printers and scanners that are not from HP.
-
Click the Apple menu, click System Preferences, and then click Print & Scan or Printers & Scanners.
-
Right-click (or Ctrl + click) anywhere inside the Printers pane, and then click Reset printing system.
Figure : Click Reset printing system

-
Click Reset or OK.
-
If prompted, type your user name and password, and then click OK to confirm the reset.
-
Turn off the printer, wait five seconds, and then turn the printer on.
-
In the Printers window, click the Add button
 to re-add the printer as Airprint to the Mac.
If the issue still persists then let us disable the IPv6 on the printer by following the below steps:
Disable IPv6 on the printer to ensure that IPv4 is used on your network.
-
If your printer has a control panel with a display, find the IPv6 setting from the Advanced network settings menu, and set it to Off or Disabled.
-
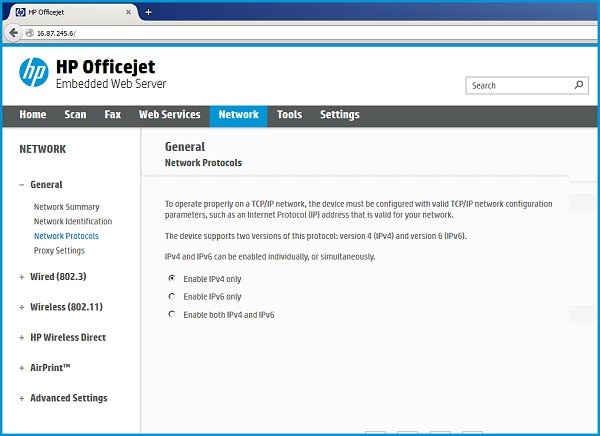
If your printer does not have a display, use the embedded web server (EWS) to turn off IPv6.
-
From a computer connected to your network, type the printer IP address into the URL field of your Internet browser.
NOTE: If the Web page appears blank, try a different Internet browser.
-
Click the Network or Networking tab, and then open the section or page for your network type - wired or wireless.
-
Select Enable IPv4 only (or similar).
Figure : Example of setting IPv4 using an EWS
-
Click Apply, and then wait until the changes are confirmed.
-
I sincerely hope this fixes the issue. Keep me posted for further assistance.
Cheers! 🙂
06-13-2019 04:08 PM
HP Recommended
Hi there,
I was having the same issue and after troubleshooting for hours, I was able to resolve this issue. The way to resolve this is go into System Preferences > Network > Location > Edit Locations, and add a new location. This should reset the networking stack and allow you to add the printer with ease.
Be alert for scammers posting fake support phone numbers and/or email addresses on the community.
If you think you have received a fake HP Support message, please report it to us by clicking on "Flag Post".
† The opinions expressed above are the personal opinions of the authors, not of HP. By using this site, you accept the Terms of Use and Rules of Participation.


Didn't find what you were looking for? Ask the community
† The opinions expressed above are the personal opinions of the authors, not of HP. By using this site, you accept the <a href="https://www8.hp.com/us/en/terms-of-use.html" class="udrlinesmall">Terms of Use</a> and <a href="/t5/custom/page/page-id/hp.rulespage" class="udrlinesmall"> Rules of Participation</a>.