• ×
    Information
    Windows update impacting certain printer icons and names. Microsoft is working on a solution.
    Click here to learn more
    Information
    Need Windows 11 help?
    Check documents on compatibility, FAQs, upgrade information and available fixes.
    Windows 11 Support Center.
  • post a message
  • ×
    Information
    Windows update impacting certain printer icons and names. Microsoft is working on a solution.
    Click here to learn more
    Information
    Need Windows 11 help?
    Check documents on compatibility, FAQs, upgrade information and available fixes.
    Windows 11 Support Center.
  • post a message
Guidelines
Experiencing 'Printer Blocked' or 'Printer Error' message? Click here for more information.
Check some of the most frequent questions about Instant Ink: HP INSTANT INK, HP+ PLANS: INK AND TONER.


Check out our Black or Color Ink Not Printing, Other Print Quality Issues info about: Print quality and Cartridge Issues.
HP Recommended
HP Photosmart 5520 e All in one printer

All cartridges are recognised as genuine HP. I've updated Windows 10 and the HP printer software and drivers. When printing the quality diagnostic, the three colours seem fine but the black is completely black

2 REPLIES 2
HP Recommended

....meant to read "completely blank"...…..sorry

HP Recommended

@Jimmy10tsg I have a few steps that should help resolve this issue:


Check the vents on the top of the ink cartridges. If they are clogged or obstructed, the ink cartridges might not work properly, which can affect print quality.

NOTE: 

To avoid print quality issues and dried out ink cartridges, do not leave any ink cartridges outside the printer for longer than 30 minutes.

  1. Press the Power button to turn on the printer, if it is not already turned on.

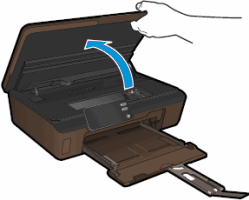
  2. Open the ink cartridge access door. The carriage moves to the access area.

    Opening the ink cartridge access door

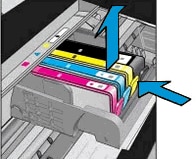
  3. Press the tab on the front of the ink cartridge inward to release it, and then pull up on the ink cartridge to remove it from the slot.

    Removing the ink cartridge from the slot

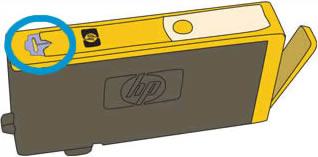
  4. Examine the vent area on each ink cartridge, above the HP logo on the top of the ink cartridge.

    Vent area on the top of the ink cartridge

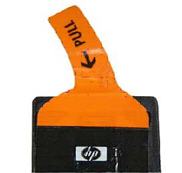
  5. If the ink cartridge still has the orange pull-tab attached, pull to remove it.

    Orange pull tab

  6. If the vent is clogged, use a straight pin to gently remove excess adhesive from the vent.

    1. Clogged vent

    2. With a straight pin, gently remove excess adhesive from the vent

    3. Unclogged vent

  7. Slide the ink cartridge into its slot, and then press down on the ink cartridge until it snaps into place.

    NOTE: 

    Make sure that each ink cartridge is installed in the correct slot. Match the shape of the icon and the color of the ink cartridge with the slot that has the same shaped icon and color.

    Reinserting the ink cartridge

  8. Repeat these steps to inspect the vents on each of the ink cartridges.

  9. Make sure that each ink cartridge is firmly in place in its slot. Run your finger along the top of the ink cartridges to feel for any that are protruding, and if any are, press down firmly until each ink cartridge snaps into place.

  10. Close the ink cartridge access door.

  11. Try the print job again.

If the issue persists, continue to the next step.


Clean the printhead

If you found defects on the Print Quality Diagnostic report, run an automated tool to clean the printhead.

  1. Make sure that plain white U.S. letter or A4 size paper is loaded in the tray.

  2. From the control panel home screen, touch the Settings icon , and then touch Tools.

  3. Touch the Down Arrow , and then touch Clean Printhead. The printer cleans the printheads, and then prints a test page.
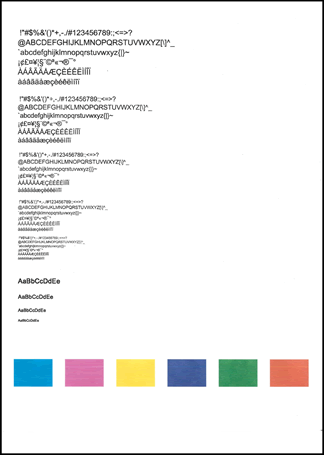
  4. Review the print quality on the test page.

    Printhead cleaning test page

    • If the print quality on the test page is satisfactory, return to the current print job.

    • If the print quality on the test page is unsatisfactory, perform a secondary cleaning of the printhead.

      If the printhead is badly clogged, it might require another cleaning cycle. If so, wait 30 minutes after the last cleaning stage to start the first stage of the cleaning process over again.

  • If these steps resolved the issue, there is no need to continue troubleshooting. The following precautions might prevent the issue in the future.

    • Avoid leaving unprotected ink cartridges out of the printer for an extended period of time.

    • Always use the Power button to turn off the printer. This protects the ink cartridges from exposure to air.

  • If the issue persists, continue to the next step.

FOR DETAILS & FURTHER INSTRUCTIONS, USE THIS LINK: CLICK HERE & SKIP TO STEP 11 ONWARD

(By the end of this article all the issues should be resolved)


P.S: Welcome to HP Community 😉


Let me know how that pans out,

If you feel I was helpful, simply click on Accept as Solution to help the community grow,

That said, I will have someone follow-up on this to ensure you've been helped,

Just in case you don't get back to us within 24 - 48hrs, and have a good day, ahead.

Riddle_Decipher
I am an HP Employee

† The opinions expressed above are the personal opinions of the authors, not of HP. By using this site, you accept the <a href="https://www8.hp.com/us/en/terms-of-use.html" class="udrlinesmall">Terms of Use</a> and <a href="/t5/custom/page/page-id/hp.rulespage" class="udrlinesmall"> Rules of Participation</a>.