• ×
    Information
    Windows update impacting certain printer icons and names. Microsoft is working on a solution.
    Click here to learn more
    Information
    Need Windows 11 help?
    Check documents on compatibility, FAQs, upgrade information and available fixes.
    Windows 11 Support Center.
  • post a message
  • ×
    Information
    Windows update impacting certain printer icons and names. Microsoft is working on a solution.
    Click here to learn more
    Information
    Need Windows 11 help?
    Check documents on compatibility, FAQs, upgrade information and available fixes.
    Windows 11 Support Center.
  • post a message
Guidelines
Experiencing 'Printer Blocked' or 'Printer Error' message? Click here for more information.
Check some of the most frequent questions about Instant Ink: HP INSTANT INK, HP+ PLANS: INK AND TONER.


Check out our Black or Color Ink Not Printing, Other Print Quality Issues info about: Print quality and Cartridge Issues.
HP Recommended
HP ENVY 4527
macOS 10.14 Mojave

Hi 

I have a brande new HP printer but unfortunatley it always passes the paper through on a slant and thus the print is slanted.

I have tried two different thickness of paper and also made sure that the paper and guides are straight in the feed tray but to no avail.

Is this something I can alter or is iy a faulty printer>?

Thank You in advance

3 REPLIES 3
HP Recommended

@Colin24

Welcome to HP Forums, 

This is a great place to get support, find answers and tips to your technical queries.


To provide you with an accurate solution, I'll need a few more details:

Are you facing the same issue while making a copy?

Did you try printing from a different Application?


UPdate the firmware for the printer using this link: https://support.hp.com/us-en/product/hp-envy-4520-all-in-one-printer-series/5447920/model/11534751/d...


Restart the printer


Make sure the rollers are moving freely.


Step 1: Check the paper, and then reload it

Paper feed issues might result from using ripped, dusty, curled, wrinkled, or bent paper. The quality of the paper can also make a difference. Use these guidelines to help avoid the issue.

  • Use only good quality paper that meets printer specifications.

  • Store all paper in a dry, cool place. Paper feed issues occur more often in humid environments.

  • Do not print on paper that is already printed. The dampness of the ink can cause the paper to stick together.

  • Wait for the printer to complete a job or to display a Load Paper in Tray message before you load more paper.

Before you load paper in the input tray or photo tray, make sure the paper is neatly stacked and in good condition, and the paper path and tray are free from obstructions.

  1. Pull the input tray toward you to open it.

  2. Remove any paper from the input tray or photo tray.

  3. Remove any severely bent, wrinkled, or torn paper from the stack.

  4. Check for obstructions inside the input tray or photo tray. Make sure nothing blocks the paper from engaging with the rollers. Even small pieces of paper can cause paper feed issues.

  5. With both hands, hold the stack of paper, and then tap the bottom edge of the stack on a flat surface so that the stack is even on all sides.

  6. Insert the stack of paper into the input tray or photo tray.

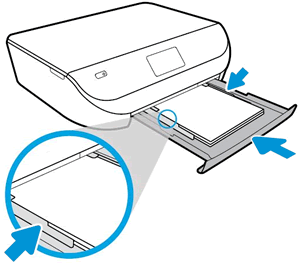
  7. Push the stack of paper toward the rear of the input tray or photo tray until the paper stops, and then gently slide in the paper width guides until they lightly rest against the edges of the paper.

    Loading paper in the input tray

  8. Push the input tray forward until it snaps into place.

  9. The printer control panel displays the paper size loaded.

    • If the paper size loaded does not match what is displayed, select the paper tray, select your paper size and type, and then touch Done.

    • If the paper size is correct, touch OK.

Try to print. If the issue persists, continue to the next step.


Step 2: Clean the paper tray roller


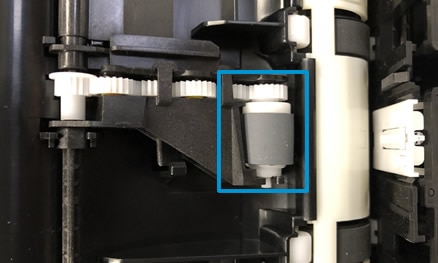
Clean the paper tray roller underneath the printer.

  1. Carefully lift the printer and set it on its side.

  2. While supporting the printer with one hand, pull the paper tray open to expose the paper roller underneath the printer.

    Rollers underneath the printer

  3. Lightly dampen a lint-free cloth with distilled water, and then squeeze any excess liquid from the cloth.

  4. Press the cloth against the roller inside the printer, and then rotate the roller upwards with your fingers. Apply a moderate amount of pressure to remove any dust or dirt buildup.

  5. Allow the roller to dry completely (approximately 10 minutes).

  6. Close the paper tray, and then set the printer upright.

Try to print. If the error persists, continue to the next step.


Step 3: Clean the paper feed rollers from inside the ink cartridge access area


Dust, paper fiber, and other debris might accumulate on the paper feed rollers and cause paper jams and paper feed issues. Clean the rollers inside the printer, and then try to print again.

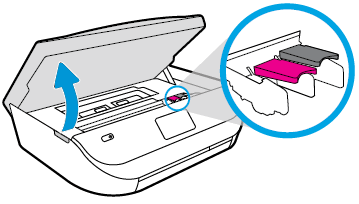
  1. Gently grasp the handles on either side of the printer, and then raise the ink cartridge access door until it locks into place.

    The carriage moves to the center of the printer.

    Image: Opening the ink cartridge access door.

  2. Wait until the carriage is idle and silent before you proceed.

  3. Turn off the printer.

  4. Disconnect the power cord from the rear of the printer.

  5. Disconnect the USB cable, if it is not already disconnected.

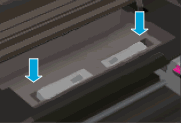
  6. Locate the paper path cover in the area behind the ink cartridge access area.

    Image: Example of the paper path cover.

  7. To remove the paper path cover, pinch the tabs together, and then lift up.

    1. Pinch the tabs together

    2. Lift up

  8. Lightly dampen a lint-free cloth with distilled water, and then squeeze any excess liquid from the cloth.

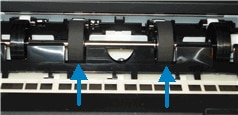
  9. Press the cloth against the rollers inside the printer, and then rotate them upward with your fingers.

    Apply a moderate amount of pressure to remove dust or dirt buildup.

    Image: Example of  rollers inside the printer

  10. Allow the rollers to dry completely (approximately 10 minutes).

  11. Replace the paper path cover.

    Image: Replacing the paper path cover.

  12. Close the ink cartridge access door.

  13. Reconnect the power cord to the rear of the printer, and then turn on the printer.

  14. Reconnect the USB cable to the printer if necessary.

Try to print. If the error persists, continue to the next step.


Step 4: Reset the printer


Sometimes an error persists even though there is no paper feed issue. Reset the printer, and then try to print.

  1. Turn the printer on, if it is not already on.

  2. Wait until the printer is idle and silent before you continue.

  3. With the printer turned on, disconnect the power cord from the rear of the printer.

  4. Unplug the power cord from the wall outlet.

  5. Wait at least 60 seconds.

  6. Plug the power cord back into the wall outlet.

    NOTE: 

    HP recommends connecting the printer power cord directly to the wall outlet.

  7. Reconnect the power cord to the rear of the printer.

  8. Turn on the printer, if it does not automatically turn on.

  9. Wait until the printer is idle and silent before you proceed.

Try to print. 


Keep me posted, how it goes!

If the information I've provided was helpful, give us some reinforcement by clicking the Accepted Solution and Kudos buttons, that'll help us and others see that we've got the answers!

Have a great day!

Cheers:)

Raj1788
I am an HP Employee 

HP Recommended

Thanks Raj1988

I tried to update the firmware but it is already up to date.

I copied a sheet and the print still comes out on a slant,

I have printed from word and from adobe PFD reader 

Both print slanted.

The paper being used in brand new and crisp and clean and has not been printed on before,

The paper is straight in the feeder tray.


As the printer is less than three weeks old I do not think it wise to mess about with the internal workings of the printer.


I have already destroyed thr box and wasted inl on the numerous test pages printed.

Please can you tell me how to go about getting the unit exchanged.


I am in the UK.

HP Recommended

@Colin24


It looks like you were interacting with @Raj1788, but he is out for the day. I'm KrazyToad & I'm at your service. 


I have sent you a private message with the next course of action


Please check your private message icon on the upper right corner of your HP Forums profile.


Next to your profile Name, you should see a little blue envelope


Thank you

KrazyToad
I Am An HP Employee

† The opinions expressed above are the personal opinions of the authors, not of HP. By using this site, you accept the <a href="https://www8.hp.com/us/en/terms-of-use.html" class="udrlinesmall">Terms of Use</a> and <a href="/t5/custom/page/page-id/hp.rulespage" class="udrlinesmall"> Rules of Participation</a>.