-
×InformationWindows update impacting certain printer icons and names. Microsoft is working on a solution.
Click here to learn moreInformationNeed Windows 11 help?Check documents on compatibility, FAQs, upgrade information and available fixes.
Windows 11 Support Center. -
-
×InformationWindows update impacting certain printer icons and names. Microsoft is working on a solution.
Click here to learn moreInformationNeed Windows 11 help?Check documents on compatibility, FAQs, upgrade information and available fixes.
Windows 11 Support Center. -
- HP Community
- Printers
- Printing Errors or Lights & Stuck Print Jobs
- Re: Paper Jams

Create an account on the HP Community to personalize your profile and ask a question
01-04-2020 05:26 PM
I have had my Officejet Pro 8720 with second paper tray for about ten months now. I print about thirty pages a week from the second tray. Recently the paper started jamming each time I print. Sometimes, I can get a page printed, but not often. The printer works well from the main tray. i use two trays so i can have two paper sizes available. it matters not which paper size I am using. I am printing duplex almost all the time. The paper is making it up to the exit on the top, but is curled at one corner or twisted slightly, enough to cause a jam. It is frustrating me to no end. I appreciate any advice. I may have to send in a warranty repair on it but woud prefer to clean or adjust whatever it needs myself. Thank you.
Solved! Go to Solution.
Accepted Solutions
01-07-2020 11:28 AM
Welcome to HP support community.
Clean the rollers inside the rear of the printer.
-
Turn off the printer, and then disconnect the power cord and any other cables.
-
Turn the printer so that the rear access door faces you.
-
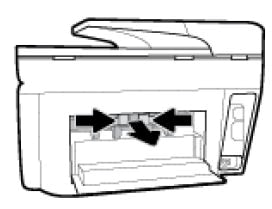
Press the two tabs inward to open the rear access door, and then remove any jammed paper.

-
Press the two buttons on the paper path cover, and then pull the cover out of the printer.

-
Lightly dampen a clean, lint-free cloth with bottled or distilled water, and then squeeze any excess liquid from the cloth.
-
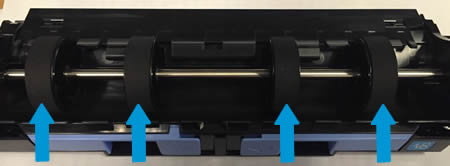
Press the cloth against the rollers, and then rotate them upward with your fingers. Apply a moderate amount of pressure to remove any dust or dirt buildup.

-
Repeat the cleaning steps on the paper path cover rollers.

-
Allow the rollers to dry completely (approximately 10 minutes).
-
Insert the paper path cover back into the printer.
-
Close the rear access door.
-
Reconnect the power cord and any other cables to the rear of the printer, and then turn on the printer.
You can refer this HP document for more assistance:- Click here
I hope that helps.
To thank me for my efforts to help you, please mark my post as an accepted solution so that it benefits several others.
Cheers.
Sandytechy20
I am an HP Employee
01-07-2020 11:28 AM
Welcome to HP support community.
Clean the rollers inside the rear of the printer.
-
Turn off the printer, and then disconnect the power cord and any other cables.
-
Turn the printer so that the rear access door faces you.
-
Press the two tabs inward to open the rear access door, and then remove any jammed paper.

-
Press the two buttons on the paper path cover, and then pull the cover out of the printer.

-
Lightly dampen a clean, lint-free cloth with bottled or distilled water, and then squeeze any excess liquid from the cloth.
-
Press the cloth against the rollers, and then rotate them upward with your fingers. Apply a moderate amount of pressure to remove any dust or dirt buildup.

-
Repeat the cleaning steps on the paper path cover rollers.

-
Allow the rollers to dry completely (approximately 10 minutes).
-
Insert the paper path cover back into the printer.
-
Close the rear access door.
-
Reconnect the power cord and any other cables to the rear of the printer, and then turn on the printer.
You can refer this HP document for more assistance:- Click here
I hope that helps.
To thank me for my efforts to help you, please mark my post as an accepted solution so that it benefits several others.
Cheers.
Sandytechy20
I am an HP Employee
Didn't find what you were looking for? Ask the community
