-
×InformationWindows update impacting certain printer icons and names. Microsoft is working on a solution.
Click here to learn moreInformationNeed Windows 11 help?Check documents on compatibility, FAQs, upgrade information and available fixes.
Windows 11 Support Center. -
-
×InformationWindows update impacting certain printer icons and names. Microsoft is working on a solution.
Click here to learn moreInformationNeed Windows 11 help?Check documents on compatibility, FAQs, upgrade information and available fixes.
Windows 11 Support Center. -
- HP Community
- Printers
- Printing Errors or Lights & Stuck Print Jobs
- Paper jam error on setup calibration

Create an account on the HP Community to personalize your profile and ask a question
Your account also allows you to connect with HP support faster, access a personal dashboard to manage all of your devices in one place, view warranty information, case status and more.
Check some of the most frequent questions about Instant Ink: HP INSTANT INK, HP+ PLANS: INK AND TONER.
Check out our Black or Color Ink Not Printing, Other Print Quality Issues info about: Print quality and Cartridge Issues.

It has been a while since anyone has replied. Simply ask a new question if you would like to start the discussion again.
10-04-2018 08:43 AM
 HP Recommended
Product: Hp photo envy 6522
I just unpacked my hp photo envy 6522. I thoroughly removed all packaging and cennected the printer to power. I selected the language and installed the ink cartridges it came with. Next i loaded paper in the tray. But when it tries to take a sheet to calibrate with i get a paper jam error message. Obviously theres no paper jammed and all rollers are clean as it is brand new and i double checked anyway. I cant get it to take paper; its stuck trying to calibrate over and over with no success.
Solved! Go to Solution.
1 ACCEPTED SOLUTION
Accepted Solutions
10-07-2018 05:53 AM
HP Recommended
I wouldn't have posted to a forum and waited for days if I hadn't already read all your literature, and as I said theres no paper jammed in it and the rollers are clean (they are brand new). I spent the last two days on the phone with HP people who cant understand what im saying and it appears the forum Is no better. All you do is read the headline and copy and paste from your literature. Even if you understood English enough to help me its doubtful that you would. You're all lazy at HP and I'm ashamed to have ever been a fan. There is no help for loyal customers such as myself. I have purchased many HP products over the years. Going forward I boycott all HP products and the HP technology. I have now begun the return process for this printer (including several desktops and my favorite HP Omen gaming notebook). Note that this is the second printer I have returned.
3 REPLIES 3
10-05-2018 02:46 PM
HP Recommended
Thank you for joining HP Forums.
This is a great place to get support, find answers to your technical queries.
Step 1: Check the paper, and then reload it
Paper feed issues might result from using ripped, dusty, curled, wrinkled, or bent paper. The quality of the paper can also make a difference. Use these guidelines to help avoid the issue.
-
Use only good quality paper that meets printer specifications.
-
Store all paper in a dry, cool place. Paper feed issues occur more often in humid environments.
-
Do not print on paper that is already printed. The dampness of the ink can cause the paper to stick together.
-
Wait for the printer to complete a job or to display a Load Paper in Tray message before you load more paper.
Before you load paper in the paper tray, make sure the paper is neatly stacked and in good condition, and the paper path and tray are free from obstructions.
-
Pull the paper tray toward you to open it.
-
Remove any paper from the paper tray.
-
Remove any severely bent, wrinkled, or torn paper from the stack.
-
Check for obstructions inside the paper tray. Make sure nothing blocks the paper from engaging with the rollers. Even small pieces of paper can cause paper feed issues.
-
With both hands, hold the stack of paper, and then tap the bottom edge of the stack on a flat surface so that the stack is even on all sides.
-
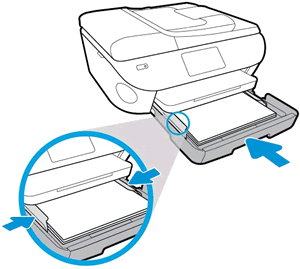
Insert the stack of paper into the paper tray.
-
Push the stack of paper toward the rear of the paper tray until the paper stops, and then gently slide in the paper width guides until they lightly rest against the edges of the paper.
Figure : Loading paper in the paper tray
-
Push the paper tray forward until it snaps into place.
-
The printer control panel displays the paper size loaded.
-
If the paper size loaded does not match what is displayed, select the paper tray, select your paper size and type, and then touch Done.
-
If the paper size is correct, touch OK.
-
Try to print. If the issue persists, continue to the next step.
Step 2: Clean the paper tray rollers
Clean the paper tray rollers underneath the printer.
-
Carefully lift the printer and set it on its side.
-
While supporting the printer with one hand, pull the paper tray open to expose the paper rollers underneath the printer.
Figure : Rollers underneath the printer
-
Lightly dampen a lint-free cloth with distilled water, and then squeeze any excess liquid from the cloth.
-
Press the cloth against the rollers inside the printer, and then rotate the rollers upwards with your fingers. Apply a moderate amount of pressure to remove any dust or dirt buildup.
-
Allow the rollers to dry completely (approximately 10 minutes).
-
Close the paper tray, and then set the printer upright.
Try to print. If the error persists, continue to the next step.
Step 3: Clean the paper feed rollers from inside the ink cartridge access area.
Dust, paper fiber, and other debris might accumulate on the paper feed rollers and cause paper jams and paper feed issues. Clean the rollers inside the printer, and then try to print again.
-
Turn off the printer, and then disconnect the power cord.
WARNING:
To avoid risk of injuries or electric shock, disconnect the power cord before reaching inside the printer.
-
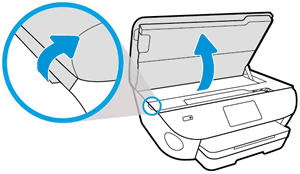
Open the ink cartridge access door.
Figure : Opening the ink cartridge access door
-
Lightly dampen a lint-free cloth with distilled water, and then squeeze any excess liquid from the cloth.
-
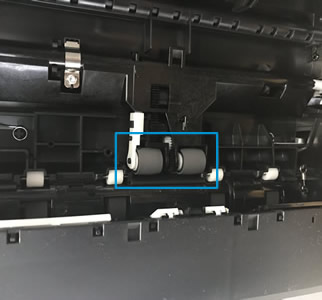
Press the cloth against the rollers inside the printer, and then rotate the rollers upwards with your fingers. Apply a moderate amount of pressure to remove any dust or dirt buildup.
Figure : Rollers in the ink cartridge access area
-
Allow the rollers to dry completely (approximately 10 minutes).
-
Close the ink cartridge access door.
-
Reconnect the power cord to the rear of the printer, and then turn on the printer.
Try to print. If the error persists, continue to the next step.
Step 4: Clean the duplexing rollers
Clean the rollers behind the ink access area of the printer.
-
Turn off the printer, and then disconnect the power cord.
WARNING:
To avoid risk of injuries or electric shock, disconnect the power cord before reaching inside the printer.
-
Open the ink cartridge access door.
Figure : Opening the ink cartridge access door
-
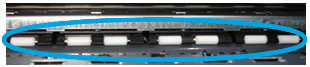
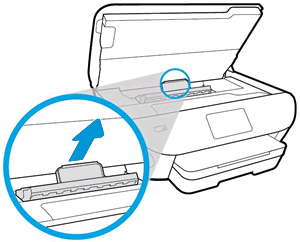
Pull out the paper path cover.
Figure : Removing the paper path cover
-
Lightly dampen a lint-free cloth with distilled water, and then squeeze any excess liquid from the cloth.
-
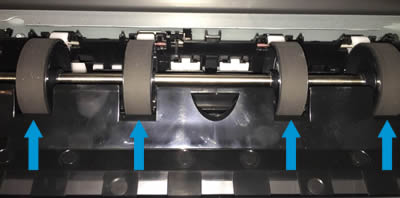
Press the cloth against the rollers, and then rotate them upward with your fingers. Apply a moderate amount of pressure to remove any dust or dirt buildup.
Figure : Paper path rollers
-
Allow the rollers to dry completely (approximately 10 minutes).
-
Insert the paper path cover back into the printer.
-
Close the ink cartridge access door.
-
Reconnect the power cord to the rear of the printer, and then turn on the printer.
Try to print. If the error persists, continue to the next step.
Step 5: Reset the printer
Sometimes an error persists even though there is no paper feed issue. Reset the printer, and then try to print.
-
Turn the printer on, if it is not already on.
-
Wait until the printer is idle and silent before you continue.
-
With the printer turned on, disconnect the power cord from the rear of the printer.
-
Unplug the power cord from the wall outlet.
-
Wait at least 60 seconds.
-
Plug the power cord back into the wall outlet.
NOTE:
HP recommends connecting the printer power cord directly to the wall outlet.
-
Reconnect the power cord to the rear of the printer.
-
Turn on the printer, if it does not automatically turn on.
-
Wait until the printer is idle and silent before you proceed.
Try to print.
Keep me posted, how it goes!
If the information I've provided was helpful, give us some reinforcement by clicking the Accepted Solution and Kudos buttons, that'll help us and others see that we've got the answers!
Have a great day!
Cheers:)
Raj1788
I am an HP Employee
10-07-2018 05:53 AM
HP Recommended
I wouldn't have posted to a forum and waited for days if I hadn't already read all your literature, and as I said theres no paper jammed in it and the rollers are clean (they are brand new). I spent the last two days on the phone with HP people who cant understand what im saying and it appears the forum Is no better. All you do is read the headline and copy and paste from your literature. Even if you understood English enough to help me its doubtful that you would. You're all lazy at HP and I'm ashamed to have ever been a fan. There is no help for loyal customers such as myself. I have purchased many HP products over the years. Going forward I boycott all HP products and the HP technology. I have now begun the return process for this printer (including several desktops and my favorite HP Omen gaming notebook). Note that this is the second printer I have returned.
10-07-2018 09:20 PM
HP Recommended
I have read this response. I will send you a private message to assist you with the next course of action. Check your forum private message box in the upper right corner next to the bell icon.
Thanks for posting in the HP support forums
DavidSMP
I am an HP Employee
Be alert for scammers posting fake support phone numbers and/or email addresses on the community.
If you think you have received a fake HP Support message, please report it to us by clicking on "Flag Post".
† The opinions expressed above are the personal opinions of the authors, not of HP. By using this site, you accept the Terms of Use and Rules of Participation.


Didn't find what you were looking for? Ask the community
† The opinions expressed above are the personal opinions of the authors, not of HP. By using this site, you accept the <a href="https://www8.hp.com/us/en/terms-of-use.html" class="udrlinesmall">Terms of Use</a> and <a href="/t5/custom/page/page-id/hp.rulespage" class="udrlinesmall"> Rules of Participation</a>.