• ×
    Information
    Windows update impacting certain printer icons and names. Microsoft is working on a solution.
    Click here to learn more
    Information
    Need Windows 11 help?
    Check documents on compatibility, FAQs, upgrade information and available fixes.
    Windows 11 Support Center.
  • post a message
  • ×
    Information
    Windows update impacting certain printer icons and names. Microsoft is working on a solution.
    Click here to learn more
    Information
    Need Windows 11 help?
    Check documents on compatibility, FAQs, upgrade information and available fixes.
    Windows 11 Support Center.
  • post a message
Guidelines
Experiencing 'Printer Blocked' or 'Printer Error' message? Click here for more information.
Check some of the most frequent questions about Instant Ink: HP INSTANT INK, HP+ PLANS: INK AND TONER.


Check out our Black or Color Ink Not Printing, Other Print Quality Issues info about: Print quality and Cartridge Issues.
HP Recommended
OfficeJet 7500A
Microsoft Windows 10 (64-bit)

Hello

Being getting General Error 0x610000f6 for awhile. Done Power Reset noting clears it. Look inside no paper Jam of debris of any kind. Please advise  THX

1 REPLY 1
HP Recommended

@JCDaddy101


Welcome to the HP Support Community.


Remove the cartridges

  1. Press the Power button () to turn on the product, if it is not already on.
    NOTE: 

    The product must be on to release the cartridges.

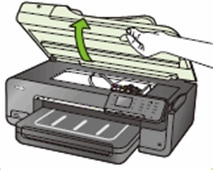
  2. Open the cartridge access door. The carriage moves to the middle of the product.

    Figure : Open the cartridge access door

    Illustration of opening the cartridge access door
       CAUTION: 

    Wait until the carriage is idle and silent before you continue.

  3. Press in the tab on the front of the cartridge to release it, and then pull it up and out to remove it from its slot.

    Figure : Remove the cartridge from its slot

    Illustration of removing the cartridge
       CAUTION: 

    Do not lift the gray latch handle on the carriage. Doing so can result in incorrectly seated cartridges and printing problems. The latch must remain down to install the cartridges correctly.

  4. Repeat these steps to remove each cartridge.

  5. Check for obstructions under and around the carriage. Remove any obstructions you find.

Reinstall the cartridges

Follow these steps to reinstall the cartridges. Repeat the steps for each cartridge.

  1. Hold the cartridge by its sides, with the contacts facing towards the carriage.

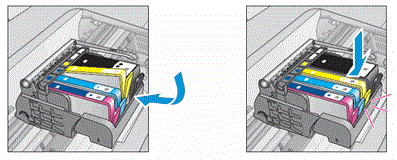
  2. Slide the cartridge into the empty slot, and then press down on the cartridge until it snaps firmly into place.

    Figure : Install the cartridge

    Illustration of installing the cartridge
  3. Repeat these steps to reinstall each cartridge.

  4. Close the cartridge access door.

    Figure : Close the cartridge access door

    Illustration of closing the cartridge access door
  5. If the product is not already turned on, press the Power button () to turn it on the product.

If the issue persists, please perform the remaining steps from this document: https://support.hp.com/in-en/product/hp-officejet-7500a-wide-format-e-all-in-one-printer-series-e910...


Let me know if this helps.


If the information I've provided was helpful, give us some reinforcement by clicking the Accepted Solution button, that'll help us and others see that we've got the answers!


Thanks!

Have a great day!


I am an HP Employee

† The opinions expressed above are the personal opinions of the authors, not of HP. By using this site, you accept the <a href="https://www8.hp.com/us/en/terms-of-use.html" class="udrlinesmall">Terms of Use</a> and <a href="/t5/custom/page/page-id/hp.rulespage" class="udrlinesmall"> Rules of Participation</a>.