• ×
    Information
    Windows update impacting certain printer icons and names. Microsoft is working on a solution.
    Click here to learn more
    Information
    Need Windows 11 help?
    Check documents on compatibility, FAQs, upgrade information and available fixes.
    Windows 11 Support Center.
  • post a message
  • ×
    Information
    Windows update impacting certain printer icons and names. Microsoft is working on a solution.
    Click here to learn more
    Information
    Need Windows 11 help?
    Check documents on compatibility, FAQs, upgrade information and available fixes.
    Windows 11 Support Center.
  • post a message
Guidelines
Experiencing 'Printer Blocked' or 'Printer Error' message? Click here for more information.
Check some of the most frequent questions about Instant Ink: HP INSTANT INK, HP+ PLANS: INK AND TONER.


Check out our Black or Color Ink Not Printing, Other Print Quality Issues info about: Print quality and Cartridge Issues.
HP Recommended
HP office jet Pro6968
macOS 10.12 Sierra

I bought the HP OfficeJet Pro 6968 about a month ago. I have not printed too much, but while printing tonite, a printer error occured that said:  Printhead Problem:  There is a problem with the printhead Oxc19a0015

I can not get informaiton on it because the printer does not say what it is. What does this mean and how do I fix or clear it?


Thank you.


2 REPLIES 2
HP Recommended

@maria951

Thank you for joining HP Forums.

It's a pleasure assisting you in finding answers to your technical queries.


To provide you with an accurate solution, I'll need a few more details:

Are you using the same cartridge which came with the printer?

How is the ink level in the cartridges?


Let's Reset the printer


In some cases, a printer reset can clear the error message.

  1. Turn the printer on, if it is not already on.

  2. Wait until the printer is idle and silent before you continue.

  3. With the printer turned on, disconnect the power cord from the rear of the printer.

  4. Unplug the power cord from the wall outlet.

  5. Wait at least 60 seconds.

  6. Plug the power cord back into the wall outlet.

    NOTE: 

    HP recommends connecting the printer power cord directly to the wall outlet.

  7. Reconnect the power cord to the rear of the printer.

  8. Turn on the printer, if it does not automatically turn on.

  9. Wait until the printer is idle and silent before you proceed.

 Clean the ink cartridge vents and contacts

Ink buildup or debris on the ink cartridge contacts and vents might cause an ink cartridge error.

  1. Gather the following materials:

    • A pin to clean any clogged vents

    • A clean, lint-free cloth

    • A clean, dry cotton swab

    • Distilled or bottled water

         CAUTION: 

      Do not use tap water because it might contain contaminants that can damage the printhead.

  2. Turn on the printer.

  3. Open the ink cartridge access door.

  4. To remove the ink cartridge, press the tab on the front of the ink cartridge to release it, and then remove it.

    Figure : Example of removing an ink cartridge from the printhead

    Example of removing an ink cartridge from the printhead
  5. Place the ink cartridges on a clean piece of paper with the ink opening pointing up.

       CAUTION: 

    Do not leave the ink cartridges outside the printer longer than 30 minutes. Doing so can result in damage to both the printer and the ink cartridges.

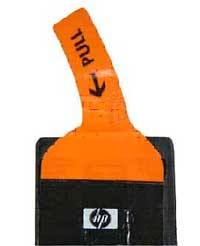
  6. If an orange tab is attached to any ink cartridge, remove it.

    Figure : Example of the orange tab

    Example of the orange tab
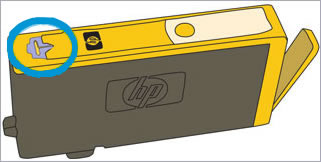
  7. Examine the vent area located on top of the ink cartridge, next to the HP logo.

    Figure : Example of the vent area

    Example of the vent area
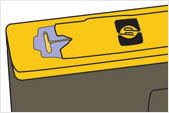
  8. If any of the ink cartridges have clogged vents, use a pin to clean the vents.

    Figure : Example of a clogged vent

    Example of a clogged vent

    Figure : Example of a clean vent

    Example of a clean vent
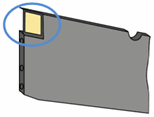
  9. Use a fresh, lightly dampened, lint-free cloth to wipe any accumulated ink and debris on the copper-colored contact on the ink cartridge.

    Figure : Example of the copper-colored contact on the ink cartridge

    Example of the copper-colored contact on the ink cartridge
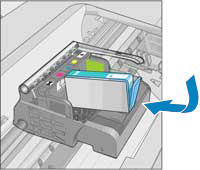
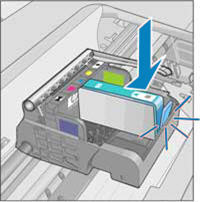
  10. Carefully reinsert one of the ink cartridges into its slot, and then push the ink cartridge down and forward until it snaps into place.

    Make sure each colored dot on the ink cartridge label matches the colored dot on the carriage.

    Figure : Reinserting the ink cartridge into the correct slot

    Example of sliding the ink cartridge into the correct slot

    Figure : Example of snapping the ink cartridge into place

     Example of snapping the ink cartridge into place
  11. Run your finger along the top of the ink cartridges to make sure none of them protrude.

    If any ink cartridges protrude, press down firmly until each ink cartridge snaps into place.

  12. Close the ink cartridge access door.

  13. Check the printer control panel display for the error message.

Manually clean the printhead

If the printhead cleaning tool did not resolve the problem, the printhead might be installed incorrectly, or there might be ink or debris on the printhead electrical contacts.

   CAUTION: 

Clean the printhead contacts only after running the printhead cleaning utility from your computer. Printhead contacts contain sensitive electronic components that can be damaged easily.

  1. Gather the following materials:

    • A clean, lint-free cloth

    • A clean, dry cotton swab

    • Distilled or bottled water

         CAUTION: 

      Do not use tap water because it might contain contaminants that can damage the printhead.

  2. Open the ink cartridge access door.

  3. To remove the ink cartridge, press the tab on the front of the ink cartridge to release it, and then remove it.

    Figure : Example of removing an ink cartridge from the printhead

    Example of removing an ink cartridge from the printhead
  4. Place the ink cartridges on a clean piece of paper with the ink opening pointing up.

       CAUTION: 

    Do not leave the ink cartridges outside the printer longer than 30 minutes. Doing so can result in damage to both the printer and the ink cartridges.

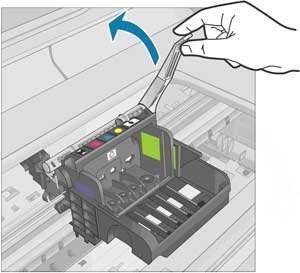
  5. Lift the latch handle on the ink carriage until it stops.

    Figure : Lifting the ink carriage latch handle

    Lifting the ink carriage latch handle
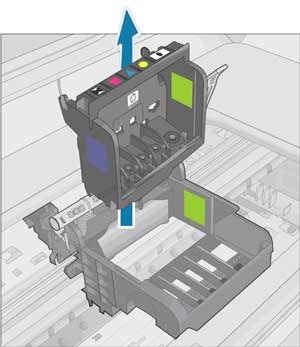
  6. Lift up to remove the printhead from the ink carriage.

    Figure : Removing the printhead

    Removing the printhead
  7. Review the three areas of the printhead that need to be cleaned.

    Figure : Example of the three areas to clean on the printhead

    1. Plastic ramp on the side of the ink nozzles

    2. Edge between nozzles and contacts

    3. Electrical contacts

       CAUTION: 

    Do not touch the nozzles or the electrical contacts with your fingers. Touch the electrical contact areas only with the cleaning materials.

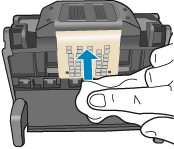
  8. Use a fresh, lightly dampened, lint-free cloth to wipe the electrical contact area from the bottom to the top until no new ink shows on the cloth.

    Use as many fresh, lightly dampened, lint-free cloths as necessary.

    Figure : Cleaning the electrical contacts

    Cleaning the electrical contacts
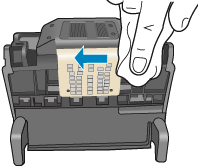
  9. Use a fresh, lightly dampened, lint-free cloth to wipe any accumulated ink and debris from the edge between the nozzles and the contacts.

    Figure : Cleaning the edge of the printhead

    Cleaning the edge of the printhead
  10. Use a fresh, lightly dampened, lint-free cloth to wipe the plastic ramps on both sides, away from the nozzles.

    Figure : Cleaning the printhead ramps

    Cleaning the printhead ramps
  11. Wipe the previously cleaned areas dry with a dry, lint-free cloth.

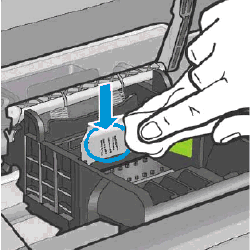
  12. Use a fresh, lightly dampened, lint-free cloth to wipe the electrical contact area inside the printer from bottom to the top until no new ink shows on the cloth.

    Use as many fresh, lightly dampened, lint-free cloths as necessary.

    Figure : Cleaning the electrical contacts inside the printer

    Cleaning the electral contacts inside the printer
  13. Wipe the electrical contact area dry with a dry, lint-free cloth.

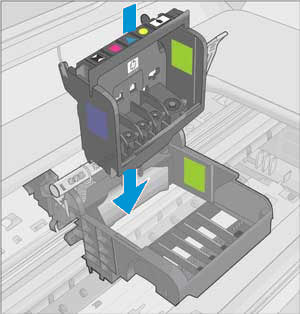
  14. Make sure the ink carriage latch handle is up, then reinstall the printhead.

    Figure : Reinstalling the printhead

     Reinstalling the printhead
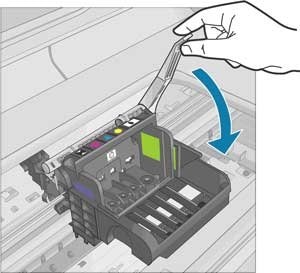
  15. Carefully lower the ink carriage latch handle.

    Figure : Lowering the ink carriage latch handle

    Lowering the ink carriage latch handle
  16. Reinsert the ink cartridge into the matching letter and colored dot slot, then push the ink cartridge down and forward until it snaps into place.

    Figure : Example of sliding the ink cartridge into the correct slot

    Example of sliding the ink cartridge into the correct slot

    Figure : Example of snapping the ink cartridge into place

     Example of snapping the ink cartridge into place
  17. Run your finger along the top of the ink cartridges to make sure none of them protrude.

    If any ink cartridges protrude, then press down firmly until each ink cartridge snaps into place.

  18. Close the ink cartridge access door.

  19. Check the printer control panel display for the error message.

Try to print.


Keep me posted, how it goes!

If the information I've provided was helpful, give us some reinforcement by clicking the Accepted Solution and Kudos buttons, that'll help us and others see that we've got the answers!

Have a great day!

Cheers:)

Raj1788
I am an HP Employee 

HP Recommended

The reboot solved my issue.  Thanks!

† The opinions expressed above are the personal opinions of the authors, not of HP. By using this site, you accept the <a href="https://www8.hp.com/us/en/terms-of-use.html" class="udrlinesmall">Terms of Use</a> and <a href="/t5/custom/page/page-id/hp.rulespage" class="udrlinesmall"> Rules of Participation</a>.