-
×InformationWindows update impacting certain printer icons and names. Microsoft is working on a solution.
Click here to learn moreInformationNeed Windows 11 help?Check documents on compatibility, FAQs, upgrade information and available fixes.
Windows 11 Support Center. -
-
×InformationWindows update impacting certain printer icons and names. Microsoft is working on a solution.
Click here to learn moreInformationNeed Windows 11 help?Check documents on compatibility, FAQs, upgrade information and available fixes.
Windows 11 Support Center. -
- HP Community
- Printers
- Printing Errors or Lights & Stuck Print Jobs
- Printing Photo 5X7

Create an account on the HP Community to personalize your profile and ask a question
Your account also allows you to connect with HP support faster, access a personal dashboard to manage all of your devices in one place, view warranty information, case status and more.
Check some of the most frequent questions about Instant Ink: HP INSTANT INK, HP+ PLANS: INK AND TONER.
Check out our Black or Color Ink Not Printing, Other Print Quality Issues info about: Print quality and Cartridge Issues.

It has been a while since anyone has replied. Simply ask a new question if you would like to start the discussion again.
07-11-2020 12:46 PM
 HP Recommended
Product: HP 9020
Operating System: Other
I cannot print a photo on 5X7 glossy paper from my MacBook Pro (os 13.1.1) to my HP 9020 without cutting off the top of the photo. I have tried borderless and bordered, portrait and landscape. Same photo prints properly in 8.5X11.
Solved! Go to Solution.
1 ACCEPTED SOLUTION
Accepted Solutions
07-16-2020 02:08 AM
HP Recommended
I am glad we are making progress,Have you tried to change the layout and check ?
Here is a print driver settings guide - Print Settings Guide (Mac)
Keep me posted!
12 REPLIES 12
07-14-2020 05:34 AM
HP Recommended
Hi @jaymac40
Welcome to the HP Support Community.
Try the steps below -
Load photo paper into the main input tray
Load photo paper into the main paper tray. How you load the paper depends on where the tray is and what type of printer you have.
NOTE:If your printer has a separate photo paper tray and you want to use it, consult your user guide on how to print from the tray.
-
Remove any plain paper from the main paper tray.
-
Load the short edge of the photo paper into the tray based on your printer type. If the paper has a perforated tab for handling the photo after it prints, load the paper so the tab faces up or towards you to prevent printing on it.
-
Inkjet printers with a front load tray: Glossy or print side facing down
-
Adjust the paper width guides so they rest against the edges of the paper.
Print the photo
Open the print dialog to select and change available settings when printing photos.
NOTE:Print settings and menu names vary by printer and the application you are printing from.
-
Before printing, edit the photo to improve colors, brightness, contrast and any other appearance settings.
-
Open the photo, click File, and then click Print. For the Photos app, select a layout, and then click Print.
The print settings window opens.
-
If you do not see the following options in the window, click Show Details.

-
Select your printer from the Printer menu.
-
Some printers offer predefined Presets for photo printing. From the Presets menu, select an option that applies to your print job or paper type.
-
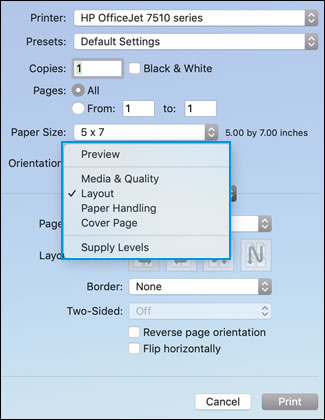
From the Paper Size menu, select the paper you are printing on. If necessary, click the arrow at the top or bottom of the pop-up menu to display more sizes.
Some paper sizes have multiple options. Make sure to select the correct borderless paper size, such as 4x6 in/10x15 cm Borderless, if you want to print a borderless photo.
-
Select the Orientation of the photo (portrait for vertical or landscape for horizontal).
-
Click the unnamed print options menu at the center of the dialog to access more print settings.
-
Make any print job settings changes. Refer to the following list for more information.
-
Paper type: Selecting the correct paper type ensures the printer properly applies the ink to the paper you loaded in the printer. Click Media & Quality, and then click the Paper Type menu.
-
Paper tray: Select the tray you loaded the photo paper into, if your printer has more than one tray. Click Media & Quality, and then select an option from the Feed from menu.
-
Print in color or black and white: Select or de-select Black & White on the main dialog. The Presets menu also includes color and black and white options.
-
Adjust print quality: Click Media & Quality, and then move the Quality slider to the desired setting.
-
Add or remove a border: Click Layout, and then click the Border menu to select a border width or select None for borderless prints.
-
Mirror printing: Reverse an image or document for printing iron-on transfers. Click Layout, and then select the Flip horizontally option.
-
-
Click Print.
Hope this helps! Keep me posted.
Please click “Accept as Solution” if you feel my post solved your issue, it will help others find the solution.
Click the “Kudos, Thumbs Up" on the bottom right to say “Thanks” for helping
07-14-2020 08:59 AM
HP Recommended
Thanks for the advice, but I had already read those instructions and followed them. It still cuts off the top of the pic on 5X7. My printer has an alternative tray for photo paper, and the main tray will not accept the 5X7 glossy stock. So, by necessity, I am using the alternative.
07-14-2020 11:21 AM
HP Recommended
What is the type of photo paper are you using?
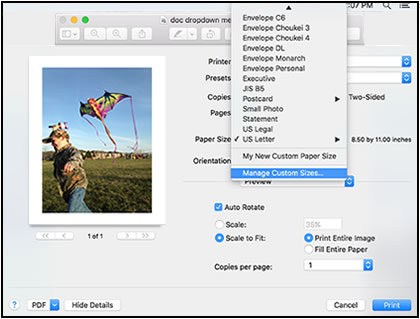
Create a custom paper size using the Print option on the File menu of your application, and then select the new custom size for the print job.
-
Load the custom-size paper into the paper input tray.
-
Open the item you want to print.
-
Click File, and then select Print.
-
In Paper Size, select Manage Custom Sizes.
The Custom Paper Sizes window displays.
-
In the Custom Paper Sizes window, click the plus sign
 to create a new paper size, double-click the default untitled name, and then type a new name for the custom paper size.
NOTE:
Use a different, unique name for the new custom paper size. Do not use an existing paper size name for any new custom paper size names because it overrides the existing preset. For example, if a custom paper size is named A4, then the existing A4 paper size is no longer available as a choice.

-
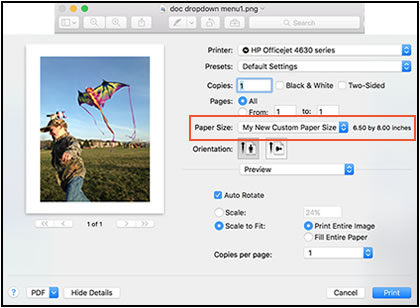
In the Paper Size section, type the dimensions of the custom paper in the Width and Height text boxes, and then set the margins, if desired.
-
Paper Size
-
Margins
-
-
Click OK.
-
In the print preview window, select the new custom paper size.
-
Change print settings, if desired, and then click OK or Print to print the document.
Let me know how this goes!
07-15-2020 08:41 AM
HP Recommended
I tried the custom option on the alternate tray; same result. I cannot try it on the main tray because the printer returns a paper error whenever I put the 5X7 stock in it, even though I close the side stops to the 5" sides and instruct it to use the custom setting.
07-15-2020 11:18 AM
HP Recommended
Add the AirPrint printer to the Mac printer queue
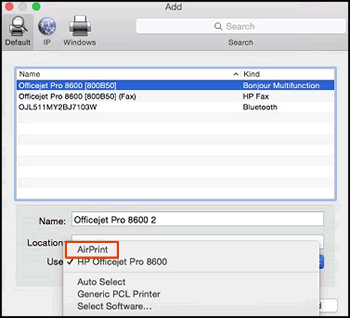
Confirm you are using AirPrint by adding the printer in System Preferences.
-
Click the Apple menu, click System Preferences, and then click Print & Scan or Printers & Scanners.
Figure : Example of the Printers & Scanners window

-
Check if your printer name displays in the Printers list, and then do one of the following steps.
-
If your printer is listed, remove and re-add the printer to confirm it is set up for AirPrint. Click the printer name, click the minus sign
 to delete the printer, click the plus sign , click Add Printer or Scanner, click the printer name and then continue to the next step.
 -
If your printer is not listed, click the plus sign, click Add Printer or Scanner, click the name of your printer, and then continue to the next step.
-
If your printer is not listed in the Add Printer or Scanner window, go to the Frequently asked questions in this document to resolve connection issues, try to add the printer again, and then continue to the next step.
-
-
Confirm AirPrint or Secure AirPrint displays in the Use or Print Using menu, and then click Add.
Figure : AirPrint displays in the Use menu
-
Open a document or photo, click File, and then click Print.
Tray 1 only supports, A4 and legal size paper.
Tray 2 support photo paper and cards
Please make sure to insert photo paper in tray 2 and select tray 2 in the print settings before printing.
Let me know how this goes!
07-15-2020 02:51 PM
HP Recommended
Okay, this helped. Now it just cuts off a little of the top of the photo. In other words the picture is not centered vertically on the paper. But once it is in a frame, it looks right. I can live with this for what I was doing, but it really should be centered.
07-16-2020 02:08 AM
HP Recommended
I am glad we are making progress,Have you tried to change the layout and check ?
Here is a print driver settings guide - Print Settings Guide (Mac)
Keep me posted!
Be alert for scammers posting fake support phone numbers and/or email addresses on the community.
If you think you have received a fake HP Support message, please report it to us by clicking on "Flag Post".
† The opinions expressed above are the personal opinions of the authors, not of HP. By using this site, you accept the Terms of Use and Rules of Participation.


Didn't find what you were looking for? Ask the community
† The opinions expressed above are the personal opinions of the authors, not of HP. By using this site, you accept the <a href="https://www8.hp.com/us/en/terms-of-use.html" class="udrlinesmall">Terms of Use</a> and <a href="/t5/custom/page/page-id/hp.rulespage" class="udrlinesmall"> Rules of Participation</a>.