• ×
    Information
    Windows update impacting certain printer icons and names. Microsoft is working on a solution.
    Click here to learn more
    Information
    Need Windows 11 help?
    Check documents on compatibility, FAQs, upgrade information and available fixes.
    Windows 11 Support Center.
  • post a message
  • ×
    Information
    Windows update impacting certain printer icons and names. Microsoft is working on a solution.
    Click here to learn more
    Information
    Need Windows 11 help?
    Check documents on compatibility, FAQs, upgrade information and available fixes.
    Windows 11 Support Center.
  • post a message
Guidelines
Experiencing 'Printer Blocked' or 'Printer Error' message? Click here for more information.
Check some of the most frequent questions about Instant Ink: HP INSTANT INK, HP+ PLANS: INK AND TONER.


Check out our Black or Color Ink Not Printing, Other Print Quality Issues info about: Print quality and Cartridge Issues.
HP Recommended

Hello, I am still having trouble with my printer recognizing the #61 color cartridge. 

I did all the steps that said to do but it still did not help. I have bought two cartridge packs, one coming from a tri pack and one not. but both are the #61XL packages. I need my printer and if I have to go out and but another one it want be a HP. I like my printer can you help. For what it cost for ink I should not have to go through this every time I replace a cartridge.  So can you help, and can you send me cartridge replacements if you think that is the problem. 


Thank You 

lonesmj1

3 REPLIES 3
HP Recommended

@Lonesmj1


Welcome to HP support community.


Provide the printer model number or the product number for further assistance.

Cheers.

Sandytechy20
I am an HP Employee

HP Recommended

Serial no. [edited]

Model no. 4632

PFU no. B4L03-64001


Thank you. 

HP Recommended

@Lonesmj1


Welcome to HP support community.


Clean the electrical contacts

  1. Gather the following materials.

    • Dry foam-rubber swabs, lint-free cloth, or any soft material that does not come apart or leave fibers (coffee filters work well)

    • Distilled, filtered, or bottled water (tap water might contain contaminants that can damage the ink cartridges)

         CAUTION: 

      Do not use platen cleaners or alcohol to clean the ink cartridge contacts. These can damage the ink cartridge or the printer.

  2. Press the Power button to turn on the printer, if it is not already on.

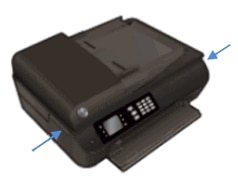
  3. Locate the slots on the left and right sides of the printer.

    Image: Locate the slots on the sides of the printer.

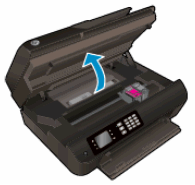
  4. Slide your fingers into the two slots, and then gently lift up to open the ink cartridge access door. The carriage moves to the ink cartridge access area. Wait until the carriage is idle and silent before you continue.

    Image: Open the ink cartridge access door.

  5. Disconnect the power cord from the rear of the printer.

       WARNING: 

    You must disconnect the power cord before reaching inside the printer to avoid the risk of injuries or electric shock.

  6. Disconnect the USB cable, if the printer is connected to your computer with a USB connection.

  7. To release the ink cartridge, lift the lid on the ink cartridge slot, and then gently push the lid back until it stops.

  8. Pull up on the ink cartridge to remove it from the slot.

    1.  

      Image: Remove the ink cartridge.

      Lift the lid
    2. Gently push the lid back

    3. Pull up on the ink cartridge

       CAUTION: 

    Do not remove both ink cartridges at the same time. Remove and clean each ink cartridge separately. Do not leave an ink cartridge outside the printer for more than 30 minutes.

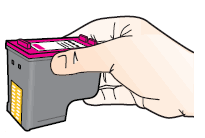
  9. Hold the ink cartridge by its sides.

    Image: Hold the ink cartridge by its sides.

  10. Inspect the ink cartridge contacts for ink and debris buildup.

       CAUTION: 

    Do not touch the copper-colored contacts or the ink nozzles. Touching these parts can result in clogs, ink failure, and bad electrical connections.

    Image: Do not touch the contacts or nozzles.

  11. Lightly moisten a foam-rubber swab or lint-free cloth with distilled water, and then squeeze any excess water from it.

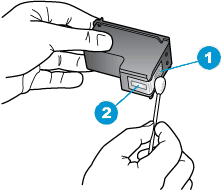
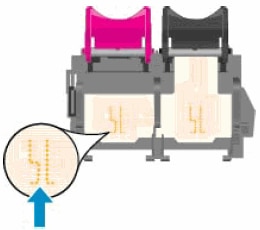
  12. Clean only the copper-colored contacts on the ink cartridge, and then allow the ink cartridge to dry for about 10 minutes.

    1.  

      Image: Clean the contacts.

      Copper-colored contacts
    2. Ink nozzles (do not clean)

  13. Lightly moisten another foam-rubber swab or lint-free cloth with distilled water, and then squeeze any excess water from it.

  14. Use the swab or cloth to clean the electrical contacts in the carriage, located inside the printer in the ink cartridge slots.

    Image: The electrical contacts in the ink cartridge slots.

  15. Allow the carriage contacts to dry for about 10 minutes.

  16. Hold the ink cartridge at a slight upward angle with the ink cartridge contacts facing the rear of the printer, slide the ink cartridge into the empty slot, and then close the lid on the ink cartridge slot to secure the ink cartridge in place.

    NOTE: 

    Insert the color ink cartridge in the slot on the left. Insert the black ink cartridge in the slot on the right.

    1. Insert the ink cartridge

    2. Close the lid

    3. The color ink cartridge is on the left, and the black ink cartridge is on the right*

  17. Repeat the previous steps to install the other ink cartridge, if necessary.

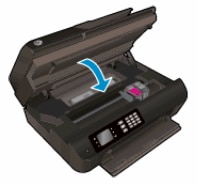
  18. Close the ink cartridge access door.

    Image: Close the ink cartridge access door.

  19. Reconnect the power cord to the rear of the printer.

  20. Reconnect the USB cable, if the printer is connected to your computer with a USB connection.

  21. Press the Power button to turn on the printer.

You can refer this HP document for more assistance:- Click here


Let me know how it goes.

To thank me for my efforts to help you, please mark my post as an accepted solution so that it benefits several others.

Cheers.

Sandytechy20
I am an HP Employee

† The opinions expressed above are the personal opinions of the authors, not of HP. By using this site, you accept the <a href="https://www8.hp.com/us/en/terms-of-use.html" class="udrlinesmall">Terms of Use</a> and <a href="/t5/custom/page/page-id/hp.rulespage" class="udrlinesmall"> Rules of Participation</a>.