-
×InformationWindows update impacting certain printer icons and names. Microsoft is working on a solution.
Click here to learn moreInformationNeed Windows 11 help?Check documents on compatibility, FAQs, upgrade information and available fixes.
Windows 11 Support Center. -
-
×InformationWindows update impacting certain printer icons and names. Microsoft is working on a solution.
Click here to learn moreInformationNeed Windows 11 help?Check documents on compatibility, FAQs, upgrade information and available fixes.
Windows 11 Support Center. -
- HP Community
- Printers
- Printing Errors or Lights & Stuck Print Jobs
- Repeated false paper jam errors on Officejet Pro 8620

Create an account on the HP Community to personalize your profile and ask a question
Your account also allows you to connect with HP support faster, access a personal dashboard to manage all of your devices in one place, view warranty information, case status and more.
Check some of the most frequent questions about Instant Ink: HP INSTANT INK, HP+ PLANS: INK AND TONER.
Check out our Black or Color Ink Not Printing, Other Print Quality Issues info about: Print quality and Cartridge Issues.

It has been a while since anyone has replied. Simply ask a new question if you would like to start the discussion again.
01-15-2018 12:35 PM
 HP Recommended
Product: HP Officejet Pro 8620 e-All-in-One Printer series
Operating System: Microsoft Windows 10 (64-bit)
Paperjam error message every morning after sitting overnight. Requires turning power button OFF and then On and then Printhead appears to be missing or incorrectly installed appears. Requires another ON/OF and then print head re-alignment.
Then ready to print the rest of the day until after midnight and then error messages repeat. Going on for 2 months.
8 REPLIES 8
01-16-2018 10:46 AM - edited 01-16-2018 10:47 AM
HP Recommended
Hi @juliusf
Welcome to HP Support Forums. A really great platform for posting all your questions and finding solutions.
I understand that you keep getting Paper Jam error.
I could help.
I suggest you do a Printer Reset.
(1) Turn the printer on, if it is not already on.
(2) Wait until the printer is idle and silent before you continue.
(3) With the printer turned on, disconnect the power cord from the rear of the printer.
(4) Unplug the power cord from the wall outlet.
(5) Wait at least 60 seconds.
(6) Plug the power cord back into the wall outlet.
NOTE: HP recommends connecting the printer power cord directly to the wall outlet.
(7) Reconnect the power cord to the rear of the printer.
(8) Turn on the printer, if it does not automatically turn on.
The printer might go through a warm-up period. The printer lights might flash, and the carriage might move.
Wait until the warm-up period finishes and your printer is idle and silent before you proceed.
Then follow these steps clean the rollers from inside the cartridge access area.
Gather the following materials:
A clean, lint-free cloth, or any cloth that will not come apart or leave fibers
Distilled, filtered, or bottled water (tap water might damage the printer)
Clean, lint-free cotton swabs
Press the Power button to turn off the printer.
Disconnect the power cord from the rear of the printer, and then unplug the power cord from the power source or electrical outlet.
WARNING:You must disconnect the power cord before reaching inside the printer to avoid risk of injuries or electric shock.
Disconnect the USB or Ethernet cable from the rear of the printer, if you have a cable connection to the printer.
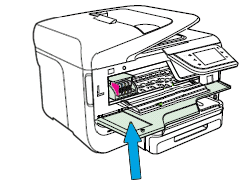
Place your fingers into the slot on the left side of the printer, and then pull forward to open the cartridge access door.
Lightly dampen the swab with the water, and then squeeze any excess liquid from the swab.
Press the swab against the rollers inside the printer, and then rotate the rollers upwards with your fingers. Apply a moderate amount of pressure to remove any dust or dirt buildup.
Figure : Clean the rollers in the cartridge access area
Allow the rollers to dry completely (approximately 10 minutes).
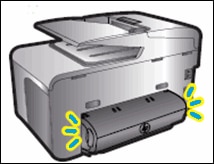
Close the cartridge access door.
Figure : Close the cartridge access door
Step 2: Clean the rollers in the ADF
Clean the paper feed rollers in the ADF.
Lift the top cover of the ADF. This provides easy access to the rollers and separator pad.
Figure : Lift the ADF cover
ADF cover
Rollers
Separator pad
Lightly dampen a clean, lint-free cloth with bottled or distilled water, and then squeeze any excess liquid from the cloth.
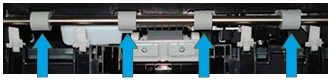
Press the cloth against the rollers, and then rotate them upward with your fingers. Apply a moderate amount of pressure to remove any dust or dirt buildup.
Figure : Clean the rollers and separator pad
Rollers
Separator pad
Allow the rollers to dry completely (approximately 10 minutes).
Close the ADF cover tightly at both ends.
Figure : Close the ADF cover tightly at both ends

Step 3: Clean the rollers from inside the rear of the printer
Follow these steps to clean the rollers from inside the rear of the printer.
Turn the printer so that the rear of the printer faces you.
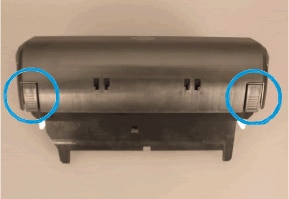
Remove the duplexer. Push in the buttons on both sides of the duplexer, pull out the duplexer, and then set it aside.
Figure : Remove the duplexer
Push in the duplexer buttons
Pull out the duplexer
Lightly dampen a clean, lint-free cloth with bottled or distilled water, and then squeeze any excess liquid from the cloth.
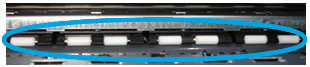
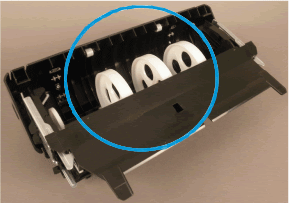
Press the cloth against the rollers, and then rotate them upward with your fingers. Apply a moderate amount of pressure to remove any dust or dirt buildup.
Figure : Clean the rollers in the rear of the printer
Allow the rollers to dry completely (approximately 10 minutes).
Step 4: Clean the rollers in the duplexer
Follow these steps to clean the rollers in the duplexer.
Lightly dampen a clean, lint-free cloth with bottled or distilled water, and then squeeze any excess liquid from the cloth.
Press the cloth against the external rollers, and then rotate them upward with your fingers. Apply a moderate amount of pressure to remove any dust or dirt buildup.
Figure : The duplexer external rollers

Press the tabs on the sides of the duplexer, and then lower the cover to open the duplexer.
Figure : Press the tabs to open the duplexer
Lightly dampen a clean, lint-free cloth with bottled or distilled water, and then squeeze any excess liquid from the cloth.
Press the cloth against the rollers, and then rotate them upward with your fingers. Apply a moderate amount of pressure to remove any dust or dirt buildup.
Figure : Clean the rollers in the duplexer
Allow the rollers to dry completely (approximately 10 minutes).
Close the duplexer cover.
Gently push the duplexer into the printer until it snaps firmly into place. Do not press the buttons on the end of the duplexer while you reattach it.
Figure : Push the duplexer into place
Reconnect the power cord to the rear of the printer, and then plug in the power cord to the electrical outlet.
Reconnect the USB or Ethernet cable, unless your printer is connected on a wireless network.
Press the Power button to turn on the printer.
The printer might go through a warm-up period. The printer lights might flash, and the carriage might move.
Wait until the warm-up period finishes before you proceed.
You can refer to this Link
Let me know how it goes.
Thank you. 🙂
If the information I've provided was helpful, give us some reinforcement by clicking the "Solution Accepted" and "Kudos" Buttons.
KrazyToad
I Am An HP Employee
01-18-2018 05:52 AM
HP Recommended
The reset/cleaning suggestion was absolutely no help. In fact repeated it at least 3 different times.
Trying now to turn printer off at midnight and back on at 6:00 in the morning. It has worked successfully twice in a row.
01-19-2018 05:11 PM
HP Recommended
Hi @juliusf,
It looks like you were interacting with @KrazyToad, but he is out for the day & I'll be glad to help you out,
I'm the Jeet_Singh & I'm at your service.
I'm glad to hear you found the solution you were looking for, However, I would suggest here is to keep the printer under observation and check how it performs.
If you need any assistance, please don't hesitate to reach out to us again.
You've been great to work with and it has been a genuine pleasure interacting with you.
I hope both you and your product works great and remain healthy for a long time 😉
To simply say thanks for my efforts to assist you, please click the "Thumbs Up" button to give me a Kudos.
And mark my post as Accepted Solution to help others find a similar solution as you have.
Take care now and do have a fabulous week ahead. 🙂
Regards,
Jeet_Singh
I am an HP Employee
01-19-2018 05:49 PM
HP Recommended
I do not consider my "solution" an acceptable solution! This HP 8620 printer did require that it be turned OFF and back ON before using it EVERY morning. On top of that I then have to deal with the error message that the cartridge is missing or not installed properly which requires the machine to be turned OFF and back ON again. So yes, I can make my HP 8620 function for the day but just ask your company's president if HE considers this an acceptable customer solution! Tell me what he says.
01-19-2018 06:58 PM
HP Recommended
Hi @juliusf,
As I understand you are having to turn off and turn on the printer everyday for it to work, this definitely is a concern, don't worry as I have a few other steps which should help you resolve this issue.
Let's try to update the printer firmware, If your printer connected wirelessly, make sure to temporary connect the device with USB and then follow the link to install the latest firmware update, http://ftp.hp.com/pub/softlib/software13/printers/oj8620/OJP8620_R1733A.exe
Once done, restart the Printer and then check if the issue persists,
Next thing, I would recommend assigning a static IP address for the printer and also to disable the IPv6 on the printer.
Here are the steps listed below for you to do the same (the menu option might change according to the printer EWS and firmware version):
Restart the printer and obtain the printer IP address.
Type the IP address on your web browser to obtain the printer EWS page on your computer.
Go to "Network" tab - General - Select "Network protocols" - Select "Enable IPv4 only" (or similar) - Apply the settings.
Go to the “Network” tab – Click on “Wireless (802.11) – Then click on “Network address (IPv4)
Click on the radio button which says “Manual IP” and then click “Suggest a manual IP address” to give a manual IP address to your printer.
Click on radio button which says “Manual DNS Server” and under manual preferred type 8.8.8.8 and under manual alternate type 8.8.4.4 (This is Google DNS server address)
Restart the printer and router once done.
Please let me know if this resolves the issue, or if you require further assistance!
Eagerly waiting for your response!
I hope you have a good day ahead,
And Feel free to ask your queries as this forum has some of the best people in the world available and ready to help.
Regards,
Jeet_Singh
I am an HP Employee
10-16-2018
07:44 PM
- last edited on
10-16-2018
07:48 PM
by
![]() rick-s
rick-s
HP Recommended
[edit] Every day I have a paper jam. I unplugged it for 60 seconds and it’s gone. Does that make any sense. You know what my solution was before this, no lie. I would hold the printer 2 feet in the air and drop it on my table just once....I guess that did a reset too. That’s how fed up I was. NEVER AGAIN, will I buy an HP printer.
Be alert for scammers posting fake support phone numbers and/or email addresses on the community.
If you think you have received a fake HP Support message, please report it to us by clicking on "Flag Post".
† The opinions expressed above are the personal opinions of the authors, not of HP. By using this site, you accept the Terms of Use and Rules of Participation.


Didn't find what you were looking for? Ask the community
† The opinions expressed above are the personal opinions of the authors, not of HP. By using this site, you accept the <a href="https://www8.hp.com/us/en/terms-of-use.html" class="udrlinesmall">Terms of Use</a> and <a href="/t5/custom/page/page-id/hp.rulespage" class="udrlinesmall"> Rules of Participation</a>.