• ×
    Information
    Windows update impacting certain printer icons and names. Microsoft is working on a solution.
    Click here to learn more
    Information
    Need Windows 11 help?
    Check documents on compatibility, FAQs, upgrade information and available fixes.
    Windows 11 Support Center.
  • post a message
  • ×
    Information
    Windows update impacting certain printer icons and names. Microsoft is working on a solution.
    Click here to learn more
    Information
    Need Windows 11 help?
    Check documents on compatibility, FAQs, upgrade information and available fixes.
    Windows 11 Support Center.
  • post a message
Guidelines
Experiencing 'Printer Blocked' or 'Printer Error' message? Click here for more information.
Check some of the most frequent questions about Instant Ink: HP INSTANT INK, HP+ PLANS: INK AND TONER.


Check out our Black or Color Ink Not Printing, Other Print Quality Issues info about: Print quality and Cartridge Issues.
HP Recommended
HP Deskjet 3520
Microsoft Windows 7 (64-bit)

Just replaced all ink cartridges in printer and already showing low ink level without even printing anything.   Help?

3 REPLIES 3
HP Recommended

@MelissaKM20


The printer might be giving wrong readings


I suggest we do a printer reset and update the firmware and check if the issue persists


- Turn on the printer.
- Wait until the printer is idle and silent before you continue.
- Disconnect the USB cable from the rear of the printer. If your printer has a network or wireless connection, leave it connected.
- Remove the ink cartridges from the printer and clean the electrical contacts with lint free cloth
- With the printer turned on, disconnect the power cord from the rear of the printer and from the wall outlet or power strip.
- Wait at least 60 seconds.
- Plug the power cord back into the wall outlet.
NOTE: HP recommends connecting the printer power cord directly to a wall outlet.
- Reconnect the power cord to the rear of the printer.
- Turn on the printer, if it does not automatically turn on.
- The printer might go through a warm-up period. The printer lights might flash, and the carriage might move.
- Wait until the warm-up period finishes and your printer is idle and silent before you proceed.
- Reinsert the ink cartridges, and then close the ink cartridge access door.


Next update the printer firmware. You can refer to this Link: https://support.hp.com/in-en/document/c02919168


Let me know if the issue persists


Thank you 😊


If the information I've provided was helpful, give us some reinforcement by clicking the "Solution Accepted" on this Post and it will also help other community members with similar issue.
 

KrazyToad
I Am An HP Employee

HP Recommended

Still not working.

HP Recommended

@MelissaKM20


Clean the cartridge contacts

  1. Turn on the printer.

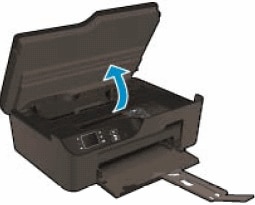
  2. Open the cartridge access door. The carriage moves to the access area.

    Open the cartridge access door

  3. Disconnect the power cord from the rear of the printer.

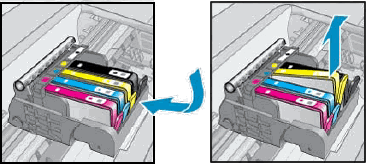
  4. Press the tab on the front of the cartridge in to release it, and then pull up on the cartridge to remove it from the slot.

    Remove the cartridge from the slot

  5. Hold the cartridge by its sides, and then find the electrical contacts on the bottom of the cartridge. The electrical contacts are four small rectangles of copper-colored metal.

    1. Cartridge contacts

  6. Inspect the contacts for ink and debris buildup.

  7. Wipe the contacts with a swab until no debris remains on them.

       CAUTION: 

    Be careful to wipe only the contacts. Do not smear any ink or debris elsewhere on the cartridge.

  8. Turn the cartridge on its side, and then place it onto the sheet of paper.

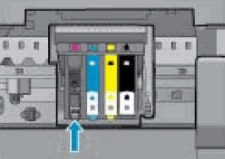
  9. Locate the electrical contacts in the cartridge slot. The contacts are four copper-colored pins.

       WARNING: 

    You must disconnect the power cord before reaching inside the HP printer to avoid risk of injuries or electric shock.

    Location of the cartridge slot contacts

  10. Wipe the contacts with a swab until no debris remains on them.

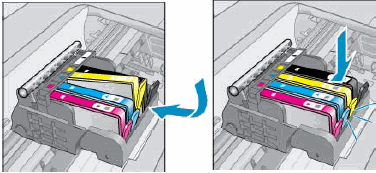
  11. With the contacts facing down, slide the cartridge into its slot. Press down on the cartridge until it clicks into place.

    Insert the cartridge

  12. Repeat these steps to clean and reinsert other cartridges that are indicated in the error message.

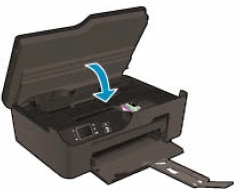
  13. Close the cartridge access door.

    Close the cartridge access door

  14. Reconnect the power cord to the rear of the printer.

  15. Turn on the printer if it does not turn on automatically.

Let me know how it goes.

To thank me for my efforts to help you, please mark my post as an accepted solution so that it benefits several others.

Cheers.

Sandytechy20
I am an HP Employee

† The opinions expressed above are the personal opinions of the authors, not of HP. By using this site, you accept the <a href="https://www8.hp.com/us/en/terms-of-use.html" class="udrlinesmall">Terms of Use</a> and <a href="/t5/custom/page/page-id/hp.rulespage" class="udrlinesmall"> Rules of Participation</a>.