• ×
    Information
    Windows update impacting certain printer icons and names. Microsoft is working on a solution.
    Click here to learn more
    Information
    Need Windows 11 help?
    Check documents on compatibility, FAQs, upgrade information and available fixes.
    Windows 11 Support Center.
  • post a message
  • ×
    Information
    Windows update impacting certain printer icons and names. Microsoft is working on a solution.
    Click here to learn more
    Information
    Need Windows 11 help?
    Check documents on compatibility, FAQs, upgrade information and available fixes.
    Windows 11 Support Center.
  • post a message
Guidelines
Experiencing 'Printer Blocked' or 'Printer Error' message? Click here for more information.
Check some of the most frequent questions about Instant Ink: HP INSTANT INK, HP+ PLANS: INK AND TONER.


Check out our Black or Color Ink Not Printing, Other Print Quality Issues info about: Print quality and Cartridge Issues.
HP Recommended

Hello,

Just received my New Smart Tank 570 Plus.

I register the warranty, then open the box, release the tapes etc...


Here comes the time to launch initial setup, It asks me to fill the tanks, I fill them one by one, and then close the door.

The little Black M circle stays saying... please fill the required tank, leaving the M.


This is the exact same problem as another user reported in March.


Any advice?  Does anyone from HP look at these posts?  Obviously impossible to speak to a human being in HP support.

Justin

3 REPLIES 3
HP Recommended

@JH999 I suggest you follow the below steps to resolve the issue:

Lets start with power reset as per HP standards, here's how we recommend doing it:

  • Turn the printer on, if it is not already on.
  • Wait until the printer is idle and silent before you continue.
  • With the printer turned on, disconnect the power cord from the rear of the printer.
  • Unplug the power cord from the wall outlet.
  • Wait at least 60 seconds.
  • Plug the power cord back into the wall outlet.
    • NOTE: 
    • HP recommends connecting the printer power cord directly to the wall outlet.
  • Reconnect the power cord to the rear of the printer.
  • Turn on the printer, if it does not automatically turn on.
  • Wait until the printer is idle and silent before you proceed.

If the issue persists, please upgrade the printer firmware:

click here for different ways of getting this done using a computer among others.


Once done, follow the below steps:

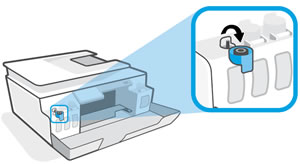
  1. Open the cyan ink tank cap.

    Opening the cap of the cyan ink tank

  2. Open the cyan ink bottle.

    • If your ink bottles have twist-off lids, twist to remove the lid, and then carefully set it aside.

      Removing the lid from a bottle with a twist-off lid

    • If your ink bottles have a flip-top lid, twist the lid to remove it. Pull the seal tab to remove the seal, and then carefully dispose of it. Replace and tighten the lid on the bottle, and then open it.

      Removing the seal from a bottle with a flip-top lid

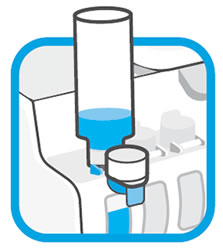
  3. Turn the bottle upside down, place it over the tank spout, and then gently push the bottle down onto the spout.

    If the bottle does not start draining, remove it, and then reinsert it onto the spout. Do not squeeze the bottle.

    Filling the ink tank

  4. After the ink tank is filled, set the ink bottle upright, and then replace or close the ink bottle lid.

  5. Close the ink tank cap.

    Closing the ink tank cap

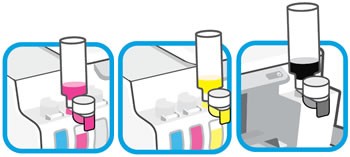
  6. Repeat the previous steps to fill the other ink tanks.

    Filling the rest of the ink tanks

  7. Store any leftover ink in a cool, dry place.

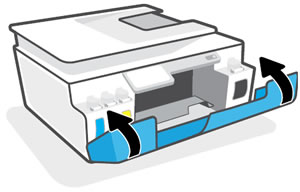
  8. Close the front door.

    Closing the front door

Step 3: Install the printheads

Install the printheads that came with your printer.

  1. Open the front door, and then open the printhead access door.

    Opening the front and printhead access doors

  2. Wait until the carriage stops moving before you continue.

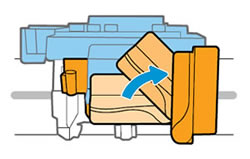
  3. Lift the plastic handle on the printhead packing material.

    Lifting the plastic handle

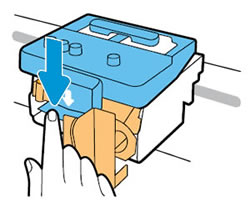
  4. Gently press down on the printhead latch to open it.

    Pressing down on the printhead latch to release it

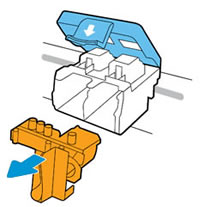
  5. Remove the plastic insert, and then recycle it.

    Removing the plastic piece

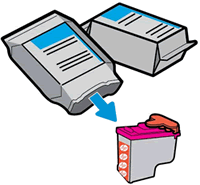
  6. Open the printhead packages, and then remove the printheads.

     Removing printheads from the package

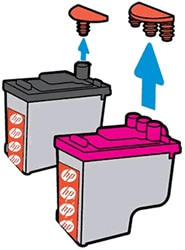
  7. Pull the orange plugs straight up to remove them from the tops of the printheads.

    Removing the orange plugs

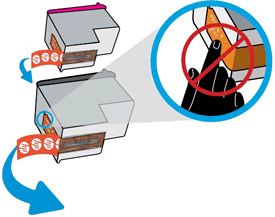
  8. Remove the tape from the printhead contacts using the pull tabs.

       CAUTION: 

    Do not touch the copper-colored contacts or the ink nozzles. Do not replace the protective tape on the contacts. Handling these parts can result in clogs, ink failure, and bad electrical connections.

    Removing the tape from the copper contacts

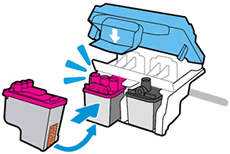
  9. Slide the printhead at a slight upward angle into the empty slot, and then gently push up on the printhead until it snaps into place.

    • Insert the black printhead into the right slot.

    • Insert the tri-color printhead into the left slot.

    Inserting the printheads

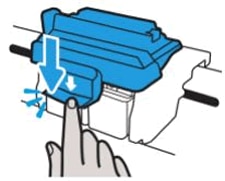
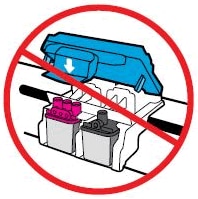
  10. Close the blue carriage latch by pushing down firmly until the latch snaps into place.

    Closing the latch

       CAUTION: 

    Do not open the blue carriage latch after printhead installation unless you are installing new printheads or moving the printer long distances.


    Do not open carriage latch

  11. Close the printhead access door, and then close the front door.

FOR DETAILS & FURTHER INSTRUCTIONS, USE THIS LINK: CLICK HERE & SKIP TO STEP 4 ONWARD

(By the end of this article all the issues should be resolved)


P.S: Welcome to HP Community 😉


Keep us posted,

If you would like to thank us for our efforts to help you, 

Give us a virtual high-five by clicking the 'Thumbs Up' icon below, followed by clicking on the "Accept as solution" on this post, 

Have a great day!

Riddle_Decipher
I am an HP Employee

HP Recommended

Thanks for the advice.  Unfortunately none of this worked.  I was just about to pack up the printer to return it, then decided to ignore the "tank empty" message and pull the printhead carriage out manually.  When I did this the error message disappeared and the rest of the setup went smoothly.  Now working well except for a message popping up once saying that the Magenta tank was running low, despite being completely full.  However that hasn't reoccured, so fingers crossed!

Justin

HP Recommended

@JH999 That's awesome, I'm glad you've got that sorted,

Let me know if you need anything else after keeping the device under observation for a few days, though,

And have a good day ahead.

Riddle_Decipher
I am an HP Employee

† The opinions expressed above are the personal opinions of the authors, not of HP. By using this site, you accept the <a href="https://www8.hp.com/us/en/terms-of-use.html" class="udrlinesmall">Terms of Use</a> and <a href="/t5/custom/page/page-id/hp.rulespage" class="udrlinesmall"> Rules of Participation</a>.