• ×
    Information
    Windows update impacting certain printer icons and names. Microsoft is working on a solution.
    Click here to learn more
    Information
    Need Windows 11 help?
    Check documents on compatibility, FAQs, upgrade information and available fixes.
    Windows 11 Support Center.
  • post a message
  • ×
    Information
    Windows update impacting certain printer icons and names. Microsoft is working on a solution.
    Click here to learn more
    Information
    Need Windows 11 help?
    Check documents on compatibility, FAQs, upgrade information and available fixes.
    Windows 11 Support Center.
  • post a message
Guidelines
Experiencing 'Printer Blocked' or 'Printer Error' message? Click here for more information.
Check some of the most frequent questions about Instant Ink: HP INSTANT INK, HP+ PLANS: INK AND TONER.


Check out our Black or Color Ink Not Printing, Other Print Quality Issues info about: Print quality and Cartridge Issues.
HP Recommended
ENvy 5646
Microsoft Windows 7 (32-bit)

I am not sure if the tray is installed properly now, although it used to work okay. always says out of paper...

I specifically chose this model to print  photos so it is very frustrating. I have tried most of the suggestions .

Any advice would be great.Thanks.

1 ACCEPTED SOLUTION

Accepted Solutions
HP Recommended

@Mags7979


Welcome to HP support community.


Load photo paper in the photo tray

  1. Turn the printer on if it is not already on.
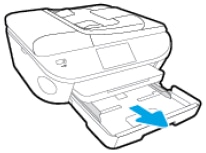
  2. Pull the photo tray inside the input tray toward you to open it as far as possible.

    NOTE: 

    If you do not see the photo tray inside the input tray, remove the output tray, and then open the photo tray.

    Figure : Pull out the photo tray inside the input tray

    Image: Pull out the photo tray inside the input tray
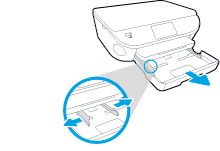
  3. Slide the paper width guides to their outermost positions.

    Figure : Slide the paper-width guides to their outermost positions

    Image: Slide the paper-width guides to their outermost positions
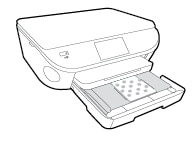
  4. Load the photo paper with the short edge forward and the print side down into the photo tray.

    NOTE: 

    For photo paper with a perforated tab, load the paper in the tray print-side down with the perforated tab closest to you.

    Figure : Load photo paper in the paper tray with the print side down

    Image: Load photo paper in the paper tray with the print side down
  5. Slide the paper forward until it stops.

    NOTE: 

    Make sure that the stack of photo paper is not higher than the top edges of the paper width guides.

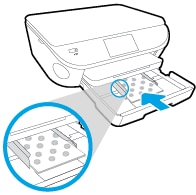
  6. Slide the paper width guides inward so that they lightly rest against the edges of the photo paper and make sure that the photo paper is centered in the tray.

    Figure : Adjust the paper-width guides

    Image: Adjust the paper-width guides
  7. Reinstall the output tray on the input tray, if you removed it, and then push the input tray into the printer until it locks into place.

You can refer this HP document or more assistance:- Click here


I hope that helps.

To thank me for my efforts to help you, please mark my post as an accepted solution so that it benefits several others.

Cheers.

Sandytechy20
I am an HP Employee

View solution in original post

1 REPLY 1
HP Recommended

@Mags7979


Welcome to HP support community.


Load photo paper in the photo tray

  1. Turn the printer on if it is not already on.
  2. Pull the photo tray inside the input tray toward you to open it as far as possible.

    NOTE: 

    If you do not see the photo tray inside the input tray, remove the output tray, and then open the photo tray.

    Figure : Pull out the photo tray inside the input tray

    Image: Pull out the photo tray inside the input tray
  3. Slide the paper width guides to their outermost positions.

    Figure : Slide the paper-width guides to their outermost positions

    Image: Slide the paper-width guides to their outermost positions
  4. Load the photo paper with the short edge forward and the print side down into the photo tray.

    NOTE: 

    For photo paper with a perforated tab, load the paper in the tray print-side down with the perforated tab closest to you.

    Figure : Load photo paper in the paper tray with the print side down

    Image: Load photo paper in the paper tray with the print side down
  5. Slide the paper forward until it stops.

    NOTE: 

    Make sure that the stack of photo paper is not higher than the top edges of the paper width guides.

  6. Slide the paper width guides inward so that they lightly rest against the edges of the photo paper and make sure that the photo paper is centered in the tray.

    Figure : Adjust the paper-width guides

    Image: Adjust the paper-width guides
  7. Reinstall the output tray on the input tray, if you removed it, and then push the input tray into the printer until it locks into place.

You can refer this HP document or more assistance:- Click here


I hope that helps.

To thank me for my efforts to help you, please mark my post as an accepted solution so that it benefits several others.

Cheers.

Sandytechy20
I am an HP Employee

† The opinions expressed above are the personal opinions of the authors, not of HP. By using this site, you accept the <a href="https://www8.hp.com/us/en/terms-of-use.html" class="udrlinesmall">Terms of Use</a> and <a href="/t5/custom/page/page-id/hp.rulespage" class="udrlinesmall"> Rules of Participation</a>.