• ×
    Information
    Windows update impacting certain printer icons and names. Microsoft is working on a solution.
    Click here to learn more
    Information
    Need Windows 11 help?
    Check documents on compatibility, FAQs, upgrade information and available fixes.
    Windows 11 Support Center.
  • post a message
  • ×
    Information
    Windows update impacting certain printer icons and names. Microsoft is working on a solution.
    Click here to learn more
    Information
    Need Windows 11 help?
    Check documents on compatibility, FAQs, upgrade information and available fixes.
    Windows 11 Support Center.
  • post a message
Guidelines
Experiencing 'Printer Blocked' or 'Printer Error' message? Click here for more information.
Check some of the most frequent questions about Instant Ink: HP INSTANT INK, HP+ PLANS: INK AND TONER.


Check out our Black or Color Ink Not Printing, Other Print Quality Issues info about: Print quality and Cartridge Issues.
HP Recommended
deskjet 3050a
Microsoft Windows 10 (64-bit)

I was printing a black and white document.  First page printed, but a little light.  Second page printed part of the page, 3rd page blank.  I changed the black ink, still it just prints blank page.  I hear print heads move.  I used the Tools menu to clean printhead.  I pull out the ink cartridge & put it back.  The Ink Level for black ink shows it's fine.  

1 REPLY 1
HP Recommended

@KellyRa


Thanks for reaching out to us on HP Support Forums. 🙂 I came across your post and would like to assist.


I understand that you have an HP Deskjet 3050A e-All-in-One Printer. I read that the printer is facing print quality issues. The black cartridge has full ink and you have even cleaned the printheads. I appreciate the steps you have performed and have certainly done a good job.


To provide an accurate resolution, I need a few more details: 

  • Are these original HP ink cartridges or refilled ink cartridges?
  • Is the printer able to make a copy in black and also in colour?

Meanwhile, I recommend you to perform the following steps to isolate the issue and arrive at a fix: 

  • Disconnect the power cable from the printer while the printer is still ON.
  • Disconnect any other cables if connected the printer.
  • Press and hold the printer’s power button for 15 seconds.
  • The printer should be directly connected to the wall outlet and not to a surge protector.
  • Reconnect the power cable to print and the printer should power ON by itself. If the printer doesn’t power ON then please manually power it ON.

Let us clean the ink cartridge manually as described in the below steps:

  • Gather the following materials:

  • Dry foam-rubber swabs, lint-free cloth, or any soft material that will not come apart or leave fibers (coffee filters work well)

  • Clean sheets of paper

  • Distilled, filtered, or bottled water (tap water might contain contaminants that can damage the print cartridges)

NOTE: Do not use platen cleaners or alcohol to clean the area. These can damage the cartridge or the printer.

  • Press the Power button to turn on the printer, if it is not already on.

  • Open the cartridge access door. The carriage moves to the center of the printer. Wait until the carriage is idle and silent to continue.

  • Remove the cartridge out.

NOTE: Do not touch the copper-colored contacts or the ink nozzles. Touching these parts can result in clogs, ink failure, and bad electrical connections.


Figure : Do not touch the contacts or nozzles

Image: Do not touch the contacts or nozzles


  • Place the cartridge on a piece of paper with the ink nozzles up.

  • Lightly moisten a clean, foam-rubber swab with distilled water.

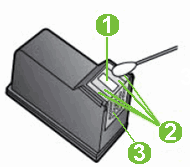
  • Clean the face and edges around the ink nozzle with the swab.

NOTE: Do not clean the ink nozzle plate.


Figure : Clean the area around the ink nozzle

Illustration of the ink nozzle and cartridge contacts

  1. Nozzle plate - DO NOT CLEAN

  2. Area surrounding ink nozzle - Do clean

  3. Cartridge contacts - Do not clean

  • Let the cartridge sit for 10 minutes to allow the cleaned area to dry, or use a new swab to dry it.
  • Hold the cartridge by its sides with the nozzles toward the printer, and then insert the cartridge into its slot. Make sure that the icon on the cartridge matches the icon on the slot.

    • The tri-color cartridge () goes in the slot on the left

    • The black cartridge () goes in the slot on the right

I sincerely hope this fixes the issue. Please feel free to let me know how it goes. Cheers! 🙂


† The opinions expressed above are the personal opinions of the authors, not of HP. By using this site, you accept the <a href="https://www8.hp.com/us/en/terms-of-use.html" class="udrlinesmall">Terms of Use</a> and <a href="/t5/custom/page/page-id/hp.rulespage" class="udrlinesmall"> Rules of Participation</a>.