• ×
    Information
    Windows update impacting certain printer icons and names. Microsoft is working on a solution.
    Click here to learn more
    Information
    Need Windows 11 help?
    Check documents on compatibility, FAQs, upgrade information and available fixes.
    Windows 11 Support Center.
  • post a message
  • ×
    Information
    Windows update impacting certain printer icons and names. Microsoft is working on a solution.
    Click here to learn more
    Information
    Need Windows 11 help?
    Check documents on compatibility, FAQs, upgrade information and available fixes.
    Windows 11 Support Center.
  • post a message
Guidelines
Experiencing 'Printer Blocked' or 'Printer Error' message? Click here for more information.
Check some of the most frequent questions about Instant Ink: HP INSTANT INK, HP+ PLANS: INK AND TONER.


Check out our Black or Color Ink Not Printing, Other Print Quality Issues info about: Print quality and Cartridge Issues.
HP Recommended
HP ENVY 5660
Microsoft Windows 10 (64-bit)

A grinding noise happens just prior to printing commencing.  It lasts about 4 seconds; then printing occurs perfectly.  No error messages. This is happening on an HP ENVY 5660.  Nothing has recently been changed with the machine.  I have taken the steps to inspect for paper jam and find none.  Not sure where to go from here.

3 REPLIES 3
HP Recommended

@denish7


Welcome to HP support community.


Manually clean the paper feed rollers

  1. Gather the following materials:

    • Long, lint-free cotton swabs

    • A clean, lint-free cloth, or any cloth that does not come apart or leave fibers

    • Distilled, filtered, or bottled water (tap water might damage the printer)

  2. Turn on the printer, if it is not already on.

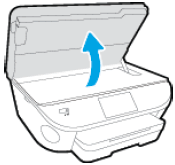
  3. Gently grasp the handles on either side of the printer, then raise the ink cartridge access door until it locks into place.

    The carriage moves to the center of the printer.

    Figure : Opening the ink cartridge access door

    Image: Opening the ink cartridge access door.
  4. Wait until the printer is idle and silent before you continue.

  5. While the printer is still on, disconnect the power cord from the rear of the printer, and then unplug the power cord from the power source or electrical outlet.

       WARNING: 

    You must disconnect the power cord before reaching inside the printer to avoid the risk of injuries or electric shock.

  6. Disconnect the USB cable from the rear of the printer, if you have a cable connection to the computer.

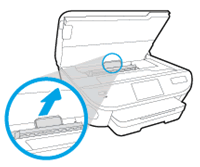
  7. Locate the paper path cover, grasp the handle, and then lift up to remove it.

    Figure : Removing the paper path cover

    Image: Locating the paper path cover.
  8. Lightly dampen the swab with the water, and then squeeze any excess liquid from the swab.

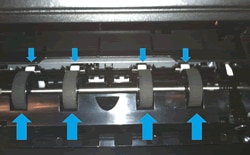
  9. Use a flashlight to inspect the rollers. Press the swab against the rollers inside the printer, and then rotate the rollers upwards with your fingers.

    Apply a moderate amount of pressure to remove any dust or dirt buildup.

    Figure : Example of the rollers in the paper path access area

    Image: Example of the rollers in the paper path access area.
  10. Allow the rollers to dry completely (approximately 10 minutes).

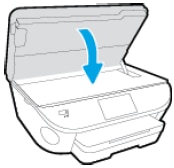
  11. Replace the paper path cover, and then close the ink cartridge access door.

    Figure : Closing the ink cartridge access door

    Image: Closing the ink cartridge access door.
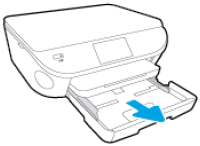
  12. Grasp the output tray, and then pull toward you to remove it.

  13. Pull out the input tray to its outermost position.

    Figure : Pulling out the input tray

    Image: Pulling out the input tray.
  14. Remove all paper from the input tray.

  15. Turn the printer onto its right side so you can access its underside. Make sure to hold the printer firmly with one hand to avoid tipping.

    Figure : Turning the printer onto its right side

    Image: Turning the printer onto its right side.
  16. Lightly dampen a clean, lint-free cloth with bottled or distilled water, and then squeeze any excess liquid from the cloth.

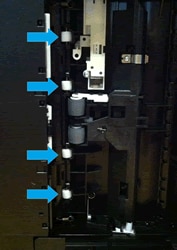
  17. Inspect the gap where the input tray was with a flashlight. Press the cloth against the rollers, and then rotate them upward with your fingers. Apply a moderate amount of pressure to remove any dust or dirt buildup.

    Figure : Example of the rollers underneath the printer

    Image: Example of the rollers underneath the printer.
  18. Allow the rollers to dry completely (approximately 10 minutes).

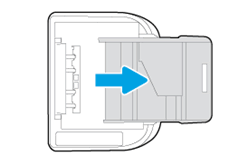
  19. Push in the input tray, and then return the printer to its normal position.

  20. Slide the output tray back onto the input tray.

  21. Reconnect the power cord to the rear of the printer, and then plug in the power cord to an electrical outlet.

  22. Reconnect the USB cable, if your printer has a cable connection to the computer.

  23. Turn on the printer.

You can refer this HP document for more assistance:- Click here


I hope that helps.

To thank me for my efforts to help you, please mark my post as an accepted solution so that it benefits several others.

Cheers.

Sandytechy20
I am an HP Employee

HP Recommended

I tried your solution, but the noise is still there.  One thing I noted is that in your solution, at the end of step three, you say that the carriage will move to the center, but the carriage did not move from its position all the way to the right.  But, I do not recall the carriage ever moving to the center when I open the ink cartridge access door.  It is always on the right, in the position it is in when I change ink cartridges.  Could this be part of the problem?

HP Recommended

@denish7


This seems to be a hardware issue.

I request you to talk to HP support.

They might have multiple options to help you with this.

  1. Click on this link - https://support.hp.com/us-en/contact-hp?openCLC=true
  2. Select the country.
  3. Enter the serial of your device.
  4. Select the country from the drop-down.
  5. Click on "Show Options".
  6. Fill the web-form.
  7. A case number and phone number will now populate for you.

Cheers.

Sandytechy20
I am an HP Employee

† The opinions expressed above are the personal opinions of the authors, not of HP. By using this site, you accept the <a href="https://www8.hp.com/us/en/terms-of-use.html" class="udrlinesmall">Terms of Use</a> and <a href="/t5/custom/page/page-id/hp.rulespage" class="udrlinesmall"> Rules of Participation</a>.