-
×InformationWindows update impacting certain printer icons and names. Microsoft is working on a solution.
Click here to learn moreInformationNeed Windows 11 help?Check documents on compatibility, FAQs, upgrade information and available fixes.
Windows 11 Support Center. -
-
×InformationWindows update impacting certain printer icons and names. Microsoft is working on a solution.
Click here to learn moreInformationNeed Windows 11 help?Check documents on compatibility, FAQs, upgrade information and available fixes.
Windows 11 Support Center. -
- HP Community
- Printers
- Printing Errors or Lights & Stuck Print Jobs
- new 6968 printer will not print colors correctly

Create an account on the HP Community to personalize your profile and ask a question
Your account also allows you to connect with HP support faster, access a personal dashboard to manage all of your devices in one place, view warranty information, case status and more.
Check some of the most frequent questions about Instant Ink: HP INSTANT INK, HP+ PLANS: INK AND TONER.
Check out our Black or Color Ink Not Printing, Other Print Quality Issues info about: Print quality and Cartridge Issues.

It has been a while since anyone has replied. Simply ask a new question if you would like to start the discussion again.
08-15-2018 09:12 PM
 HP Recommended
I purchased the printer three days ago, installed everything, and was able to print 2 photos correctly with excellent color. The next photo was pink and everything else that prints now - except for black - prints "off." The colors look pink. Yes, we are using the brand new hp cartriges that came with the printer. We traded in an hp printer that wouldn't print black for one that worked for 2 minutes. Little frustrated. Please help!
Solved! Go to Solution.
1 ACCEPTED SOLUTION
Accepted Solutions
08-20-2018 10:34 AM
HP Recommended
Thanks for the reply.
I appreciate your time and effort.
Did make sure the cyan ink cartridge is properly vented and seated correctly
-
Turn on the printer, if it is not already turned on.
-
Open the ink cartridge access door.
The carriage moves to the center of the printer.
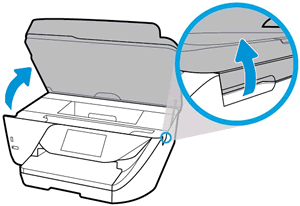
-
Wait until the carriage stops moving before you continue.
-
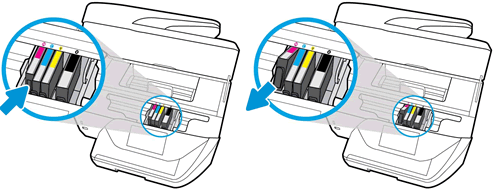
Press the tab inward on the front of the old ink cartridge to release it, and then pull up on the ink cartridge to remove it from the slot.
-
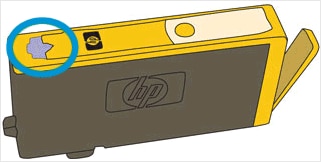
Examine the vent area above the HP logo on the top of the ink cartridge.
-
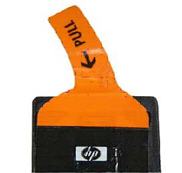
If the ink cartridge still has the orange pull-tab attached, pull to remove it.
-
If the vent is clogged, use a straight pin to gently remove excess adhesive from the vent.
-
-
Clogged vent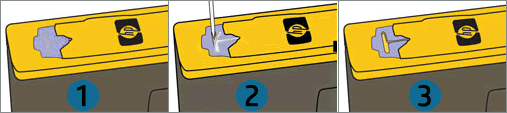
-
With a straight pin, gently remove excess adhesive from the vent
-
Unclogged vent
-
-
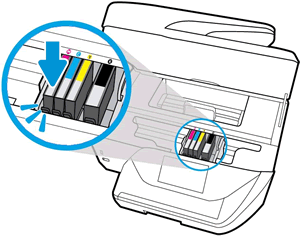
Turn the ink cartridge so that the ink cartridge contacts face downward, and then match the label color with the color dot on the carriage.
-
Slide the ink cartridge into its slot, and then gently press the ink cartridge down until it snaps into place.
-
Repeat these steps to inspect the vents on each of the ink cartridges.
-
Make sure each ink cartridge is firmly installed in its slot. Run your finger along the top of the ink cartridges to feel for any that are protruding, and if any are, press down firmly until each ink cartridge snaps into place.
-
Close the ink cartridge access door.
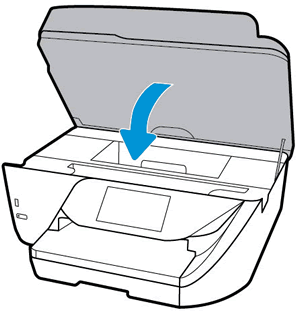
Try to print.
If yes, then I am sending you a private message. Please check the mailbox icon at the top-right corner of this screen.
I hope this helps resolve this issue completely.
To thank me for my efforts to help you, please mark my post as an accepted solution so that it benefits several others and please give the same post a Kudos.
Cheers.
Sandytechy20
I am an HP Employee
5 REPLIES 5
08-16-2018 02:29 PM
HP Recommended
Welcome to HP forums, I see that you are getting the print quality issue.
Which operating system is installed on the computer to which this printer is connected?
Print a Print Quality Diagnostic Page
-
Load plain white paper in the input tray.
-
From the printer control panel, open the Setup
 menu.
menu. -
Open the Reports or Tools menu.
-
Touch Print Quality Report.
A Print Quality Diagnostic Page prints.
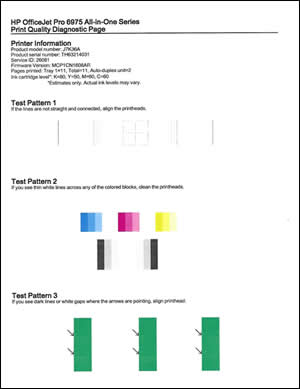
If get print quality issues in this page, then follow the below steps.
Clean the printhead
-
From the printer control panel, open the Setup
menu. -
Open the Printer Maintenance menu.
-
If necessary, open the Tools menu, and then touch Clean Printhead.
A test page prints.
-
Examine the test page.
-
If the print quality is unacceptable, touch Clean Again to continue the next level of cleaning. If necessary, repeat these steps for the third cleaning cycle.
NOTE:
If the printhead is badly clogged, it might require another cleaning cycle. If so, wait 30 minutes before you perform all three levels of cleaning again.
-
If the print quality is acceptable, touch Done.
-
You can refer this HP document for more assistance:- Click here
Let me know how it goes.
To thank me for my efforts to help you, please mark my post as an accepted solution so that it benefits several others and please give the same post a Kudos.
Cheers.
Sandytechy20
I am an HP Employee
08-19-2018 02:10 PM
HP Recommended
Thank you. That did help me diagnose the issue, but it didn't solve my problem. The blue is not printing (though it did for two initial prints when we first got the printer last weekend). The level is equal with the level of the other cartridges (80). Suggestions? Cleaning the printhead did not help.
08-20-2018 10:34 AM
HP Recommended
Thanks for the reply.
I appreciate your time and effort.
Did make sure the cyan ink cartridge is properly vented and seated correctly
-
Turn on the printer, if it is not already turned on.
-
Open the ink cartridge access door.
The carriage moves to the center of the printer.
-
Wait until the carriage stops moving before you continue.
-
Press the tab inward on the front of the old ink cartridge to release it, and then pull up on the ink cartridge to remove it from the slot.
-
Examine the vent area above the HP logo on the top of the ink cartridge.
-
If the ink cartridge still has the orange pull-tab attached, pull to remove it.
-
If the vent is clogged, use a straight pin to gently remove excess adhesive from the vent.
-
-
Clogged vent -
With a straight pin, gently remove excess adhesive from the vent
-
Unclogged vent
-
-
Turn the ink cartridge so that the ink cartridge contacts face downward, and then match the label color with the color dot on the carriage.
-
Slide the ink cartridge into its slot, and then gently press the ink cartridge down until it snaps into place.
-
Repeat these steps to inspect the vents on each of the ink cartridges.
-
Make sure each ink cartridge is firmly installed in its slot. Run your finger along the top of the ink cartridges to feel for any that are protruding, and if any are, press down firmly until each ink cartridge snaps into place.
-
Close the ink cartridge access door.
Try to print.
If yes, then I am sending you a private message. Please check the mailbox icon at the top-right corner of this screen.
I hope this helps resolve this issue completely.
To thank me for my efforts to help you, please mark my post as an accepted solution so that it benefits several others and please give the same post a Kudos.
Cheers.
Sandytechy20
I am an HP Employee
Be alert for scammers posting fake support phone numbers and/or email addresses on the community.
If you think you have received a fake HP Support message, please report it to us by clicking on "Flag Post".
† The opinions expressed above are the personal opinions of the authors, not of HP. By using this site, you accept the Terms of Use and Rules of Participation.


Didn't find what you were looking for? Ask the community
† The opinions expressed above are the personal opinions of the authors, not of HP. By using this site, you accept the <a href="https://www8.hp.com/us/en/terms-of-use.html" class="udrlinesmall">Terms of Use</a> and <a href="/t5/custom/page/page-id/hp.rulespage" class="udrlinesmall"> Rules of Participation</a>.