• ×
    Information
    Windows update impacting certain printer icons and names. Microsoft is working on a solution.
    Click here to learn more
    Information
    Need Windows 11 help?
    Check documents on compatibility, FAQs, upgrade information and available fixes.
    Windows 11 Support Center.
  • post a message
  • ×
    Information
    Windows update impacting certain printer icons and names. Microsoft is working on a solution.
    Click here to learn more
    Information
    Need Windows 11 help?
    Check documents on compatibility, FAQs, upgrade information and available fixes.
    Windows 11 Support Center.
  • post a message
Guidelines
Experiencing 'Printer Blocked' or 'Printer Error' message? Click here for more information.
Check some of the most frequent questions about Instant Ink: HP INSTANT INK, HP+ PLANS: INK AND TONER.


Check out our Black or Color Ink Not Printing, Other Print Quality Issues info about: Print quality and Cartridge Issues.
HP Recommended
Officejet 6230
Microsoft Windows 7 (64-bit)

Officejet6230 black ink light flashing. Won't do anything.  Change the cartridge to no avail.

3 REPLIES 3
HP Recommended

@Meloman

Welcome to the HP Support Community


The printer might be in an error state if the cartridges are not inserted correctly. Follow these steps to make sure that the cartridges are inserted correctly.


 Make sure that the cartridges are inserted correctly


Follow these steps to make sure that the cartridges are inserted correctly

  1. Press the Power button to turn on the printer, if it is not already on.

  2. Open the cartridge access door. The carriage moves to the center of the printer. Wait until the carriage is idle and silent before you continue.

    Figure : Open the cartridge access door

    Image: Open the cartridge access door
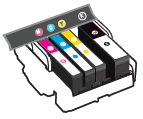
  3. Check the color icons on the cartridges and the carriage. Make sure that the color icon on each cartridge label matches the color icon on the carriage slot.

    Figure : Example of the cartridges in their color-coded slots

    Image: Example of the cartridges in their color-coded slots
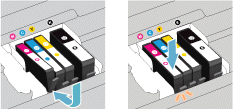
  4. Run your finger along the top of the cartridges to check for any unseated cartridges in the carriage. Press down on any cartridge that is higher than the others to snap the cartridge into its slot.

    Figure : Snap the cartridge into its slot

    Image: Snap the cartridge into its slot
  5. If the cartridge does not snap into place, press in the tab on the front of the cartridge, and then pull up on the cartridge to remove it from the carriage.

    Figure : Remove the cartridge

    1. Press in the tab on the front of the cartridge

    2. Pull the cartridge up

    3. Remove the cartridge

  6. Gently bend the tab away from the cartridge.
       CAUTION: 

    Be careful not to bend the tab out more than 1.27 cm (0.5 in). Moving the tab too far might damage the cartridge.


    Figure : Adjust the cartridge tab 

    Image: Adjust the cartridge tab
  7. Slide the cartridge into its slot, and then gently press down on the cartridge until it clicks into place.

Clean the cartridge contacts


Follow these steps to clean the cartridge contacts, and then reinstall the cartridges.

   CAUTION: 

Clean the cartridges one at a time. Do not leave a cartridge outside of the printer for more than 30 minutes. Also, never turn off the printer when a cartridge is removed from its slot. Leaving cartridge slots empty might damage the ink system.

  1. Gather the following materials:

    • Dry foam-rubber swabs, a lint-free cloth, or any soft material that does not come apart or leave fibers (coffee filters work well)

    • Distilled, filtered, or bottled water (tap water might contain contaminants that can damage the cartridges)

         CAUTION: 

      Do not use platen cleaners or alcohol to clean the cartridge contacts. These can damage the cartridge or the printer.

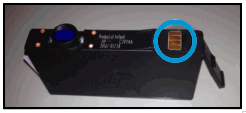
  2. Moisten a foam-rubber swab or clean, lint-free cloth with distilled, filtered, or bottled water, and then wipe the copper-colored contact on the cartridge.

    Figure : Copper-colored cartridge contact

    Image: Copper-colored cartridge contact
  3. Wait 10 minutes for the cartridge contact to dry.

  4. Reinsert the cartridge into its slot, and then press down on the cartridge until it clicks into place.

    Figure : Reinsert the cartridge

    Image: Reinsert the cartridge
    NOTE: 

    Make sure that the color on the cartridge matches the color on the slot you're installing it in.

  5. Repeat these steps for other cartridges, if necessary.

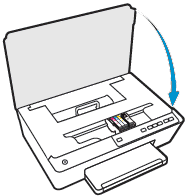
  6. Close the cartridge access door.

    Figure : Close the cartridge access door

    Image: Close the cartridge access door.

Reset the printer


A printer reset can recalibrate the cartridges.

  1. With the printer turned on, disconnect the power cord from the rear of the printer.

  2. Unplug the power cord from the wall outlet.

  3. Wait at least 15 seconds.

  4. Plug the power cord back into the wall outlet.

  5. Reconnect the power cord to the printer.

  6. Turn the printer on.

Remove and reinsert the cartridges again


Removing and then reinserting the cartridges a second time can help resolve the issue. Repeat the steps that you performed earlier in this document to remove and reinsert the cartridges.


Clean the cartridge contacts again


Cleaning the cartridge contacts a second time can help resolve the issue. Repeat the steps that you performed earlier in this document to clean the cartridge contacts.


Refer to this document: https://support.hp.com/in-en/product/hp-officejet-pro-6230-eprinter-series/5390318/document/c0431702... for Blinking Lights.


Keep me posted, how it goes!

If the information I've provided was helpful, give us some reinforcement by clicking the Accepted Solution and Kudos buttons, that'll help us and others see that we've got the answers!

Have a great day!

Cheers:)

Raj1788
I am an HP Employee 

HP Recommended

Hi.  This procedure did not resolve the issue.  The black cartridge is still blinking.  Any other suggestions?

HP Recommended

@Meloman


Appreciate all your time and efforts!


I would personally suggest you contact our HP Support for one on one interaction. 


Please use the following link to create yourself a case number, then call and it may help speed up the call process:


Step 1. Open link: www.hp.com/contacthp

Step 2. Sign in / sign in as a guest

Step 3. Enter the product number or select to auto detect

Step 4. Scroll down to "Still need help? Complete the form to select your contact options"

Step 5. Scroll down and click: HP contact options - click on Get phone number and phone number appear.


Keep me posted on further assistance. Hope that helps! 

Have a great day ahead!

Raj1788
I am an HP Employee 

† The opinions expressed above are the personal opinions of the authors, not of HP. By using this site, you accept the <a href="https://www8.hp.com/us/en/terms-of-use.html" class="udrlinesmall">Terms of Use</a> and <a href="/t5/custom/page/page-id/hp.rulespage" class="udrlinesmall"> Rules of Participation</a>.