• ×
    Information
    Windows update impacting certain printer icons and names. Microsoft is working on a solution.
    Click here to learn more
    Information
    Need Windows 11 help?
    Check documents on compatibility, FAQs, upgrade information and available fixes.
    Windows 11 Support Center.
  • post a message
  • ×
    Information
    Windows update impacting certain printer icons and names. Microsoft is working on a solution.
    Click here to learn more
    Information
    Need Windows 11 help?
    Check documents on compatibility, FAQs, upgrade information and available fixes.
    Windows 11 Support Center.
  • post a message
Guidelines
Experiencing 'Printer Blocked' or 'Printer Error' message? Click here for more information.
Check some of the most frequent questions about Instant Ink: HP INSTANT INK, HP+ PLANS: INK AND TONER.


Check out our Black or Color Ink Not Printing, Other Print Quality Issues info about: Print quality and Cartridge Issues.
HP Recommended
HP officeJet 4650

After it stops trying to pull the paper from the paper tray, a box comes up and says  "Service Station Stalled"

Under that it says  "Press the OK button to have the printer automatically attempt its recovery process" then I clicked on OK.  Went to home screen and right back to Service Station Stalled....  I have unplugged it and let it set, retried it, opened up everything I could to see if there was a piece of paper somewhere and couldn't find anything.  There were no torn papers in the paper tray.

1 REPLY 1
HP Recommended

@Wrigley23,


Welcome to the HP Support Community!


I recommend you follow the below steps and check if it helps.

  1. With the printer turned on, disconnect the power cord from the rear of the printer and also unplug the power cord from the wall outlet. 
  2. Remove USB cable, if present. 
  3. Wait for 2-3 minutes, press and hold the power button on your printer for about 30 seconds to remove any additional charge. 
  4. Now plug back the power cable straight to a wall outlet without any surge protector or an extension cord (This is important) and then plug back the power cord to the printer. 
  5. Turn on the printer and wait till warm-up period finishes and the printer is idle.

If you continue facing the issue, follow the below steps.


  1. Turn on the printer, if it is not on already.

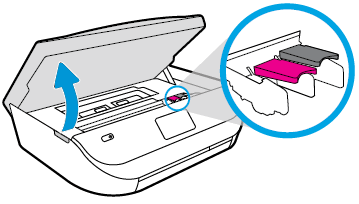
  2. Gently grasp the handles on either side of the printer, then raise the ink cartridge access door until it locks into place.

    The carriage moves to the center of the printer.

    Figure : Opening the ink cartridge access door

    Image: Opening the ink cartridge access door.
  3. Wait until the carriage is idle and silent before you proceed.

  4. To release the ink cartridge, lift the lid on the ink cartridge slot, then gently push the lid back until it stops.

  5. Pull up on the ink cartridge to remove it from the slot.

    Figure : Removing the ink cartridge

    1. Lift the lid

    2. Gently push the lid back

    3. Pull up on the ink cartridge

  6. Inspect the contacts for any protective tape that still might be on the nozzles.

       CAUTION: 

    Do not touch the copper-colored contacts or the ink nozzles. Touching these parts can result in clogs, ink failure, and bad electrical connections.

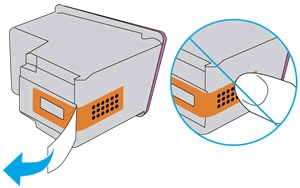
  7. Remove the protective tape from the contacts, if necessary.

       CAUTION: 

    Do not try to remove the copper electrical strip.

    Figure : Removing the plastic tape

    Image: Removing the plastic tape
  8. Hold the ink cartridge by its sides with the nozzles toward the printer, then slide the ink cartridge forward into the slot.

  9. Close the lid on the ink cartridge slot to secure the ink cartridge into place.

    Figure : Inserting the ink cartridges

    1. Insert the ink cartridge

    2. Close the lid

    3. The color ink cartridge is on the left, and the black ink cartridge is on the right

  10. Repeat the previous steps to remove, inspect, and reseat the other ink cartridge, if necessary.

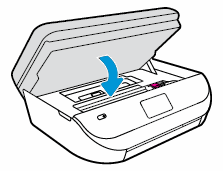
  11. Close the ink cartridge access door.

    Figure : Closing the ink cartridge access door.

    Image: Closing the ink cartridge access door.

Let me know how it goes and you have a great day!


If you wish to show appreciation for my efforts, mark my post as Accept as Solution. Your feedback counts!


Cheers!

The_Fossette
I am an HP Employee

† The opinions expressed above are the personal opinions of the authors, not of HP. By using this site, you accept the <a href="https://www8.hp.com/us/en/terms-of-use.html" class="udrlinesmall">Terms of Use</a> and <a href="/t5/custom/page/page-id/hp.rulespage" class="udrlinesmall"> Rules of Participation</a>.