• ×
    Information
    Windows update impacting certain printer icons and names. Microsoft is working on a solution.
    Click here to learn more
    Information
    Need Windows 11 help?
    Check documents on compatibility, FAQs, upgrade information and available fixes.
    Windows 11 Support Center.
  • post a message
  • ×
    Information
    Windows update impacting certain printer icons and names. Microsoft is working on a solution.
    Click here to learn more
    Information
    Need Windows 11 help?
    Check documents on compatibility, FAQs, upgrade information and available fixes.
    Windows 11 Support Center.
  • post a message
Guidelines
Do you need the WPS PIN to connect your printer? Click here for tips and tricks!
HP Recommended
Hp 281cdw
Microsoft Windows 10 (64-bit)

Try to scan multi documents from top fader it work but come out not straight.

1 REPLY 1
HP Recommended

@Charliekhun


Welcome to the HP Support Community.


Does this happen while copying too from the Feeder?


Clean the plastic and glass strips inside the document feeder with a soft, lint-free cloth sprayed with glass cleaner.

NOTE: 

Some printers ship with a document feeder cleaning cloth. If you have the cloth, load it into the document feeder and start a scan job to clean the scanner mechanism.

  1. Turn the printer off, disconnect the power cord, and remove the battery if your printer has one.

  2. Depending on your printer model, open any top cover, document feeder tray, and scan document feeder cover.

  3. Remove any debris such as bits of paper or paper clips from inside the document feeder.

  4. Spray a soft, lint-free cloth with glass cleaner, then wipe the scanner glass and the white strip on the underside of the document feeder until clean, dry, and streak-free.

       CAUTION: 

    To protect the interior printer parts, do not spray the cleaner directly on or into the printer.

  5. Completely close any covers and trays that you opened.

  6. Reconnect the power cord, reinstall the battery if necessary, then turn on the printer.

  7. Load the original document or photo, then try to scan. Make sure the original document or photo is in good condition and free of tears, creases, folds, staples, or tape.

Clean the rollers:


  1. Gather the following materials:

    • A clean, lint-free cloth, or any cloth that does not come apart or leave fibers

    • Distilled, filtered, or bottled water (tap water might damage the printer)

  2. Remove the original document from the ADF.

  3. Turn off the printer.

  4. Disconnect the power cord from the rear of the printer.

  5. Open the ADF cover.

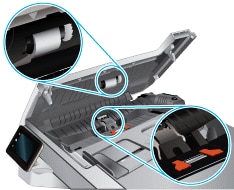
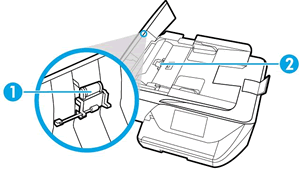
  6. Find the paper pick rollers and the separator pad inside the ADF.

    Figure : Example of the paper pick rollers and separator pad in a LaserJet printer

    The paper pick rollers and separator pad

    Figure : Example of the paper pick rollers and separator pad in a OfficeJet printer

  7. Lightly dampen a clean, lint-free cloth with filtered or distilled water, then squeeze any excess liquid from the cloth.

  8. Use the damp cloth to wipe any residue off the paper pick rollers and the separator pad.

  9. Leave the ADF cover open for two minutes to allow the paper pick rollers and separator pad to dry.

  10. Close the ADF cover.

  11. Reload the original document print side up in the document feeder tray. Gently slide the document into the printer as far as it can go.

  12. Slide in the paper width guides until they are snug against the paper.

    Do not push the paper width guides in so far that they bend the paper.

  13. Reconnect the power cord to the rear of the printer.

  14. Turn on the printer, then try to scan.

Let's try to reset the Printer here:


Turn the printer on, if it is not already on.

  1. Wait until the printer is idle and silent before you continue.
  2. With the printer turned on, disconnect the power cord from the rear of the printer.
  3. Unplug the power cord from the wall outlet.
  4. Wait at least 60 seconds.
  5. Plug the power cord back into the wall outlet.
  6. NOTE: HP recommends connecting the printer power cord directly to the wall outlet.
  7. Reconnect the power cord to the rear of the printer.
  8. Turn on the printer, if it does not automatically turn on.
  9. Wait until the printer is idle and silent before you proceed.

Let me know if this helps.


If the information I've provided was helpful, give us some reinforcement by clicking the Accepted Solution button, that'll help us and others see that we've got the answers!


Thanks!

Have a great day!


I am an HP Employee

† The opinions expressed above are the personal opinions of the authors, not of HP. By using this site, you accept the <a href="https://www8.hp.com/us/en/terms-of-use.html" class="udrlinesmall">Terms of Use</a> and <a href="/t5/custom/page/page-id/hp.rulespage" class="udrlinesmall"> Rules of Participation</a>.