-
×InformationWindows update impacting certain printer icons and names. Microsoft is working on a solution.
Click here to learn moreInformationNeed Windows 11 help?Check documents on compatibility, FAQs, upgrade information and available fixes.
Windows 11 Support Center. -
-
×InformationWindows update impacting certain printer icons and names. Microsoft is working on a solution.
Click here to learn moreInformationNeed Windows 11 help?Check documents on compatibility, FAQs, upgrade information and available fixes.
Windows 11 Support Center. -
- HP Community
- Printers
- Mobile Printing & Cloud Printing
- Hi. My HP OfficeJet 4620 has started printing blank pages a...

Create an account on the HP Community to personalize your profile and ask a question
Your account also allows you to connect with HP support faster, access a personal dashboard to manage all of your devices in one place, view warranty information, case status and more.
Check some of the most frequent questions about Instant Ink: HP INSTANT INK, HP+ PLANS: INK AND TONER.
Check out our WINDOWS 11 Support Center info about: OPTIMIZATION, KNOWN ISSUES, FAQs AND MORE.

It has been a while since anyone has replied. Simply ask a new question if you would like to start the discussion again.
03-06-2019 09:31 AM
 HP Recommended
Product: HP officejet 4620
I have turned my printer off and unplugged it. Left it off overnight. I put some water on the ‘head’ for the black ink and then it printed faintly. I put a color page on glass and nothing printed. Not even faintly. I know the ink cartridges are full. We only occassionally use this when we are at this residence about 6 mos a year.
Thanks for help!
Solved! Go to Solution.
1 ACCEPTED SOLUTION
Accepted Solutions
03-07-2019 11:30 AM
HP Recommended
@Vtopmiller The ink could have dried out as it's suggested that the printer is used or at least turned on every day for the ink to be functioning,
that said, If you've ensured genuine/compatible ink cartridges are being used, please try the below steps:
Step one: Print the report
-
Load plain white U.S. letter or A4 size paper in the tray.
-
On the control panel home screen, press the Setup icon
 .
. -
Press the button
 next to the Down Arrow
  until Reports displays next to OK.
 -
Press the button next to OK to select Reports.
-
Press the button next to the Down Arrow
until Print Quality Report displays next to OK, and then press the button next to OK. The report prints.Figure : Example of the report

Also, check if the copier works as a stand-alone device:
If it works fine, this could be a software issue with the printer drivers,
If that doesn't work either, send a picture of the print diagnostic page or let me know if that's blank as well.
Keep us posted,
If you would like to thank us for our efforts to help you,
Give us a virtual high-five by clicking the 'Thumbs Up' icon below, followed by clicking on the "Accept as solution" on the post you feel, helped you the most,
Have a great day!
Riddle_Decipher
I am an HP Employee
3 REPLIES 3
03-07-2019 11:30 AM
HP Recommended
@Vtopmiller The ink could have dried out as it's suggested that the printer is used or at least turned on every day for the ink to be functioning,
that said, If you've ensured genuine/compatible ink cartridges are being used, please try the below steps:
Step one: Print the report
-
Load plain white U.S. letter or A4 size paper in the tray.
-
On the control panel home screen, press the Setup icon
. -
Press the button
next to the Down Arrow until Reports displays next to OK. -
Press the button next to OK to select Reports.
-
Press the button next to the Down Arrow
until Print Quality Report displays next to OK, and then press the button next to OK. The report prints.Figure : Example of the report
Also, check if the copier works as a stand-alone device:
If it works fine, this could be a software issue with the printer drivers,
If that doesn't work either, send a picture of the print diagnostic page or let me know if that's blank as well.
Keep us posted,
If you would like to thank us for our efforts to help you,
Give us a virtual high-five by clicking the 'Thumbs Up' icon below, followed by clicking on the "Accept as solution" on the post you feel, helped you the most,
Have a great day!
Riddle_Decipher
I am an HP Employee
03-08-2019 10:31 AM
HP Recommended
Hi, Riddle. I am so new to this. Thank you for replying. I did what you said. It printed and all that was there were some black, bold lines in the middle of the paper. Here’s what printed. I cleaned the printer heads with alcohol. I watched a video and did what ‘Brandon’ instructed. I didnt take printerhead out. Just cleaned where ink goes in and let it dry overnight. I tried new black ink even so it is that. Is it hopeless? I’m willing to try any procedure since right now the printer is useless. Thank you SO much! 
03-10-2019 07:43 AM - edited 03-10-2019 07:45 AM
HP Recommended
@Vtopmiller To confirm, the copier works the same as your printer? if yes, here are a few things I suggest you do:
(To try everything possible before we can conclude it's a hardware malfunction)
If the vent on the top of the cartridge is clogged or obstructed, the cartridge might not work properly. Follow these steps to make sure that the cartridges are properly vented and seated correctly.
Press the Power button to turn on the printer, if it is not already turned on. Wait until the printer is idle and silent before you continue.
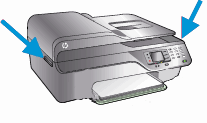
Locate the two slots on the left and right sides of the printer.
Figure : Locations of the two slots
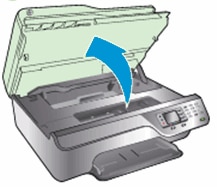
Slide your fingers into the two slots, and then lift up to open the cartridge access door. The carriage moves into the access area.
Figure : Open the cartridge access door
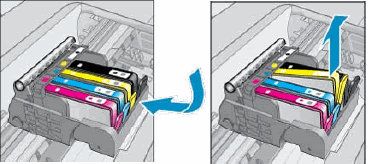
Press the tab on the front of the cartridge inward to release it, and then pull up on the cartridge to remove it from the slot.
Figure : Remove the ink cartridge from its slot
Locate the vent area on the top of the cartridge.
Figure : Vent area on the top of the cartridge
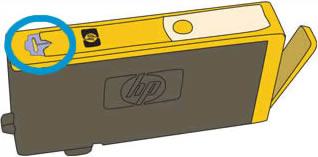
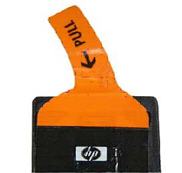
If the cartridge still has the orange pull-tab attached, pull to remove it.
Figure : Orange pull tab
If the vent is clogged, use a straight pin to gently remove excess adhesive from the vent.
Figure : Clean the clogged vent with a pin
Clogged vent
With a straight pin, gently remove excess adhesive from the vent
Unclogged vent
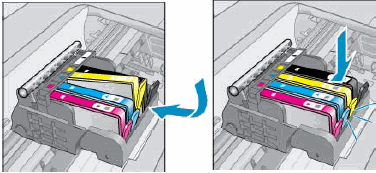
With the nozzle and contacts facing down, slide the cartridge into its slot. Press down on the cartridge until it clicks into place.
NOTE:
Make sure that each cartridge is installed in the correct slot. Match the shape of the icon and the color of the cartridge with the slot that has the same shaped icon and color.
Figure : Reinsert the cartridge
Repeat these steps to inspect the vents on each of the cartridges.
Make sure that each cartridge is firmly in place in its slot. Run your finger along the top of the cartridges to feel for any that are protruding, and if any are, press down firmly until each cartridge snaps into place.
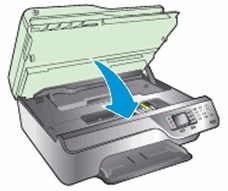
Close the cartridge access door.
Figure : Close the cartridge access door
Print, and then review another test page.
If these steps resolved the issue, there is no need to continue troubleshooting.
If the issue persists, see the next step.
Step four: Use an automated tool to clean the printhead
Follow these steps to run an automated tool to clean the printhead.
CAUTION:Never turn off the printer when ink cartridges are not installed. To avoid issues that require cleaning the printhead or that can damage the ink system, always replace ink cartridges as soon as possible, and always turn off the printer using the Power button.
Load plain, white U.S. letter or A4 size paper in the input tray.
On the printer control panel, press the Setup icon
.Press the button
next to the arrow until Tools displays next to OK.Press the button next to OK to select Tools, and then press the button next to the arrow
until Clean Printhead displays next to OK.Press the button next to OK to clean the printheads.
The printer cleans the printheads and then prints a test page.
Evaluate the test page for print quality.
Figure : Example of the printhead cleaning test page
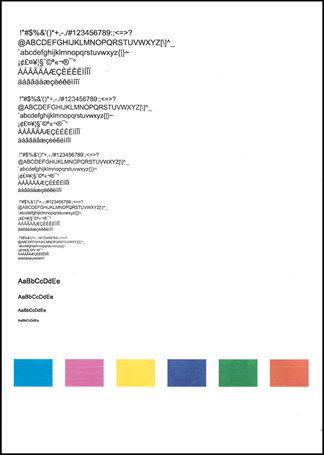
If the print quality on the test page is satisfactory, touch No to return to the current print job.
If the print quality on the test page is unsatisfactory, touch Yes to perform a secondary cleaning of the printhead.
There are three printhead cleaning stages. Complete all three stages if necessary. If the printhead is badly clogged, it might require another cleaning cycle. If so, wait 30 minutes after the last (third) cleaning stage to start the first stage of the cleaning
Step five: Update the printer firmware
If cleaning the printhead fixed the problem, select the link for your printer to install the latest firmware update. The firmware update can prevent future printing problems.
NOTE:
Currently, firmware updates are only available for Windows operating systems.
Select your printer:
Follow the on-screen instructions to download and install the firmware update for your printer.
If you do not see defects on the test page, the print mechanism and cartridges work correctly. Do not continue the troubleshooting steps in this document.
If you see defects on the test page, try the second-stage cleaning option the printer offers. If you still see defects on the test page, continue to the next step.
Step six: Align the printer
Follow these steps to align the printer if you found defects on the test report.
Make sure that there is plain white U.S. letter or A4 size paper in the tray.
On the printer control panel, press the Setup icon
.Press the button
next to the Down Arrow until Tools displays next to OK.Press the button next to OK to select Tools, and then press the button next to the Down Arrow
until Align Printhead displays next to OK.Press the button next to OK to align the printhead. The printer aligns the printhead, and then prints an alignment page.
Lift the scanner lid.
Figure : Lift the scanner lid

Load the alignment page print-side down in the right-front corner of the glass.
Figure : Load the alignment page on the scanner glass
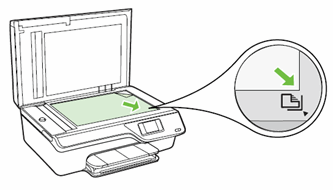
Press the button next to OK. The printer scans the alignment page.
process over again.
If the issue persists, replace both cartridges and if that doesn't do the trick, I'm afraid we are all out of options, hence we'll need to consider getting the printer repaired/replaced,
To help you further I'd like to know if your device is under warranty? If not, please send me a private message with the region you are contacting us from, here's how private messages work:
if you wish to thank us for our efforts, click on the thumbs up for kudos.
Have a great day ahead.
Riddle_Decipher
I am an HP Employee
Be alert for scammers posting fake support phone numbers and/or email addresses on the community.
If you think you have received a fake HP Support message, please report it to us by clicking on "Flag Post".
† The opinions expressed above are the personal opinions of the authors, not of HP. By using this site, you accept the Terms of Use and Rules of Participation.


Didn't find what you were looking for? Ask the community
† The opinions expressed above are the personal opinions of the authors, not of HP. By using this site, you accept the <a href="https://www8.hp.com/us/en/terms-of-use.html" class="udrlinesmall">Terms of Use</a> and <a href="/t5/custom/page/page-id/hp.rulespage" class="udrlinesmall"> Rules of Participation</a>.