-
×InformationNeed Windows 11 help?Check documents on compatibility, FAQs, upgrade information and available fixes.Windows 11 Support Center.
-
-
×InformationNeed Windows 11 help?Check documents on compatibility, FAQs, upgrade information and available fixes.Windows 11 Support Center.
-
- HP Community
- Printers
- Mobile Printing & Cloud Printing
- Printer HP Envy 4500, product n°A9T80B, doesn't recognize co...

Create an account on the HP Community to personalize your profile and ask a question
03-25-2019
11:29 AM
- last edited on
03-25-2019
11:40 AM
by
danny-r
Crazy printer? I need help:
It prints only with 301 black cartridge , in "single mode"; when color cartridge 301 is installed, it says ""non compatible cartridge" (but I've always used them, without any problems... till a few days ago...).
It also says, sometimes: "unsufficient toner!" (but it has never had, and, of course, it hasn't actually, any toner!).
How can I do? I have no idea of what can be happened.
Thanks for your help.
BA19
Solved! Go to Solution.
Accepted Solutions
03-26-2019 05:59 PM - edited 03-26-2019 06:02 PM
Welcome to HP support community.
Are you using genuine HP ink cartridge?
Meanwhile:
Remove, inspect, and reseat the cartridges
Press the Power button to turn the printer on, if it is not already on.
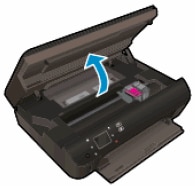
Open the cartridge access door. The carriage moves to the cartridge access area. Wait until the carriage is idle and silent before continuing.
Figure : Open the cartridge access door
To release the cartridge, lift the lid on the cartridge slot, and then gently push the lid back until it stops.
Pull up on the cartridge to remove it from the slot.
Figure : Remove the cartridge
-
Lift the lidGently push the lid back
Pull up on the cartridge
CAUTION:
Do not touch the copper-colored contacts or the ink nozzles. Touching these parts can result in clogs, ink failure, and bad electrical connections.
Figure : Do not touch the contacts or nozzle
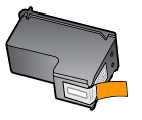
Remove any protective tape that still might be on the nozzles.
Figure : Remove any protective tape that still might be on the nozzles
CAUTION:
Do not try to remove the copper-colored electrical strip.
Hold the cartridge at a slight upward angle with the cartridge contacts facing the rear of the printer, and then slide the cartridge into the empty slot.
Close the lid on the cartridge slot to secure the cartridge into place.
NOTE:
Insert the color cartridge in the slot on the left. Insert the black cartridge in the slot on the right.
Figure : Insert the cartridge
-
Insert the cartridgeClose the lid
The color cartridge is on the left, and the black cartridge is on the right
Repeat the previous steps to remove, and then reinsert the other cartridge.
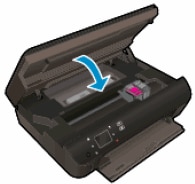
Close the cartridge access door.
Figure : Close the cartridge access door
If these steps resolved the issue, you do not need to continue troubleshooting.
Clean the electrical contacts
Gather the following materials:
Dry foam-rubber swabs, lint-free cloth, or any soft material that does not come apart or leave fibers (coffee filters work well)
Distilled, filtered, or bottled water (tap water might contain contaminants that can damage the cartridges)
CAUTION:
Do not use platen cleaners or alcohol to clean the cartridge contacts. These can damage the cartridge or the printer.
Press the Power button to turn on the printer, if it is not already on.
Open the scanner lid.
Open the cartridge access door. The carriage moves to the cartridge access area.
Figure : Open the cartridge access door
Disconnect the power cord from the rear of the printer.
Disconnect the USB cable, if the printer is connected to your computer with a USB connection.
WARNING:
You must disconnect the power cord before reaching inside the printer to avoid the risk of injuries or electric shock.
To release the cartridge, lift the lid on the cartridge slot, and then gently push the lid back until it stops.
Pull up on the cartridge to remove it from the slot.
Figure : Remove the cartridge
-
Lift the lidGently push the lid back
Pull up on the cartridge
CAUTION:
Do not remove both cartridges at the same time. Remove and clean each cartridge one at a time. Do not leave a cartridge outside the printer for more than 30 minutes.
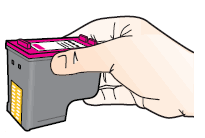
Hold the cartridge by its sides.
Figure : Hold the cartridge by its sides
Inspect the ink cartridge contacts for ink and debris buildup.
CAUTION:
Do not touch the copper-colored contacts or the ink nozzles. Touching these parts can result in clogs, ink failure, and bad electrical connections.
Figure : Do not touch the contacts or nozzles
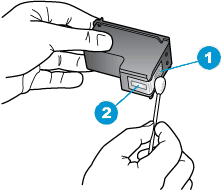
Lightly moisten a foam-rubber swab or lint-free cloth with distilled water, and then squeeze any excess water from it.
Clean only the copper-colored contacts on the cartridge, and then allow the cartridge to dry for about 10 minutes.
Figure : Clean the contacts
-
Copper-colored contactsInk nozzles (do not clean)
Lightly moisten another foam-rubber swab or lint-free cloth with distilled water, and then squeeze any excess water from it.
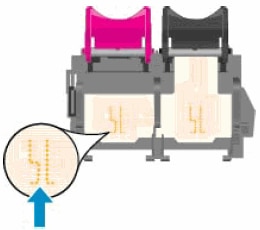
Use the swab or cloth to clean the electrical contacts in the carriage, located inside the printer in the cartridge slots.
Figure : The electrical contacts in the cartridge slots
Allow the carriage contacts to dry for about 10 minutes.
Hold the cartridge at a slight upward angle with the cartridge contacts facing the rear of the printer, and then slide the cartridge into the empty slot.
Close the lid on the cartridge slot to secure the cartridge into place.
NOTE:
Insert the color cartridge in the slot on the left. Insert the black cartridge in the slot on the right.
Figure : Insert the cartridge
-
Insert the cartridgeClose the lid
The color cartridge is on the left, and the black cartridge is on the right
Repeat the previous steps to install the other cartridge, if necessary.
Close the cartridge access door.
Figure : Close the cartridge access door
Close the scanner lid.
Reconnect the power cord to the rear of the printer.
Reconnect the USB cable, if the printer is connected to your computer with a USB connection.
Press the Power button to turn on the printer.
You can refer this HP document for more assistance:- Click here
Let me know how it goes.
To thank me for my efforts to help you, please mark my post as an accepted solution so that it benefits several others.
Cheers.
Sandytechy20
I am an HP Employee
Didn't find what you were looking for? Ask the community