• ×
    Information
    Windows update impacting certain printer icons and names. Microsoft is working on a solution.
    Click here to learn more
    Information
    Need Windows 11 help?
    Check documents on compatibility, FAQs, upgrade information and available fixes.
    Windows 11 Support Center.
  • post a message
  • ×
    Information
    Windows update impacting certain printer icons and names. Microsoft is working on a solution.
    Click here to learn more
    Information
    Need Windows 11 help?
    Check documents on compatibility, FAQs, upgrade information and available fixes.
    Windows 11 Support Center.
  • post a message
Guidelines
Do you need the WPS PIN to connect your printer? Click here for tips and tricks!
Check some of the most frequent questions about Instant Ink: HP INSTANT INK, HP+ PLANS: INK AND TONER.


Check out our WINDOWS 11 Support Center info about: OPTIMIZATION, KNOWN ISSUES, FAQs AND MORE.
HP Recommended
envy 5640
Microsoft Windows 10 (64-bit)

hi, I'm getting an error message saying the cartridge is incorrectly installed.. it has worked previously with the same cartridge, I've followed the instructions to reinstall and no change  

1 REPLY 1
HP Recommended

Hi @emmaD123


Welcome to the HP Support Community. I'd be happy to assist you with the  "cartridge installed incorrectly" error. 


Let's try a reset on the printer-


Step 1: Reset the printer


Reset the printer to recover from printer failures.

  1. With the printer turned on, disconnect the power cord from the printer.

  2. Unplug the power cord from the power source.

  3. Wait 60 seconds.

  4. Reconnect the power cord to a wall outlet and to the printer.

    NOTE: 

    HP recommends plugging the printer directly into a wall outlet.


Step 2: Clean the electrical contacts

Remove the cartridge indicated by the error message, clean the electrical contacts, and then reinsert the cartridge in its color-coded slot.

  1. Turn the printer on.

  2. Open the door to access the cartridges.

  3. Wait until the carriage stops moving before you continue.

  4. Remove the cartridge indicated in the error message from its slot, holding it by its side.

       CAUTION: 

    Do not touch the copper-colored contacts or the ink nozzles. Touching these parts can result in clogs, ink failure, and bad electrical connections.

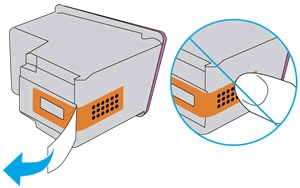
  5. Remove any protective tape that still might be on the contacts.

       CAUTION: 

    Do not touch or try to remove the copper electrical strip.

    Remove the plastic tape and do not touch the contacts or ink nozzles

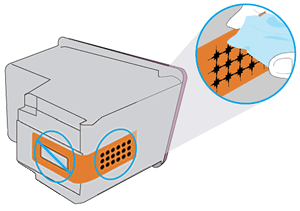
  6. Lightly dampen a lint-free cloth with distilled water, and then clean only the copper-colored contacts on the cartridge.

    Cleaning the copper-colored contacts on the cartridge

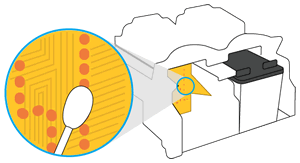
  7. Lightly dampen a lint-free cloth with distilled water, and then clean the electrical contacts in the carriage, located inside the printer.

    The carriage contacts

  8. Wait 10 minutes for the contacts to dry.

  9. Reinsert the cartridge.

    • Insert the black cartridge into the right slot.

    • Insert the tri-color cartridge into the left slot.

  10. Repeat these steps for the other cartridge, if necessary.

  11. Close the cartridge access door.

  12. If the error persists, repeat the previous steps to clean the cartridge and carriage contacts a second time.

  13. Check for the error message.

Step 2: Replace the problem cartridge

For best results, replace the cartridge indicated in the error message with a genuine HP cartridge. To find your cartridge number and to purchase ink or toner supplies, go to HP Store or a local retailer.

NOTE: 

If you have a defective cartridge or printhead, it might be under warranty. To check the warranty on your ink or toner supplies, go to Printer and Page Yield Overview, and then review the limited warranty information for your supplies.


HP Instant Ink subscribers: To order a replacement for a faulty ink cartridge, go to HP Instant Ink, and then select the option to contact HP Support.

  1. Open the door to access the cartridges.

  2. Wait until the carriage stops moving before you continue.

  3. Remove the cartridge indicated by the error message.

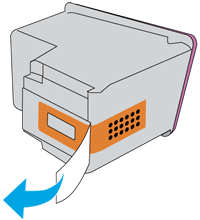
  4. Remove the new cartridge from its package, and then remove the protective tape on the contacts.

       CAUTION: 

    Do not try to remove or touch the copper electrical strip.

    Removing tape from a new cartridge

  5. Insert the new cartridge into its color-coded slot.

    • Insert the black cartridge into the right slot.

    • Insert the tri-color cartridge into the left slot.

  6. Repeat these steps for the other cartridge, if necessary.

  7. Close the cartridge access door.

 You may also refer to: Error Indicates Faulty Ink Cartridge 


Hope this helps! Keep me posted. 


Please click “Accept as Solution” if you feel my post solved your issue, it will help others find the solution.

Click the “Kudos, Thumbs Up" on the bottom right to say “Thanks” for helping!


Have a great day! 

† The opinions expressed above are the personal opinions of the authors, not of HP. By using this site, you accept the <a href="https://www8.hp.com/us/en/terms-of-use.html" class="udrlinesmall">Terms of Use</a> and <a href="/t5/custom/page/page-id/hp.rulespage" class="udrlinesmall"> Rules of Participation</a>.