-
×InformationWindows update impacting certain printer icons and names. Microsoft is working on a solution.
Click here to learn moreInformationNeed Windows 11 help?Check documents on compatibility, FAQs, upgrade information and available fixes.
Windows 11 Support Center. -
-
×InformationWindows update impacting certain printer icons and names. Microsoft is working on a solution.
Click here to learn moreInformationNeed Windows 11 help?Check documents on compatibility, FAQs, upgrade information and available fixes.
Windows 11 Support Center. -
- HP Community
- Notebooks
- Notebook Audio
- Laptop Mic not connected

Create an account on the HP Community to personalize your profile and ask a question
Your account also allows you to connect with HP support faster, access a personal dashboard to manage all of your devices in one place, view warranty information, case status and more.
Check out our WINDOWS 11 Support Center info about: OPTIMIZATION, KNOWN ISSUES, FAQs, VIDEOS AND MORE.

It has been a while since anyone has replied. Simply ask a new question if you would like to start the discussion again.
09-18-2020 06:26 AM
 HP Recommended
Product: Envy x360 - 15-ed0300nd
Operating System: Microsoft Windows 10 (64-bit)
hi,
I have a intergrated mic but my notebook does not detect it.
Also my mic mute button is not working annymore.
I hope someone can help me.
.png")
Solved! Go to Solution.
1 ACCEPTED SOLUTION
Accepted Solutions
09-20-2020 03:41 PM
HP Recommended
@Raymon1212 Welcome to HP Community!
I understand that the Laptop Mic not connected.
Please perform the below steps.
Step 1: Check the microphone hardware
Make sure the microphone has power, is turned up, and functioning.
-
If the microphone operates on battery power, make sure the batteries are correctly seated and are functional. If the microphone operates on external power, make sure that all the power connections are secure and the power cord is connected to a power source.
-
If the microphone has a volume control, make sure it is turned up half way.
-
Disconnect the microphone from the computer port, and then re-connect it. If the microphone uses a USB port, try connecting it to a different USB port on the computer.
-
Connect the microphone to another device, such as another computer, and then try to use it.
-
If the microphone functions correctly when connected to the other device, a driver or computer recognition issue might be causing the problem. Continue to the next step to check for an update to the audio driver.
-
If the microphone does not function correctly when connected to the alternative device, then the microphone might need to be replaced.
-
Step 2: Update the audio driver
An old audio driver can cause your microphone to function incorrectly. Make sure the audio driver is current.
-
Connect to the Internet.
-
In Windows, search for and open Device Manager.
-
Double-click Sound, video and game controllers.
-
Right-click the name of the sound hardware, and then select Update Driver.

-
Click Search automatically for updated driver software, and then wait for Windows to update the driver software.
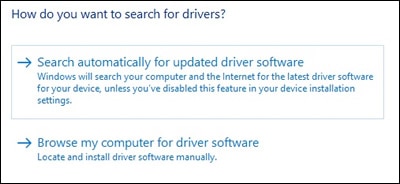
-
Windows checks to see if updated driver software is available.
If an update is available, let Windows install the update.
-
When the update is installed successfully, a Windows has finished installing the driver software for this device window displays.
Test the microphone.
If updating the driver did not resolve the issue, continue to the next step.
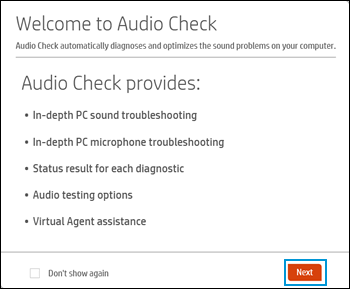
Step 3: Run the Audio Check in HP Support Assistant
Run the Audio Check in HP Support Assistant to make sure the audio device is functioning properly.

-
Go to HP Support Assistant to download and install the HP Support Assistant software, if it is not already installed on your computer.
-
In Windows, search for and open HP Support Assistant.
-
On the My devices tab, click your computer.

-
Click the Troubleshooting and fixes tab, and then click Audio Check
 in the One click fixes section.
 -
Click Next, and then wait for the audio test to complete.
-
Review the test results on the audio and microphone diagnostic results display, and then click Test Audio.
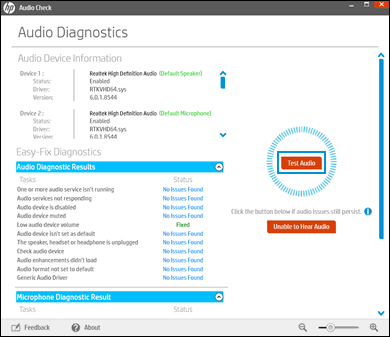
-
If sound is not heard correctly, click Unable to Hear Audio and then follow the on-screen instructions.
If the audio issue persists, continue to the next step.
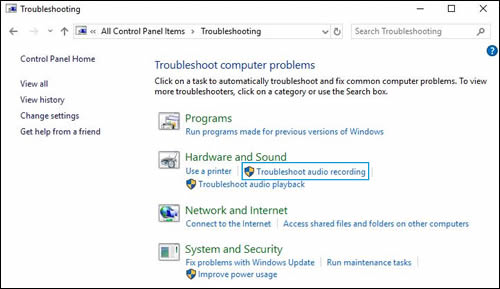
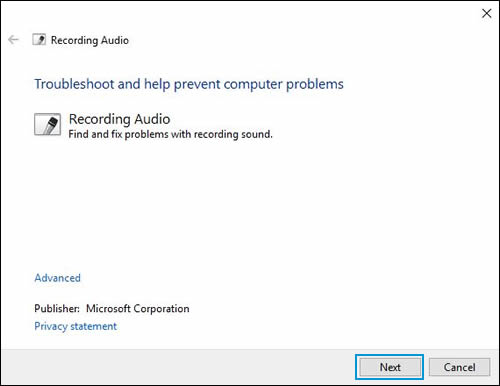
Step 4: Use the Troubleshooting tool
The Troubleshooting tool automatically finds and fixes many computer issues. Use it to troubleshoot microphone problems.
-
In Windows, search for and open Control Panel.
-
Click Troubleshooting.
-
Under Hardware and Sound, click Troubleshoot audio recording.
note:
Administrator permission is required to run this program. If prompted, type the administrator password or provide confirmation.
-
The Sound troubleshooter opens. Click Next. The troubleshooter begins checking the audio service status.
-
Select the device you want to troubleshoot, and then click Next.
-
Follow the on-screen instructions and make any changes suggested by the troubleshooter. When done, close the troubleshooter.
-
If the problem persists, continue to the next step.
Step 5: Configure the sound settings in Windows
An incorrect setting in Windows could cause microphone issues. Use Windows Sound settings to configure the microphone.
-
Connect the microphone to the computer.
-
In Windows, search for and open Sound.
-
Click the Recording tab in the Sound window.

-
In the list of devices, find the microphone that you want to use.
If the microphone is not listed, use the following steps to show disabled and disconnected devices:
-
Right-click an empty area of the Sound window.
-
Click Show Disabled Devices and Show Disconnected Devices.

-
If the microphone is listed as Currently unavailable or Not plugged in, disconnect it, and then reconnect it to the port.
If the device you want to use contains a small circle with an arrow pointing down, the device is disabled. To enable the device, right-click the device name, and then select Enable.
-
-
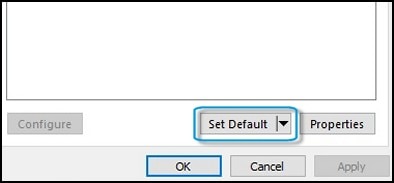
Select the microphone you want to use, and then click Set Default to make this device the default audio input device.
-
With the device still selected, click Properties.
-
In the Properties window, click the Levels tab.

-
If the Mute button
 is on, click it to unmute. The volume button should display as a blue speaker icon
  .
. -
Use the slider bar to raise the volume level to at least 75.
-
If Microphone Boost is available, adjust it to +20.0 dB.
-
Click OK to save changes.
Keep us posted,
If you would like to thank us for our efforts to help you,
Give us a virtual high-five by clicking the 'Thumbs Up' icon below, followed by clicking on the "Accept as solution" on this post,
Have a great day!
6 REPLIES 6
.png")
09-20-2020 03:41 PM
HP Recommended
@Raymon1212 Welcome to HP Community!
I understand that the Laptop Mic not connected.
Please perform the below steps.
Step 1: Check the microphone hardware
Make sure the microphone has power, is turned up, and functioning.
-
If the microphone operates on battery power, make sure the batteries are correctly seated and are functional. If the microphone operates on external power, make sure that all the power connections are secure and the power cord is connected to a power source.
-
If the microphone has a volume control, make sure it is turned up half way.
-
Disconnect the microphone from the computer port, and then re-connect it. If the microphone uses a USB port, try connecting it to a different USB port on the computer.
-
Connect the microphone to another device, such as another computer, and then try to use it.
-
If the microphone functions correctly when connected to the other device, a driver or computer recognition issue might be causing the problem. Continue to the next step to check for an update to the audio driver.
-
If the microphone does not function correctly when connected to the alternative device, then the microphone might need to be replaced.
-
Step 2: Update the audio driver
An old audio driver can cause your microphone to function incorrectly. Make sure the audio driver is current.
-
Connect to the Internet.
-
In Windows, search for and open Device Manager.
-
Double-click Sound, video and game controllers.
-
Right-click the name of the sound hardware, and then select Update Driver.
-
Click Search automatically for updated driver software, and then wait for Windows to update the driver software.
-
Windows checks to see if updated driver software is available.
If an update is available, let Windows install the update.
-
When the update is installed successfully, a Windows has finished installing the driver software for this device window displays.
Test the microphone.
If updating the driver did not resolve the issue, continue to the next step.
Step 3: Run the Audio Check in HP Support Assistant
Run the Audio Check in HP Support Assistant to make sure the audio device is functioning properly.
-
Go to HP Support Assistant to download and install the HP Support Assistant software, if it is not already installed on your computer.
-
In Windows, search for and open HP Support Assistant.
-
On the My devices tab, click your computer.
-
Click the Troubleshooting and fixes tab, and then click Audio Check
in the One click fixes section. -
Click Next, and then wait for the audio test to complete.
-
Review the test results on the audio and microphone diagnostic results display, and then click Test Audio.
-
If sound is not heard correctly, click Unable to Hear Audio and then follow the on-screen instructions.
If the audio issue persists, continue to the next step.
Step 4: Use the Troubleshooting tool
The Troubleshooting tool automatically finds and fixes many computer issues. Use it to troubleshoot microphone problems.
-
In Windows, search for and open Control Panel.
-
Click Troubleshooting.
-
Under Hardware and Sound, click Troubleshoot audio recording.
note:
Administrator permission is required to run this program. If prompted, type the administrator password or provide confirmation.
-
The Sound troubleshooter opens. Click Next. The troubleshooter begins checking the audio service status.
-
Select the device you want to troubleshoot, and then click Next.
-
Follow the on-screen instructions and make any changes suggested by the troubleshooter. When done, close the troubleshooter.
-
If the problem persists, continue to the next step.
Step 5: Configure the sound settings in Windows
An incorrect setting in Windows could cause microphone issues. Use Windows Sound settings to configure the microphone.
-
Connect the microphone to the computer.
-
In Windows, search for and open Sound.
-
Click the Recording tab in the Sound window.
-
In the list of devices, find the microphone that you want to use.
If the microphone is not listed, use the following steps to show disabled and disconnected devices:
-
Right-click an empty area of the Sound window.
-
Click Show Disabled Devices and Show Disconnected Devices.
-
If the microphone is listed as Currently unavailable or Not plugged in, disconnect it, and then reconnect it to the port.
If the device you want to use contains a small circle with an arrow pointing down, the device is disabled. To enable the device, right-click the device name, and then select Enable.
-
-
Select the microphone you want to use, and then click Set Default to make this device the default audio input device.
-
With the device still selected, click Properties.
-
In the Properties window, click the Levels tab.
-
If the Mute button
is on, click it to unmute. The volume button should display as a blue speaker icon . -
Use the slider bar to raise the volume level to at least 75.
-
If Microphone Boost is available, adjust it to +20.0 dB.
-
Click OK to save changes.
Keep us posted,
If you would like to thank us for our efforts to help you,
Give us a virtual high-five by clicking the 'Thumbs Up' icon below, followed by clicking on the "Accept as solution" on this post,
Have a great day!
09-21-2020 12:54 AM
HP Recommended
I tried all of that but nothing works,
can it be a broken mic because i can not select it as standard anymore. also like the picture says the mic is not connected.
it is a internal mic so i can not disconnect or connect the mic.
09-21-2020 02:24 PM
HP Recommended
I understand your concerns.
Please run the SFC scan. you can refer to this Link: https://support.microsoft.com/en-in/help/4026529/windows-10-using-system-file-checker
Try creating a new user account on your computer.
Go to http://hp.care/2dWJKgW and follow the steps to create a new user account.
Have a nice day!!
09-21-2020 03:27 PM
HP Recommended
Thank you for the update.
We are happy to hear that the issue is resolved.
In the future, if you have any other concerns, Please get back to us. We will assist you.
Have a nice day!!
Be alert for scammers posting fake support phone numbers and/or email addresses on the community.
If you think you have received a fake HP Support message, please report it to us by clicking on "Flag Post".
† The opinions expressed above are the personal opinions of the authors, not of HP. By using this site, you accept the Terms of Use and Rules of Participation.


Didn't find what you were looking for? Ask the community
† The opinions expressed above are the personal opinions of the authors, not of HP. By using this site, you accept the <a href="https://www8.hp.com/us/en/terms-of-use.html" class="udrlinesmall">Terms of Use</a> and <a href="/t5/custom/page/page-id/hp.rulespage" class="udrlinesmall"> Rules of Participation</a>.