• ×
    Information
    Windows update impacting certain printer icons and names. Microsoft is working on a solution.
    Click here to learn more
    Information
    Need Windows 11 help?
    Check documents on compatibility, FAQs, upgrade information and available fixes.
    Windows 11 Support Center.
  • post a message
  • ×
    Information
    Windows update impacting certain printer icons and names. Microsoft is working on a solution.
    Click here to learn more
    Information
    Need Windows 11 help?
    Check documents on compatibility, FAQs, upgrade information and available fixes.
    Windows 11 Support Center.
  • post a message
Guidelines
We have new content about Hotkey issue, Click here to check it out!
Check out our WINDOWS 11 Support Center info about: OPTIMIZATION, KNOWN ISSUES, FAQs, VIDEOS AND MORE.
HP Recommended
15-da0511sa
Microsoft Windows 10 (64-bit)

There is no option to input direct audio line. This model does not have shared mic/headphone option. Is there a way to get round this.

1 REPLY 1
HP Recommended

@bigmald Welcome to HP Community!


I understand that the No audio line input on !5-da051sa laptop.


Check the device connection

Confirm the correct port is used for the connector type on the microphone or line-in device.

  1. Identify the connector type on your microphone or line-in device. Most devices have either a USB connector or a pin connector. There are two types of pin connectors.

    1. Four-pin connector: Voice and audio devices such as a headset

    2. Three-pin connector: Audio-only devices such as headphones

  2. Identify the compatible computer port for the device. Look for the following icons or color-coded ports.

    • Headset port: Many newer computers have one port that supports both three and four-pin connector headsets and headphones.

    • Headphone port: Supports headphones only.

    • Microphone port: Supports microphones only
Please perform the below steps.


Step 1: Check the microphone hardware

Make sure the microphone has power, is turned up, and functioning.

  1. If the microphone operates on battery power, make sure the batteries are correctly seated and are functional. If the microphone operates on external power, make sure that all the power connections are secure and the power cord is connected to a power source.

  2. If the microphone has a volume control, make sure it is turned up half way.

  3. Disconnect the microphone from the computer port, and then re-connect it. If the microphone uses a USB port, try connecting it to a different USB port on the computer.

  4. Connect the microphone to another device, such as another computer, and then try to use it.

    • If the microphone functions correctly when connected to the other device, a driver or computer recognition issue might be causing the problem. Continue to the next step to check for an update to the audio driver.

    • If the microphone does not function correctly when connected to the alternative device, then the microphone might need to be replaced.

Step 2: Update the audio driver

An old audio driver can cause your microphone to function incorrectly. Make sure the audio driver is current.

  1. Connect to the Internet.

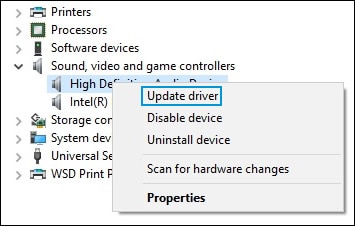
  2. In Windows, search for and open Device Manager.

  3. Double-click Sound, video and game controllers.

  4. Right-click the name of the sound hardware, and then select Update Driver.

    Update Driver option in Device Manager

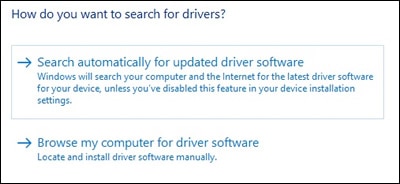
  5. Click Search automatically for updated driver software, and then wait for Windows to update the driver software.

    Updated Driver Software: Search automatically for updated driver software

  6. Windows checks to see if updated driver software is available.

    If an update is available, let Windows install the update.

  7. When the update is installed successfully, a Windows has finished installing the driver software for this device window displays.

    Test the microphone.

If updating the driver did not resolve the issue, continue to the next step.

Step 3: Use the Troubleshooting tool

The Troubleshooting tool automatically finds and fixes many computer issues. Use it to troubleshoot microphone problems.

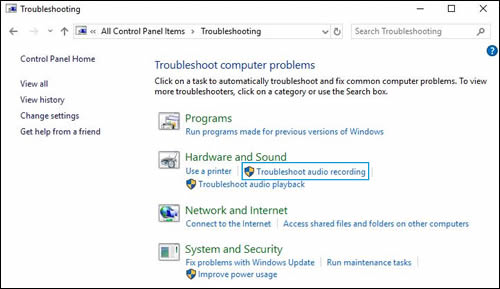
  1. In Windows, search for and open Control Panel.

  2. Click Troubleshooting.

  3. Under Hardware and Sound, click Troubleshoot audio recording.

    NOTE: 

    Administrator permission is required to run this program. If prompted, type the administrator password or provide confirmation.

    Troubleshoot audio recording

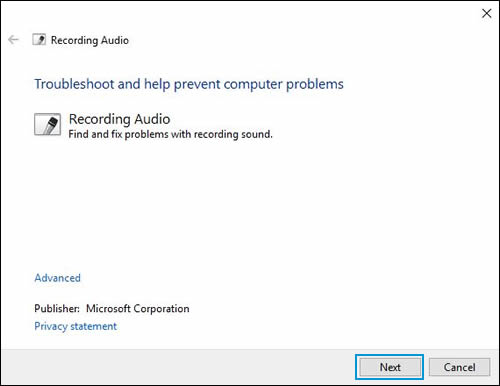
  4. The Sound troubleshooter opens. Click Next. The troubleshooter begins checking the audio service status.

    Select device to troubleshoot

  5. Select the device you want to troubleshoot, and then click Next.

  6. Follow the on-screen instructions and make any changes suggested by the troubleshooter. When done, close the troubleshooter.

  7. If the problem persists, continue to the next step.

Step 4: Configure the sound settings in Windows

An incorrect setting in Windows could cause microphone issues. Use Windows Sound settings to configure the microphone.

  1. Connect the microphone to the computer.

  2. In Windows, search for and open Sound.

  3. Click the Recording tab in the Sound window.

    Recording tab in the Sound window

  4. In the list of devices, find the microphone that you want to use.

    If the microphone is not listed, use the following steps to show disabled and disconnected devices:

    1. Right-click an empty area of the Sound window.

    2. Click Show Disabled Devices and Show Disconnected Devices.

      Disabled and disconnected devices shown in the Sound window

    3. If the microphone is listed as Currently unavailable or Not plugged in, disconnect it, and then reconnect it to the port.

      If the device you want to use contains a small circle with an arrow pointing down, the device is disabled. To enable the device, right-click the device name, and then select Enable.

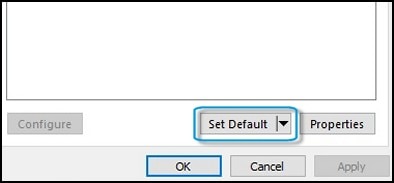
  5. Select the microphone you want to use, and then click Set Default to make this device the default audio input device.

    Set Default option in the Sound window

  6. With the device still selected, click Properties.

  7. In the Properties window, click the Levels tab.

    Levels tab

  8. If the Mute button  is on, click it to unmute. The volume button should display as a blue speaker icon  .

  9. Use the slider bar to raise the volume level to at least 75.

  10. If Microphone Boost is available, adjust it to +20.0 dB.

  11. Click OK to save changes.

Keep us posted,

If you would like to thank us for our efforts to help you, 


Give us a virtual high-five by clicking the 'Thumbs Up' icon below, followed by clicking on the "Accept as solution" on this post, 


Have a great day!

† The opinions expressed above are the personal opinions of the authors, not of HP. By using this site, you accept the <a href="https://www8.hp.com/us/en/terms-of-use.html" class="udrlinesmall">Terms of Use</a> and <a href="/t5/custom/page/page-id/hp.rulespage" class="udrlinesmall"> Rules of Participation</a>.