-
×InformationNeed Windows 11 help?Check documents on compatibility, FAQs, upgrade information and available fixes.
Windows 11 Support Center. -
-
×InformationNeed Windows 11 help?Check documents on compatibility, FAQs, upgrade information and available fixes.
Windows 11 Support Center. -
- HP Community
- Notebooks
- Notebook Software and How To Questions
- How to set up E-Mails

Create an account on the HP Community to personalize your profile and ask a question
09-20-2017 10:48 AM
I have already got my emails set up on my laptop, and created a new one when I received the laptop, but I am not receiving any emails on my laptop although it says I am logged in, and am receiving them on my phone. I have tried to log out and back in again like everyone usually does, however i couldn't find the 'log out' button so couldn't succeed. Please help as I finally want to be able to reply to emails on my laptop to make my life easier. Many Thanks.
09-20-2017 11:58 AM
Hello,
Set up email in Mail for Windows 10
Once you log on to Windows 10 with your Microsoft account, that account is added to the Mail and Calendar apps. You can add that and many other email accounts to the Mail and Calendar apps to start sending and receiving email and creating and managing events.
NOTES:
If you still need a Microsoft account you can create one with any email address.
Seeing a message that your account is out-of-date? You probably need to update your account settings. See Fixing an out-of-date account for more information.
Did you set up your email, but you don't see your messages? Change your mailbox sync settings..
Add a new email account
The first time you open the Mail app, you’ll see a Welcome page. Select Add account to get started. Otherwise, at the bottom of the left navigation pane, select Settings
 > Manage Accounts > Add account.
NOTE: On a phone or tablet, tap the three dots at the bottom of the page to access Settings.
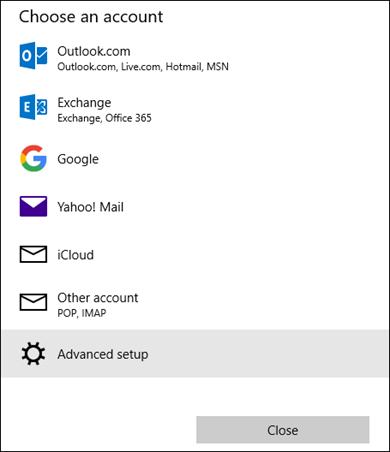
Choose the type of the account you want to add.
NOTE: You may need to scroll down theChoose an account dialog box to view all options.

Enter the required information and click Sign in. For most accounts, this is your email address, password, and the account name. The account name is what you'll see in both the left pane of Windows 10 Mail as well as the Manage Accounts pane.
NOTES:
If you click Google, you’ll need to sign in to your Google account, enter your 2-step verification code if you’ve enabled that security feature, and give Windows permission to access your information. Click Allow and your account will be created.
If you click Yahoo or iCloud, you'll need to follow the special instructions under Special instructions for other accountsbelow.
If you receive the message “We couldn’t find info for that account. Make sure that the email address is correct and then try again,” you’ll need to click Try again three times before the button changes to Advanced. Click Advanced and follow the steps in the next section to add your account.
Click Done. Your data will start syncing as soon as your account is set up.
NOTE: It may take a few minutes for your account to synchronize. During this time, you may see Not synced yet in the message pane. If this message persists, see Resolve sync issues in Mail and Calendar apps in Windows 10.
Add an account using advanced setup
There are two ways you can access the Advanced setup options for your email account.
Click Advanced setup if your automatic email setup fails in Step 3 above.
Click Advanced setup from the Choose an account window in Step 2 above. The Advanced setup option is the last option on the list, and you may have to scroll to see it.
You can choose an Exchange ActiveSync account or an Internet email account. Unless your administrator has instructed you to use Exchange ActiveSync, click Internet email.
Enter the following information in the Advanced setup window.
Email address This is the name you'll see in the left pane of the Mail app.
User name This is your full email address.
Password Enter your email account password.
Account name This is the name that you'll see in the left pane of Mail for Windows 10, as well as in the Manage Accounts pane. You can choose any name you want.
Send your messages using this name Enter the name you want recipients to see when they receive your message.
Incoming email server You can get this information from your ISP or administrator. Usually, an incoming mail server address is in the format of mail.contoso.com or imap.google.com. For many email accounts, you can find this information in our POP and IMAP server name reference.
Account type Choose POP3 or IMAP4. Most email accounts use IMAP4. If you don't know which one to choose, contact your ISP.
Outgoing (SMTP) email server You can get this information from your ISP or administrator. Usually, an outgoing email server address is in the format of mail.contoso.com or smtp.contoso.com.
By default, all four checkboxes at the bottom of the window will be selected. Most email accounts don't require any changes to these options.
Your email provider can give you the settings you need to fill in the Advanced setup but you can also go to the POP and IMAP server name reference we've provided for the most popular email providers.
After you've entered the required information, click Sign in > Done.
Thanks!
I am a HP employee.
**Click Accept as Solution on a Reply that solves your issue to help others**
******Clicking the Thumbs-Up button is a way to say -Thanks!.******
