• ×
    Information
    Windows update impacting certain printer icons and names. Microsoft is working on a solution.
    Click here to learn more
    Information
    Need Windows 11 help?
    Check documents on compatibility, FAQs, upgrade information and available fixes.
    Windows 11 Support Center.
  • post a message
  • ×
    Information
    Windows update impacting certain printer icons and names. Microsoft is working on a solution.
    Click here to learn more
    Information
    Need Windows 11 help?
    Check documents on compatibility, FAQs, upgrade information and available fixes.
    Windows 11 Support Center.
  • post a message
Guidelines
Do you need the WPS PIN to connect your printer? Click here for tips and tricks!
HP Recommended

I was printing double-sided and (I think) as it pulled the paper in for side 2, I could hear it crumpling up inside, and there was nothing I could do. When I lifted the lid, I could see corners of the angled paper sticking out in front, but pulling on them did not draw the paper out (as it usually does), they just tore off. The inner lid -- the "paper path door" with the squeeze tabs -- will not lift out. (The tabs squeeze normally.) Turning the printer over and pulling the paper tray out as far as it goes, I see a sheet of paper but there is no way to grasp it, and it is not crumpled.


The icons that show up in the little window show raising the cover, lifting out the inner lid -- and the last one shows the paper tray pulled out and a rectangle opposite it, as if there's a door on the back wall that can be lowered, but I can find no way to open the back panel that is separate from the frame.


How do I get the sheet of paper out?

3 REPLIES 3
HP Recommended

@grammatim


Welcome to the HP support community.


I understand that you are getting paper jam errors, I am glad to assist you.

Clear jammed paper from the paper tray area

Remove any jammed paper that is accessible from the input tray and underneath the printer.

  1. Touch OK to try to automatically clear the paper jam.

    If the paper jam error persists, continue these steps to manually clear the jam.

  2. Push in the output tray, if necessary.

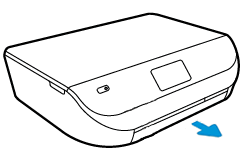
  3. Open the input tray door, and then pull it toward you to extend the input tray.

    Figure : Opening the input tray

    Opening the input tray.
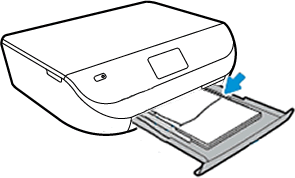
  4. Use a flashlight to check for any paper or objects in input tray area, and then remove any paper or objects that you find. To avoid tearing any whole sheets of paper, pull the paper with both hands.

    Figure : Removing jammed paper from the input tray

    Removing jammed paper from the input tray.
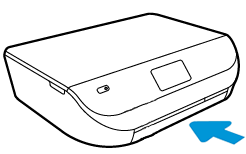
  5. Push the input tray back into the printer.

    Figure : Closing the input tray

    Closing the input tray.
  6. Turn off the printer, and then disconnect any cords connected to the printer, such as the power cord and USB cable.

  7. Turn the printer on its side to access its underside (base).

       CAUTION: 

    Before turning the printer, use your hands to secure the scanner lid.

  8. Open the input tray door, and then pull it toward you to extend the input tray.

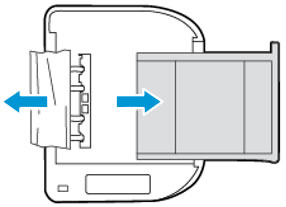
  9. Use a flashlight to check for any paper or objects in the cleanout area, and then remove any paper or objects you find. To avoid tearing the paper, slowly pull out the paper.

    If any torn pieces of paper remain inside the printer, more jams are likely to occur.

    Figure : Removing jammed paper from underneath the printer

    Removing jammed paper underneath the printer.
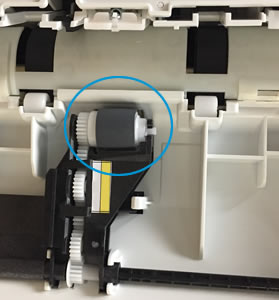
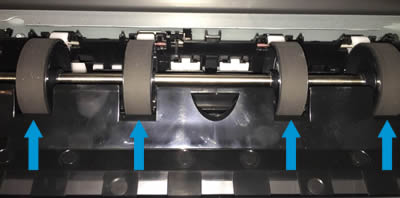
  10. Use a flashlight to check for any torn paper in the paper pick rollers, and then remove any paper you find.

    Figure : Example of the paper pick roller

    Example of  the paper pick roller
  11. Close the input tray.

  12. Return the printer to its normal position.

  13. Open the ink cartridge access door, and then look inside the printer for any loose objects that might have shifted when the printer was turned over.

  14. Remove any loose objects found.

  15. Close the ink cartridge access door.

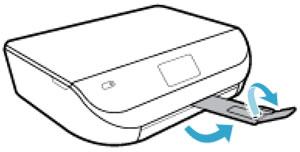
  16. Pull out the output tray, and then lift the output tray extender.

    Figure : Pulling out the output tray and lifting the output tray extender

    Pulling out the output tray and lifting the output tray extender
  17. Reconnect the power cord and any other cables to the rear of the printer, and then turn on the printer.

Clean the paper feed rollers

Dust, paper fiber, and other debris might accumulate on the paper feed rollers and cause paper jams and paper feed issues.

  1. Turn off the printer, and then disconnect the power cord.

       WARNING: 

    To avoid risk of injuries or electric shock, disconnect the power cord before reaching inside the printer.

  2. Push in the output tray, if necessary.

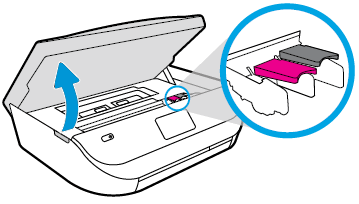
  3. Gently grasp the handles on either side of the printer, and then raise the ink cartridge access door until it locks into place.

    Figure : Opening the ink cartridge access door

    Opening the ink cartridge access door.
  4. Lightly dampen a lint-free cloth with distilled water, and then squeeze any excess liquid from the cloth.

  5. Press the cloth against the rollers inside the printer, and then rotate the rollers upwards with your fingers. Apply a moderate amount of pressure to remove any dust or dirt buildup.

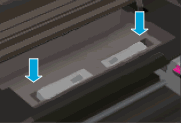
    Figure : Rollers in the ink cartridge access area

    Rollers in the ink cartridge access area
  6. Allow the rollers to dry (approximately 10 or 15 minutes).

  7. Locate the paper path cover in the area behind the ink cartridge access area.

    Figure : Example of the paper path cover

    Example of the paper path cover.
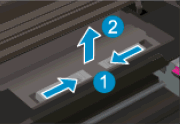
  8. To remove the paper path cover, pinch the tabs together, and then lift up.

    Figure : Removing the paper path cover

    1.  

      Removing the paper path cover.

      Pinch the tabs together
    2. Lift up

  9. Lightly dampen a lint-free cloth with distilled water, and then squeeze any excess liquid from the cloth.

  10. Press the cloth against the rollers, and then rotate them upward with your fingers. Apply a moderate amount of pressure to remove any dust or dirt buildup.

    Figure : Rollers behind the ink cartridges

    Rollers behind  the ink cartridges
  11. Allow the rollers to dry (approximately 10 or 15 minutes).

  12. Replace the paper path cover.

    Figure : Replacing the paper path cover

    Replacing the paper path cover.
  13. Close the ink cartridge access door.

  14. Pull out the output tray, and then lift the output tray extender.

    Figure : Pulling out the output tray and lifting the output tray extender

    Pulling out the output tray and lifting the output tray extender
  15. Reconnect the power cord and any other cables to the rear of the printer, and then turn on the printer.

Here is the HP document for your future reference:- Click here


Let me know how it goes.

To thank me for my efforts to help you, please mark my post as an accepted solution so that it benefits several others.

Cheers.

Sandytechy20
I am an HP Employee

HP Recommended

Dear Sandy,


Thank you for the emailed reply on Monday. Today I had the opportunity to do all the steps listed. Then I cam here and saw that the photographs were in color (Clearer, but they didn't help.) I now have the vocabulary to describe the problem more fully. A tiny edge of paper is sticking out under the "Rollers in the ink cartridge area." When I tried to pull the paper out, it did not budge, but pieces tore off. The Paper Path Cover is completely jammed. The tabs squeeze together, but it will not come out. (I've lifted the Cover off before, and it simply lifted off when the tabs were squeezed.)


What can I do? 

HP Recommended

@grammatim


This might require one on one interaction to fix the issue.

I request you to talk to HP support.

They might have multiple options to help you with this.

  1. Click on this link - https://support.hp.com/us-en/contact-hp?openCLC=true
  2. Select the country.
  3. Enter the serial of your device.
  4. Select the country from the drop-down.
  5. Click on "Show Options".
  6. Fill the web-form. A case number and phone number will now populate for you.

Keep me posted.

To thank me for my efforts to help you, please mark my post as an accepted solution so that it benefits several others.

Cheers.

Sandytechy20
I am an HP Employee

† The opinions expressed above are the personal opinions of the authors, not of HP. By using this site, you accept the <a href="https://www8.hp.com/us/en/terms-of-use.html" class="udrlinesmall">Terms of Use</a> and <a href="/t5/custom/page/page-id/hp.rulespage" class="udrlinesmall"> Rules of Participation</a>.