-
×InformationWindows update impacting certain printer icons and names. Microsoft is working on a solution.
Click here to learn moreInformationNeed Windows 11 help?Check documents on compatibility, FAQs, upgrade information and available fixes.
Windows 11 Support Center. -
-
×InformationWindows update impacting certain printer icons and names. Microsoft is working on a solution.
Click here to learn moreInformationNeed Windows 11 help?Check documents on compatibility, FAQs, upgrade information and available fixes.
Windows 11 Support Center. -
- HP Community
- Printers
- Printer Paper Jams & Feed Issues
- Envy 5660 "paper jam" when duplex printing

Create an account on the HP Community to personalize your profile and ask a question
Your account also allows you to connect with HP support faster, access a personal dashboard to manage all of your devices in one place, view warranty information, case status and more.

It has been a while since anyone has replied. Simply ask a new question if you would like to start the discussion again.
09-23-2020 09:04 PM
 HP Recommended
Product: HP Envy 5660
Operating System: Microsoft Windows 10 (64-bit)
HP Envy 5660 consistently prints back side of page on duplex print, then indicates "paper jam" before pulling page back in to print the front side. I cannot duplex print at all.
Since I've had the printer, I've duplex-printed MANY documents with no problems. This problem is new within the last two weeks. It is significant for me, as I have grown to depend upon this feature and design many documents to use it.
I have checked thoroughly inside the printer (as best I know how), and found no paper jammed inside. Only a small bit of dust.
How can I get my duplex print capability back? THANK YOU!!!!!
Solved! Go to Solution.
1 ACCEPTED SOLUTION
Accepted Solutions
09-29-2020 09:01 AM
HP Recommended
Welcome to the HP support community.
Manually clean the paper feed rollers
-
Gather the following materials:
-
Long, lint-free cotton swabs
-
A clean, lint-free cloth, or any cloth that does not come apart or leave fibers
-
Distilled, filtered, or bottled water (tap water might damage the printer)
-
-
Turn on the printer, if it is not already on.
-
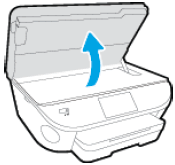
Gently grasp the handles on either side of the printer, then raise the ink cartridge access door until it locks into place.
The carriage moves to the center of the printer.
Figure : Opening the ink cartridge access door
-
Wait until the printer is idle and silent before you continue.
-
While the printer is still on, disconnect the power cord from the rear of the printer, and then unplug the power cord from the power source or electrical outlet.
WARNING:
You must disconnect the power cord before reaching inside the printer to avoid the risk of injuries or electric shock.
-
Disconnect the USB cable from the rear of the printer, if you have a cable connection to the computer.
-
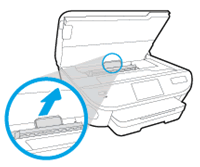
Locate the paper path cover, grasp the handle, and then lift up to remove it.
Figure : Removing the paper path cover
-
Lightly dampen the swab with the water, and then squeeze any excess liquid from the swab.
-
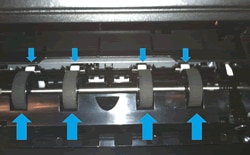
Use a flashlight to inspect the rollers. Press the swab against the rollers inside the printer, and then rotate the rollers upwards with your fingers.
Apply a moderate amount of pressure to remove any dust or dirt buildup.
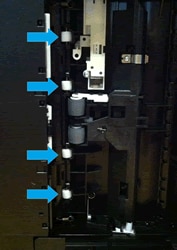
Figure : Example of the rollers in the paper path access area
-
Allow the rollers to dry completely (approximately 10 minutes).
-
Replace the paper path cover, and then close the ink cartridge access door.
Figure : Closing the ink cartridge access door

-
Grasp the output tray, and then pull toward you to remove it.
-
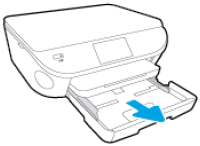
Pull out the input tray to its outermost position.
Figure : Pulling out the input tray
-
Remove all paper from the input tray.
-
Turn the printer onto its right side so you can access its underside. Make sure to hold the printer firmly with one hand to avoid tipping.
Figure : Turning the printer onto its right side

-
Lightly dampen a clean, lint-free cloth with bottled or distilled water, and then squeeze any excess liquid from the cloth.
-
Inspect the gap where the input tray was with a flashlight. Press the cloth against the rollers, and then rotate them upward with your fingers. Apply a moderate amount of pressure to remove any dust or dirt buildup.
Figure : Example of the rollers underneath the printer
-
Allow the rollers to dry completely (approximately 10 minutes).
-
Push in the input tray, and then return the printer to its normal position.
-
Slide the output tray back onto the input tray.
-
Reconnect the power cord to the rear of the printer, and then plug in the power cord to an electrical outlet.
-
Reconnect the USB cable, if your printer has a cable connection to the computer.
-
Turn on the printer.
The printer might go through a warm-up period and the carriage might move. Wait until the warm-up period finishes before you proceed.
You can refer this HP document for more assistance:- Click here
I hope that helps.
To thank me for my efforts to help you, please mark my post as an accepted solution so that it benefits several others.
Cheers.
Sandytechy20
I am an HP Employee
3 REPLIES 3
09-29-2020 09:01 AM
HP Recommended
Welcome to the HP support community.
Manually clean the paper feed rollers
-
Gather the following materials:
-
Long, lint-free cotton swabs
-
A clean, lint-free cloth, or any cloth that does not come apart or leave fibers
-
Distilled, filtered, or bottled water (tap water might damage the printer)
-
-
Turn on the printer, if it is not already on.
-
Gently grasp the handles on either side of the printer, then raise the ink cartridge access door until it locks into place.
The carriage moves to the center of the printer.
Figure : Opening the ink cartridge access door
-
Wait until the printer is idle and silent before you continue.
-
While the printer is still on, disconnect the power cord from the rear of the printer, and then unplug the power cord from the power source or electrical outlet.
WARNING:
You must disconnect the power cord before reaching inside the printer to avoid the risk of injuries or electric shock.
-
Disconnect the USB cable from the rear of the printer, if you have a cable connection to the computer.
-
Locate the paper path cover, grasp the handle, and then lift up to remove it.
Figure : Removing the paper path cover
-
Lightly dampen the swab with the water, and then squeeze any excess liquid from the swab.
-
Use a flashlight to inspect the rollers. Press the swab against the rollers inside the printer, and then rotate the rollers upwards with your fingers.
Apply a moderate amount of pressure to remove any dust or dirt buildup.
Figure : Example of the rollers in the paper path access area
-
Allow the rollers to dry completely (approximately 10 minutes).
-
Replace the paper path cover, and then close the ink cartridge access door.
Figure : Closing the ink cartridge access door
-
Grasp the output tray, and then pull toward you to remove it.
-
Pull out the input tray to its outermost position.
Figure : Pulling out the input tray
-
Remove all paper from the input tray.
-
Turn the printer onto its right side so you can access its underside. Make sure to hold the printer firmly with one hand to avoid tipping.
Figure : Turning the printer onto its right side
-
Lightly dampen a clean, lint-free cloth with bottled or distilled water, and then squeeze any excess liquid from the cloth.
-
Inspect the gap where the input tray was with a flashlight. Press the cloth against the rollers, and then rotate them upward with your fingers. Apply a moderate amount of pressure to remove any dust or dirt buildup.
Figure : Example of the rollers underneath the printer
-
Allow the rollers to dry completely (approximately 10 minutes).
-
Push in the input tray, and then return the printer to its normal position.
-
Slide the output tray back onto the input tray.
-
Reconnect the power cord to the rear of the printer, and then plug in the power cord to an electrical outlet.
-
Reconnect the USB cable, if your printer has a cable connection to the computer.
-
Turn on the printer.
The printer might go through a warm-up period and the carriage might move. Wait until the warm-up period finishes before you proceed.
You can refer this HP document for more assistance:- Click here
I hope that helps.
To thank me for my efforts to help you, please mark my post as an accepted solution so that it benefits several others.
Cheers.
Sandytechy20
I am an HP Employee
09-30-2020 09:01 AM
HP Recommended
Sandytech20,
THANK YOU!!!
I'm sure this will help, and anxious to try it. I am, however, currently separated from my printer by several hundred miles. I will try this procedure as soon as I return, and will post here the results.
I do appreciate your excellent response, and particularly the very detailed instructions, which will be very helpful to me. I'm not a very "mechanical" person, and appreciate all the detail I can get! I'm probably not alone in that.
Most sincerely thankful!
Rod_T
Be alert for scammers posting fake support phone numbers and/or email addresses on the community.
If you think you have received a fake HP Support message, please report it to us by clicking on "Flag Post".
† The opinions expressed above are the personal opinions of the authors, not of HP. By using this site, you accept the Terms of Use and Rules of Participation.


Didn't find what you were looking for? Ask the community
† The opinions expressed above are the personal opinions of the authors, not of HP. By using this site, you accept the <a href="https://www8.hp.com/us/en/terms-of-use.html" class="udrlinesmall">Terms of Use</a> and <a href="/t5/custom/page/page-id/hp.rulespage" class="udrlinesmall"> Rules of Participation</a>.