• ×
    Information
    Windows update impacting certain printer icons and names. Microsoft is working on a solution.
    Click here to learn more
    Information
    Need Windows 11 help?
    Check documents on compatibility, FAQs, upgrade information and available fixes.
    Windows 11 Support Center.
  • post a message
  • ×
    Information
    Windows update impacting certain printer icons and names. Microsoft is working on a solution.
    Click here to learn more
    Information
    Need Windows 11 help?
    Check documents on compatibility, FAQs, upgrade information and available fixes.
    Windows 11 Support Center.
  • post a message
Guidelines
Do you need the WPS PIN to connect your printer? Click here for tips and tricks!
HP Recommended
Examplwireless tank 455

Flashing p and saying out of paper but entirely of paper in printer 

1 REPLY 1
HP Recommended

Hi @Poppy96,


I'd like to help!


I understand you're facing flashing P and out-of-paper errors.


Try the below suggestions -


Step 1: Make sure the ink tanks are full

Before you start the priming process, make sure there is enough ink in every tank. The ink levels should be within the maximum and minimum fill lines on the ink tank.

Figure : Example of properly filled ink tanks

  1. Maximum fill line

  2. Minimum fill line

Step 2: Make sure the printheads are properly installed

Install the printheads properly. If you have already installed the printheads, skip to the next step.

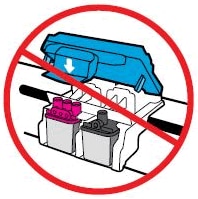
   CAUTION: 

Do not open the blue carriage latch after printhead installation unless you are installing new printheads or moving the printer long distances.


Do not open carriage latch

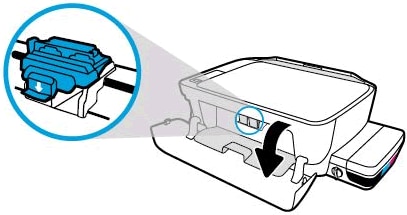
  1. With the printer turned on, open the exterior door, and then open the printhead access door.

    The printhead carriage moves to the center of the printer.

    Figure : Accessing the printhead carriage

    Image: Access the printhead carriage
  2. Install the printheads.

    • Insert the black printhead into the right slot.

    • Insert the tri-color printhead into the left slot.

    Figure : Inserting the black and color printheads

    Image: Insert the printheads
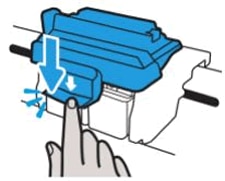
  3. Close the blue carriage latch by pushing down firmly until the latch snaps into place.

    Figure : Closing the blue carriage latch

     Closing the latch

Step 3: Load paper

Load plain white paper in the input tray.

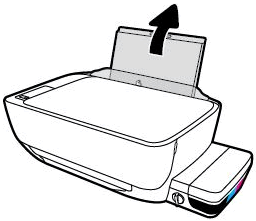
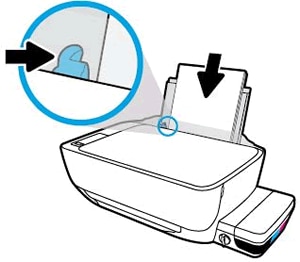
  1. Raise the input tray.

    Image: Pull up the input tray

  2. Slide the paper width guide all the way to the left.

    Image: Slide the paper width guide left

  3. Load plain white paper into the input tray, slide the stack of paper down until it stops, and then slide the paper width guide against the edge of the paper.

    Image: Load paper and slide guide right

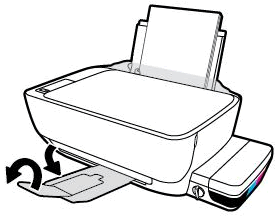
  4. Pull out the output tray, and then raise the tray extender.

    Image: Pull out the output tray and tray extender

Step 4: Confirm that the printer can start the printing process

After you verify that there is sufficient ink in the tanks, the printhead is latched, and paper is loaded, align the printer and then start the priming process.

  1. On the printer control panel, press and hold the Resume button  for 3 seconds to start the priming process.
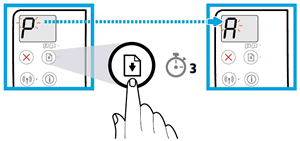
    The printer prints an alignment page.

    NOTE: 

    The alignment page might have a small blot or smear at the bottom of the page. This is a normal during the printer's initial setup.

    Figure : Pressing and holding the Resume button

    Press and hold the resume button
  2. Lift the scanner lid.

  3. Place the alignment page with the print side down on the right-front corner of the scanner glass, and then close the scanner lid. Position it according to the guides around the scanner glass.

    Figure : Placing the alignment page on the scanner glass

    Printer alignment
  4. Close the scanner lid.

  5. On the control panel, press the Start Copy Color button .

    The printer aligns the printheads.

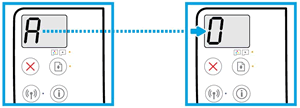
    Alignment is complete when the A becomes a 0 on the control panel.

    Figure : Alignment complete

    Alignment complete

Also, refer to -An 'Out of Paper' error displays, printer does not pick paper


If the issue persists, I'd suggest you contact HP in your region regarding the service options for your printer


Hope this helps! Keep me posted. 


And, Welcome to the HP Support Community. 


Please click “Accept as Solution” if you feel my post solved your issue, it will help others find the solution.

Click the “Yes" on the bottom right to say “Thanks” for helping

† The opinions expressed above are the personal opinions of the authors, not of HP. By using this site, you accept the <a href="https://www8.hp.com/us/en/terms-of-use.html" class="udrlinesmall">Terms of Use</a> and <a href="/t5/custom/page/page-id/hp.rulespage" class="udrlinesmall"> Rules of Participation</a>.