• ×
    Information
    Windows update impacting certain printer icons and names. Microsoft is working on a solution.
    Click here to learn more
    Information
    Need Windows 11 help?
    Check documents on compatibility, FAQs, upgrade information and available fixes.
    Windows 11 Support Center.
  • post a message
  • ×
    Information
    Windows update impacting certain printer icons and names. Microsoft is working on a solution.
    Click here to learn more
    Information
    Need Windows 11 help?
    Check documents on compatibility, FAQs, upgrade information and available fixes.
    Windows 11 Support Center.
  • post a message
Guidelines
Do you need the WPS PIN to connect your printer? Click here for tips and tricks!
HP Recommended
Hp photosmart C4795

When the cartridge moves from the right there is an awful grinding sound. I checked the back and there is not a paper jam. The print quality is fine. I also tried moving the rollers 5 times as suggested,  still no luck. This only happens at the start of the print job.

1 REPLY 1
HP Recommended

@123school Welcome to HP Community!


I understand that paper will not feed.


Please perform the hard reset and check.


Turn the printer on, if it is not already on. 


Wait until the printer is idle and silent before you continue. 


With the printer turned on, disconnect the power cord from the rear of the printer. 


Unplug the power cord from the wall outlet. 


Wait at least 60 seconds. 


Plug the power cord back into the wall outlet. 


Reconnect the power cord to the rear of the printer. 


Turn on the printer, if it does not automatically turn on. 


Wait until the printer is idle and silent before you proceed 


Clean the rollers in the rear of the product

  1. Gather the following materials:

    • A clean, lint-free cloth, or any cloth that will not come apart or leave fibers

    • Distilled, filtered, or bottled water (tap water might damage the product)

    • Clean, lint-free cotton swabs

  2. Press the Power button () to turn off the product.

  3. Disconnect the power cord from the rear of the product.

  4. Press the tab on the left side of the rear access door, and then pull the door outward to remove it.

    Figure : Remove the rear access door

    Illustration of removing the rear access door
  5. Lightly dampen a clean, lint-free cloth with bottled or distilled water, and then squeeze any excess liquid from the cloth.

  6. Press the cloth against the rollers, and then rotate them upward with your fingers. Apply a moderate amount of pressure to remove any dust or dirt buildup.

    Figure : Rotate and clean the rollers

    Illustration of the rollers
  7. Lightly dampen a cotton swab.

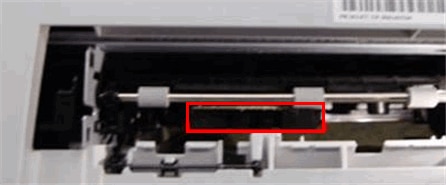
  8. Locate the two internal pick rollers just inside the rear of the product.

    Figure : Location of internal pick rollers

    Photograph of location of internal pick rollers

    Figure : The two internal pick rollers

    Photograph of the two internal pick rollers
  9. Place the swab against the internal pick rollers, and then rotate them upward with your fingers to remove any dust or dirt buildup.

  10. Allow the rollers to dry for 10 or 15 minutes.

  11. Gently push the rear access door into the product until it snaps firmly into place.

    Figure : Reattach the rear access door

    Illustration of reattaching the rear access door
  12. Reconnect the power cord to the rear of the product.

  13. Press the Power button to turn on the product.

Also, please refer to the below link as well.


https://support.hp.com/in-en/document/c02065582


Keep us posted,

If you would like to thank us for our efforts to help you, 


Give us a virtual high-five by clicking the 'Thumbs Up' icon below, followed by clicking on the "Accept as solution" on this post, 


Have a great day!

† The opinions expressed above are the personal opinions of the authors, not of HP. By using this site, you accept the <a href="https://www8.hp.com/us/en/terms-of-use.html" class="udrlinesmall">Terms of Use</a> and <a href="/t5/custom/page/page-id/hp.rulespage" class="udrlinesmall"> Rules of Participation</a>.