-
×InformationFix Windows 10 Update Issues
Resolve Windows 10 related issues for your HP computers or printers by HP Windows 10 Support Center
-
-
×InformationFix Windows 10 Update Issues
Resolve Windows 10 related issues for your HP computers or printers by HP Windows 10 Support Center
-
- HP Community
- >
- Printers
- >
- Printer Setup, Software & Drivers
- >
- 2540 Scanner Dialog Box Won't Open
- Mark Topic as New
- Mark Topic as Read
- Float this Topic for Current User
- Bookmark
- Subscribe
- Mute
- Printer Friendly Page

Create an account on the HP Community to personalize your profile and ask a question
2540 Scanner Dialog Box Won't Open
03-04-2021 02:32 PM - edited 03-04-2021 02:34 PM

Just when I need it most, the scanner dialog box will not open. I've done everything the "Wizard" suggests, including uninstalling/reinstalling the driver, upgrading Print and Scan Doctor, printing the "report", rebooting, hard reset, etc.
I can print and I can do a scan using an alternate method I stumbled onto, but it did not allow me to add pages, and I have multi-page documents to scan and save.
Doesn't work wireless or USB. I can print wireless, so it's communicating. Just not to scan.
I have had connectivity problems before, but PASD always got me going again.
Thanks for your help, our banker is waiting!!!!!
03-04-2021 04:30 PM

====================================================================
Welcome to the HP Community.
Be Aware:
Do not respond to individuals who post phone numbers or email addresses.
Do not respond to individuals who ask you to provide private information in a public Post.
These people might be scammers trying to steal your information / money.
====================================================================
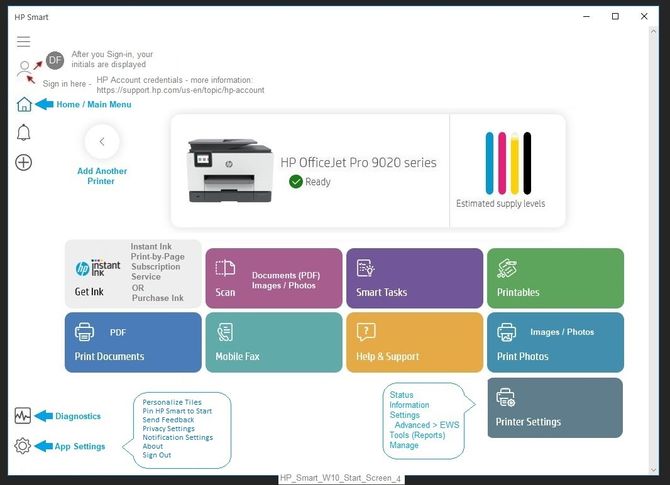
If using HP Smart for Windows,
Try / Consider
Open HP Smart
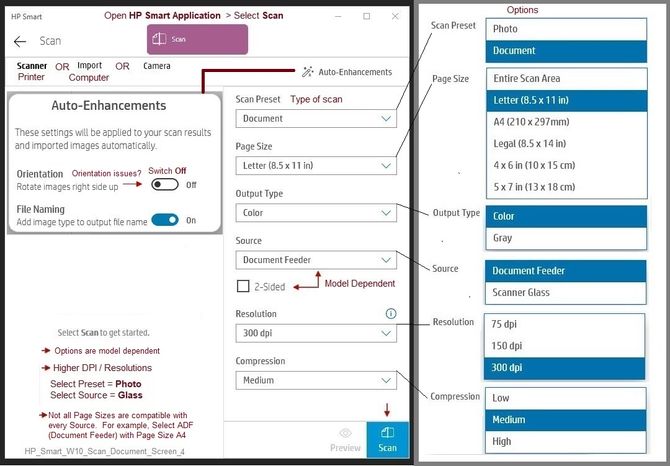
Select to scan a Document,
Open Auto-Enhancements > Switch Orientation OFF
Scan the first page
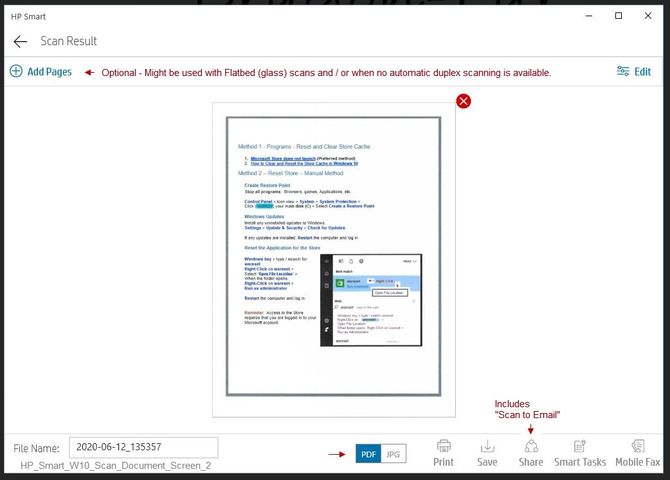
Remove the page after it is scanned, add next page.
Click to Add Pages
After the document is scanned,
Save or Share (scan to email - requires that you have added the "Sender" address to Windows Mail)
Partial Example
HP Smart - Windows - Scan Document
HP_Smart_W10_Start_Screen_4
HP_Smart_W10_Scan_Document_Screen_4
HP_Smart_W10_Scan_Document_Screen_2
References / Resources
HP Smart for Windows
HP Smart is an application available in the Microsoft Store
Learn how to use HP Smart on your Windows 10 computer.
Open the Software and Drivers Support Website for your printer > Check the Box Get the App
OR
HP Printers - Using the HP Smart App (Windows 10)
NOTES:
- Website includes the HP Smart software for Windows and Mobile devices, plus an FAQ section to assist with questions / issues
- HP Smart requires that you be signed into the application with your HP Account credentials.
Printer Home Page - References and Resources – Learn about your Printer - Solve Problems
“Things that are your printer”
NOTE: Content depends on device type and Operating System
Categories: Alerts, Access to the Print and Scan Doctor (Windows), Warranty Check, HP Drivers / Software / Firmware Updates, How-to Videos, Bulletins/Notices, Lots of How-to Documents, Troubleshooting, Manuals > User Guides, Product Information (Specifications), more
When the website support page opens, Select (as available) a Category > Topic > Subtopic
HP DeskJet 2540 All-in-One Printer series
Thank you for participating in the HP Community.
The Community is a separate wing of the HP website - We are not an HP business group.
Our Community is comprised of volunteers - people who own and use HP devices.
Click Thumbs Up to say Thank You.
Question Resolved / Answered, Click "Accept as Solution"
03-05-2021 09:07 AM

@triedandfailed wrote:It looks like I use HP Printer Assistant. I had never paid attention to what it's called.
There's always time to learn more about the tools you are using.
In this case, the Printer Assistant (icon on the Desktop named for your printer) represents the Full Feature Software.
The Full Feature Software includes HP Scan.
If HP Scan won't open - and / or you have having trouble with opening the printing software,
If you have not already done so,
Try / Consider
- Create a Restore Point
- Run Windows Updates > Restart the computer if any updates are installed
- Uninstall the printer software > Restart the computer > Install a fresh copy of the Full Feature Software > Restart the computer.
Preparation / Information
NOTE
If you wish to skip the Preparation, start at The Detailed Procedure – “All the bits and extra steps”
Create Restore Point
Before making any changes to your system, always create a Restore Point!
Stop / Exit all programs: Browsers, games, Applications, etc.
Control Panel > icon view > System > System Protection >
Click (Highlight) your main disk (C) > Select Create a Restore Point
OR
(As available)
Create a restore point now for the drives that have system protection turned on
Create
Windows Updates
Before you install / reinstall printer software, do check and run Windows Updates. Even if Windows Updates appears to have caused trouble in the past, it is always possible rerunning Updates again can resolve odd issues (for example, printer not recognized).
Printer Software – Blocked in Security Software
Check your Security Software to make sure the printer software is not being blocked. Most Security software will allow you to make an exception for applications / software you want to use on your computer.
If you make changes to the security software setup, Restart your computer and log in.
The Detailed Procedure – “All the bits and extra steps”
Use this method when there are problems uninstalling the software.
Start - “All the bits”
Uninstall Existing Printer Software (Full Feature Software)
Control Panel > icon view > Programs and Features >
Find / Select > Uninstall the printer software
If software will not uninstall, appears to be removed and it “still hanging around”
Microsoft: Fix problems that block programs from being installed or removed
OR
Revo Uninstaller (Free version)
After the software is removed, Restart the computer and log in
Check and Remove Section
NOTE:
After all checks > If any devices are removed, Restart the computer and log in
NOTE 2:
Can't stand it?
Too much to do?
Check / remove printer from Devices and Printers and skip the rest.
Check / Remove - Printer Drivers – Lurking in Devices and Printers
Control Panel > icon view > Devices and Printers
Left-Click on any unwanted Printer found in the Printers list
NEXT
(Top Ribbon) Click Print Server Properties > tab Drivers
Select each unwanted entry > Remove > OK to exit menu
Back in Devices and Printers > Right-Click on the printer > Remove Device
Check / Remove – Printer folder/files in C:\ ProgramData
Contributed by HP Support Agent Betty0610
Open File Explorer > Navigate to C:\ProgramData > Open folder Hewlett Packard
Delete any Printer related folders / files
Check / Remove - Printer Software – Lurking in the Device Manager
Control Panel > icon view > Device Manager
Expand category Printers
If any unwanted printer name or “Unknown Device” is listed,
Right-Click on the printer / device > Uninstall
Expand category Imaging Devices
If any unwanted printer name or “Unknown Device” is listed,
Right-Click on the printer / device > Uninstall
Check / Remove - Printer Software – Lurking in the User Account
Clear HP / files in Temp folder
Windows key + X + R (Run command) > type %temp%
Delete the files in the Temp folder (Ignore files that cannot be removed)
Clear HP Printer mention in AppData\Local\HP
Open File Explorer > Navigate to C:\Users\YourAccount\AppData\Local\HP
Remove / Delete any folder named for the printer you wish to remove
End Check and Remove Section
After all checks > If any devices are removed, Restart the computer and log in
======================================================
Installation – Full Feature Software
- Open your printer Support Website
- Open Category Software and Drivers
Printer Software
- Look for Easy Start in subcategory Software-Utility
- Home Page - HP Easy Start >> Open Category Software and Drivers > Topic: Software-Utility > Download and save the current version of the Easy Start wrapper to install your print software
No Easy Start? Look for and Install the Full Feature Software
➡️➡️ HP Deskjet 2540 All-in-One Printer series Full Feature Software and Drivers
- Full Feature Software might have been relocated to subcategory Software-Utility and / or might now be called Print and Scan Driver and Accessories
Basic Instructions
- Download the Full Feature Software installation package or the Easy Start wrapper
- Open File Explorer
- Navigate to the folder in which you saved the installation file (likely Downloads)
- Right-Click on the installation package and “Run as Administrator”
- If using Easy Start > When asked, opt for "Full Driver" (exact wording might vary).
- After the software is installed, Restart the computer and log in
NOTES
- For printer supporting OCR, be sure not to remove the option to install with the full driver. OCR will be available as “Scan as Editable Text” in HP Scan (part of the full driver software).
- If using USB, disconnect the USB cable between the printer and the computer before starting the installation. Connect the cable when instructed to do so (toward the end of the installation procedure).
- Both the HP Smart Application and the Full Feature Software can be installed on the same computer – when available, consider installing Full Feature Software first.
HP Documents
HP Printers - Finding Drivers, Apps, and Updates for HP Printers
HP Printers - Uninstalling the Printer Software (Windows)
Thank you for participating in the HP Community.
The Community is a separate wing of the HP website - We are not an HP business group.
Our Community is comprised of volunteers - people who own and use HP devices.
Click Thumbs Up to say Thank You.
Question Resolved / Answered, Click "Accept as Solution"
03-05-2021 02:47 PM

My HDD kicked in way before I could get through all of that. 😁
So, before I start any of it . . . I have already uninstalled the driver, and installed the latest one, I have already updated PASD, when I was instructed to, I have already rebooted our router and the printer, PASD says it found problems and fixed them, I have already printed a report and it says everything's OK. I can print wirelessly. But the scan dialog box won't open.
If I could try just one thing next, what would it be?
03-05-2021 03:19 PM - edited 03-06-2021 07:46 AM

The root level uninstall would usually help (removing the extra "bits" sections).
There might be corruption in the File system.
None of the following can address corruption - the first two might help if the root level uninstall missed something or if there are continuing communication issues.
Three more things to try...
1) Run the particular Doctor version
2) Connect the printer using TCP/IP
OR
3) Try using HP Smart to scan (first solution suggestion)
1. Offline Doctor
Download and run this version
http://ftp.hp.com/pub/printers/hppsdr/patches/HPPSdr.exe
- Download and Save the doctor to your computer
- Open File Explorer > Navigate to the folder in which you saved the file (likely Downloads)
- Execute the doctor – Answer any prompts / let the process complete
- Restart the computer, log in, and wait for the final steps in the Doctor to finish.
- Check for any difference.
Original Notes – Contributed by ShlomiL
Paraphrased
Connection Issues
- Print and Scan Doctor Version 5.0.7 creates a secondary queue for printing with TCP/IP port.
After the Offline Doctor completes…
Verify / Adjust the “Default” printing device (Default Printer)
Settings > Devices > Printers and scanners
UNCHECK (clear box) Let Windows manage my default printer
Select (Left-Click) your printer from the list of printers > Manage > Set as Default
OR
Open Control Panel > icon view > Devices and Printers > Right-Click on printer > Set printer as Default
NOTES – Selecting Default Printer
- Do not select the printer marked as “Scan Only / DO NOT DELETE”
- Do not select the printer marked as “Fax”
Example Default Printer: Set “Default” Printer = HP OfficeJet Pro 9020 series PCL-3 (Net)
Reference: HP Printers - Printer is Offline (Windows) > Step 2: Manually set the default printer
2. Method - Create TCP IP port
Find printer's IP / IPv4 address
Print a Configuration Page
OR
Tap on the wireless icon on Printer Control / Display Panel
Control Panel > icon view > Devices and Printers
Right-Click on the printer > Left-Click Printer Properties
Select Tab Ports > Add Port
Select Standard TCP/IP Port > New Port and follow the wizard.
Use / Enter IP address for the printer.
Example - How-to “Create TCP Port” Contributed by greenturtle
Video: Create & Use TCP IP port
“Note that you can ALWAYS revert back to the original port that the HP software installed by selecting the HP port within the Ports tab (in Printer Properties)”
Thank you for participating in the HP Community.
The Community is a separate wing of the HP website - We are not an HP business group.
Our Community is comprised of volunteers - people who own and use HP devices.
Click Thumbs Up to say Thank You.
Question Resolved / Answered, Click "Accept as Solution"

Didn't find what you were looking for? Ask the community