• ×
    Information
    Windows update impacting certain printer icons and names. Microsoft is working on a solution.
    Click here to learn more
    Information
    Need Windows 11 help?
    Check documents on compatibility, FAQs, upgrade information and available fixes.
    Windows 11 Support Center.
  • post a message
  • ×
    Information
    Windows update impacting certain printer icons and names. Microsoft is working on a solution.
    Click here to learn more
    Information
    Need Windows 11 help?
    Check documents on compatibility, FAQs, upgrade information and available fixes.
    Windows 11 Support Center.
  • post a message
Guidelines
Do you need the WPS PIN to connect your printer? Click here for tips and tricks!
Check some of the most frequent questions about Instant Ink: HP INSTANT INK, HP+ PLANS: INK AND TONER.


Check out our WINDOWS 11 Support Center info about: OPTIMIZATION, KNOWN ISSUES, FAQs AND MORE.
HP Recommended
HP 8610
Unknown

I have an HP 8610, it keeps saying printer or ink not working. Have turned it off/on, unplugged, changed the ink, all with the same result

1 REPLY 1
HP Recommended

@Ka20


Welcome to the HP Support Community.


A poor electrical contact between the printhead and the printer might cause this issue. Removing and reinserting the printhead can help.

Step 1: Remove the printhead

Open the ink cartridge access door, disconnect the power cord from the rear of the printer, and then remove the printhead.

  1. Press the Power button to turn on the printer, if it is not already on. Wait until the warm-up period finishes and your printer is idle and silent before you proceed.

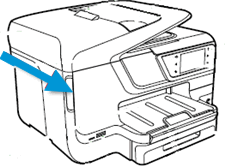
  2. Place your fingers into the slot on the left side of the printer, and then pull to open the cartridge access door. Allow the carriage to move to the cartridge access area, and the carriage stops moving.

    Figure : The slot on the side of the printer

    Image: The slot on the side of the printer.
  3. Disconnect the power cord from the rear of the printer. Unplugging the printer prevents the carriage from moving.

       WARNING: 

    You must disconnect the power cord before reaching inside the printer to avoid risk of injuries or electric shock.

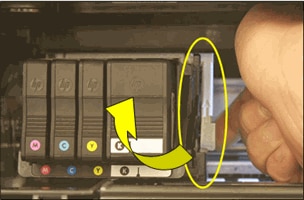
  4. Lift the carriage latch.

    Figure : Lift the carriage latch

    Image: Lift the carriage latch.
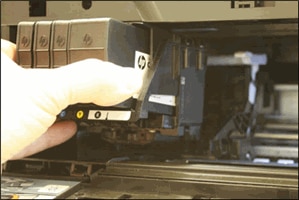
  5. Grasp the sides of the printhead, gently lift and remove the printhead from the carriage.

    NOTE: 

    Do not remove the cartridges from the printhead. You can safely remove the printhead with all of the cartridges inserted.

    Figure : Remove the printhead

    Image: Remove the printhead.
       CAUTION: 

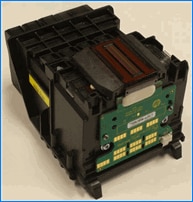
    The nozzle area on the bottom of the printhead is fragile! Make sure that the bottom of the printhead does not bump or rub on the printer. Do not touch the nozzles or electrical contacts. Touching these areas can cause electrical failures or print quality problems.

    Figure : Nozzles and electrical contacts

    1. Nozzles

    2. Electrical contacts

  6. Place the printhead assembly (with the cartridges still installed) upside down on a clean sheet of paper.

       CAUTION: 

    Do not leave the printhead assembly outside of the printer for an extended period. Doing so can result in damage to the printhead or the printer.

    Figure : Printhead upside down on a clean sheet of paper

    Image: Printhead upside down on a clean sheet of paper.

Step 2: Inspect the carriage path inside the printer

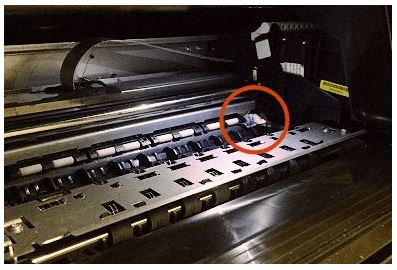
Inside the printer, look for and remove any obstructions from the printhead compartment. If necessary, use a flashlight to thoroughly check for any obstructions.

Figure : Check for paper jammed in the carriage path

Image: Check for paper jammed in the carriage path

Step 3: Reinsert the printhead, and then lower the carriage latch

After checking the carriage path for jammed paper, reinsert the printhead into the carriage, and then lower the carriage latch.

  1. Grasp the sides of the printhead and turn it right side up with the nozzles facing down and the electrical contacts facing away from you.

  2. On the front of the printer, insert the printhead into the carriage, ensuring that the electrical contacts face the inside of the printer. As you guide the printhead into the carriage, it lowers into the carriage as it seats.

       CAUTION: 

    The nozzle area on the bottom of the printhead is fragile! Make sure that the bottom of the printhead does not bump or rub on the printer. Do not touch the nozzles or electrical contacts. Touching these areas can cause electrical failures or print quality problems.

    Figure : Insert the printhead

    Image: Insert the printhead.
  3. Gently rock the printhead to the left and right to make sure that the printhead fully seats in the carriage.

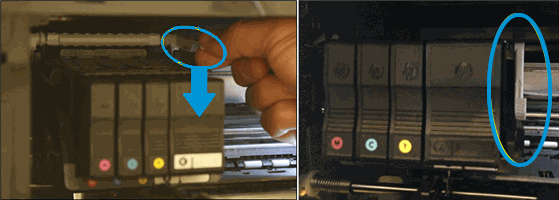
  4. Carefully lower the carriage latch to secure the printhead.

    Figure : Lower the carriage latch

    Image: Lower the carriage latch.
  5. Verify that the carriage latch is down.

    Figure : Carriage latch positions

    1. Carriage latch is up

    2. Carriage latch is down

  6. Close the cartridge access door.

  7. Reconnect the power cord to the rear of the printer.

  8. If the printer does not turn on by itself, press the Power button to turn it on.

    NOTE: 

    The printer might go through a warm-up period. The printer lights might flash, and the carriage might move.

  9. Wait until the warm-up period finishes and your printer is idle and silent before you proceed.

If the issue persists, please perform the remaining steps from this document "The 'Printer Failure' message does not include an error code": https://support.hp.com/in-en/product/hp-officejet-pro-8610-e-all-in-one-printer-series/5367603/docum...


Let me know if this helps.


If the information I've provided was helpful, give us some reinforcement by clicking the Accepted Solution button, that'll help us and others see that we've got the answers!


Thanks!

Have a great day!


I am an HP Employee

† The opinions expressed above are the personal opinions of the authors, not of HP. By using this site, you accept the <a href="https://www8.hp.com/us/en/terms-of-use.html" class="udrlinesmall">Terms of Use</a> and <a href="/t5/custom/page/page-id/hp.rulespage" class="udrlinesmall"> Rules of Participation</a>.