-
×InformationWindows update impacting certain printer icons and names. Microsoft is working on a solution.
Click here to learn moreInformationNeed Windows 11 help?Check documents on compatibility, FAQs, upgrade information and available fixes.
Windows 11 Support Center. -
-
×InformationWindows update impacting certain printer icons and names. Microsoft is working on a solution.
Click here to learn moreInformationNeed Windows 11 help?Check documents on compatibility, FAQs, upgrade information and available fixes.
Windows 11 Support Center. -
- HP Community
- Printers
- Printer Setup, Software & Drivers
- hp deskjet gt 5820 all icons blinking and E error only - no ...

Create an account on the HP Community to personalize your profile and ask a question
Your account also allows you to connect with HP support faster, access a personal dashboard to manage all of your devices in one place, view warranty information, case status and more.
Check some of the most frequent questions about Instant Ink: HP INSTANT INK, HP+ PLANS: INK AND TONER.
Check out our WINDOWS 11 Support Center info about: OPTIMIZATION, KNOWN ISSUES, FAQs AND MORE.

It has been a while since anyone has replied. Simply ask a new question if you would like to start the discussion again.
09-20-2018 08:35 PM
 HP Recommended
Product: hp deskjet gt 5820
Operating System: Microsoft Windows 7 (32-bit)
My hp deskjet gt 5820 suddenly stops printing and all icons are flashing on printer with only error E (no code number). When I long press power & cancel button, the flashing icons is gone and it works.
Other said the printhead needs to be replaced.
Is it true?
I tried to update its firmware but no luck. Still the same.
Please help.
Thanks.
10 REPLIES 10
09-21-2018 02:38 PM
HP Recommended
Welcome to HP forums, I see that you are getting you are getting printhead error.
- Did you do any changes to the printer before getting this error?
Meanwhile, perform a hard reset on the printer.
Perform a power reset
- Turn on the printer, if it is not already on.
- Wait until the printer is idle and silent before you continue.
- With the printer turned on, disconnect the power cord from the rear of the printer.
- Wait at least 30 seconds.
- Plug back the power cable straight to a wall outlet without any surge protector and printer.
- Turn on the printer.
Step 1: Remove, inspect, and then reseat the printheads
The printer might display an error if the printheads are not correctly installed. Perform the following steps for the printhead(s) indicated by the Printhead icons  on the printer control panel.
-
Close the output tray extender, and then rotate the output tray left to stow it in the printer.
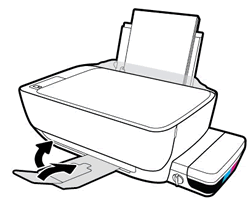
-
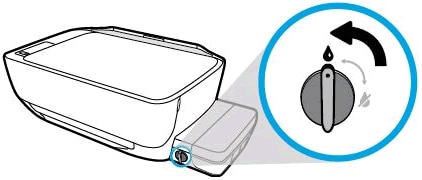
Make sure the ink valve is unlocked.
-
Open the exterior door, and then open the printhead access door.
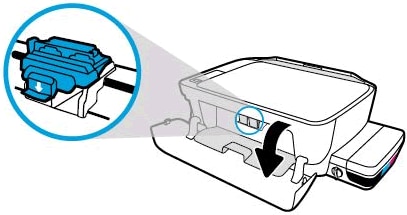
-
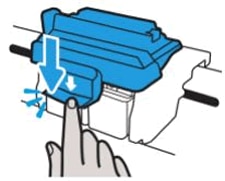
Gently push down on the blue carriage latch.
The blue carriage latch opens.

-
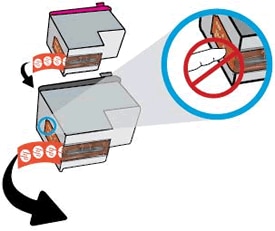
Lightly press down on the printhead to release it, and then pull the printhead out of its slot.

-
Make sure the plugs on top of the printhead have been removed.

-
Make sure the tape from the printhead contacts has been removed.
CAUTION:
Do not touch the copper-colored contacts or the ink nozzles. Do not replace the protective tape on the contacts. Handling these parts can result in clogs, ink failure, and bad electrical connections.
-
Slide the printhead at a slight upward angle into the empty slot, and then gently push up on the printhead until it snaps into place.

-
Insert the tri-color printhead into the left slot.
-
Insert the black printhead into the right slot.
-
-
Close the blue carriage latch by pushing down firmly until the latch snaps into place.
-
Close the printhead access door.
-
Close the exterior door.
The priming process should continue.
If the error persists and the printer did not prime, continue to the next step.
Step 2: Clean the printhead contacts
The printer might display a printhead error if the printhead contacts are dirty. Perform the following steps for the printhead(s) indicated by the Printhead icons on the printer control panel.
CAUTION:
Clean the printheads one at a time, and make sure the printheads are reinstalled in the printer as soon as possible. Leaving the printheads outside the printer for more than 30 minutes can damage them.
-
Gather the following materials:
-
Dry foam-rubber swabs, lint-free cloth, or any soft material that does not come apart or leave fibers (coffee filters work well)
-
Distilled, filtered, or bottled water (tap water might contain contaminants that can damage the printheads)
CAUTION:
Do not use platen cleaners or alcohol to clean the printhead contacts. These can damage the printhead or the printer.
-
-
Open the exterior door, and then open the printhead access door.
-
With the printer turned on, disconnect the power cord from the rear of the printer.
-
Gently push down on the blue carriage latch.
The blue carriage latch opens.
-
Lightly press down on the printhead to release it, and then pull the printhead out of its slot.
CAUTION:
Keep the printhead upright during removal to prevent ink from leaking.
-
Inspect the contacts for any debris buildup.
-
Wipe the contacts with a dry swab or other lint-free material until no debris remains on them.
CAUTION:
Be careful to wipe only the contacts. Do not smear any debris elsewhere on the printhead.
-
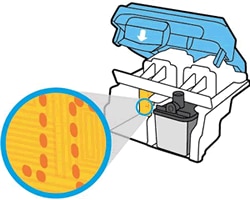
Dip a clean foam-rubber swab or lint-free cloth into distilled water, and then squeeze any excess water from it.
-
Clean only the copper-colored contacts, and then allow the printhead to dry for approximately 10 minutes.
CAUTION:
While cleaning the contacts, to avoid damaging the printhead, be careful not to touch the ink nozzles.
-
Copper-colored contacts
-
Ink nozzles (do not clean)
-
-
Lightly moisten another foam-rubber swab with distilled water, and then squeeze any excess water from the swab.
-
Use the swab to clean the electrical contacts in the carriage, located inside the printer.
-
Clean the contacts in the carriage.
-
Either let the printhead sit for 10 minutes to allow the cleaned area to dry, or use a new swab to dry it.
NOTE:
Make sure the printhead is not left out of the printer for more than 30 minutes.
-
Slide the printhead at a slight upward angle into the empty slot, and then gently push up on the printhead until it snaps into place.
-
Insert the tri-color printhead into the left slot.
-
Insert the black printhead into the right slot.
-
-
Close the blue carriage latch by pushing down firmly until the latch snaps into place.
-
Close the printhead access door.
-
Close the exterior door.
-
Reconnect the power cord to the rear of the printer.
-
Turn on the printer.
You can refer this HP document for more assistance:- Click here
Let me know how it goes.
To thank me for my efforts to help you, please mark my post as an accepted solution so that it benefits several others and please give the same post a Kudos.
Cheers.
Sandytechy20
I am an HP Employee
09-21-2018 07:09 PM
HP Recommended
@sandytechy20
thanks for the effort to help me find the solution.
However, it didn't work. Upon turning on the printer and waiting for a few seconds, it immediately flashes the E error (no error code number). All icons are flashing. When this happen, even the computer cant detect the printer.
What I'm doing to clear this error is, pressing the Power Button for 1 to 2 minutes. But sometimes, it suddenly flashes again the E error (no error code number).
I suspect that the problem is the printer board. Not the printhead.
My email is johnpaul_tibar@yahoo.com if you need to send any further solution. Thanks.

09-22-2018 01:52 AM - edited 09-22-2018 01:54 AM
HP Recommended
Another question.
What is the last icon below means (flashing on the printer screen together with other icons)? ( see picture attached on previous reply)
I have another thought of this error is about the waste pad or ink absorber like in other printer brands.
Thanks.
09-22-2018 11:45 AM
HP Recommended
I am responding on behalf of @sandytechy20 as he is out for the day. It is great to have you back and your patience is greatly appreciated.
Please refer to the below image for the errors you may get on the printer.

I recommend you follow the steps in the below artilce and check if the issue is resolved.
https://support.hp.com/ro-en/document/c04912971
Let me know how it goes. Awaiting your reply!
If you wish to show appreciation for my efforts, mark my post as Accept as Solution. Your feedback counts!
Good day! Take care 🙂
Cheers!
The_Fossette
I am an HP Employee
09-23-2018 10:53 PM - edited 09-23-2018 10:53 PM
HP Recommended
@The_Fossette
thanks for the reply.
however I already read those troubleshooting guidelines you gave before asking here.
what i want to know now is the flashing icon at the very buttom (from the wifi icon above).
What is that for??? I already pointed it with red arrow to be specific.
Pls. dont send anymore non-sense troubleshooting guide. It doesn't solve my HP printer problem.

09-24-2018 11:01 AM - edited 09-24-2018 11:03 AM
HP Recommended
This particular Icon mean there is a Notification regarding your HP Connected Account
Since the Printer is still in error state after performing all the required troubleshooting steps, I have sent you a private message with the next course of action
Please check your private message icon on the upper right corner of your HP Forums profile.
Next to your profile Name, you should see a little blue envelope
Thank you
If the information I've provided was helpful, give us some reinforcement by clicking the "Solution Accepted" on this Post and it will also help other community members with similar issue.
KrazyToad
I Am An HP Employee
09-21-2019 09:35 PM
HP Recommended
Same issue with HP I do recommend do not buy HP printers anymore. The unit is costly would take less than year of usage. I don't have any business for printing this is only used by my 2 college students and now I need yo buy a new printer!!!
Be alert for scammers posting fake support phone numbers and/or email addresses on the community.
If you think you have received a fake HP Support message, please report it to us by clicking on "Flag Post".
† The opinions expressed above are the personal opinions of the authors, not of HP. By using this site, you accept the Terms of Use and Rules of Participation.


Didn't find what you were looking for? Ask the community
† The opinions expressed above are the personal opinions of the authors, not of HP. By using this site, you accept the <a href="https://www8.hp.com/us/en/terms-of-use.html" class="udrlinesmall">Terms of Use</a> and <a href="/t5/custom/page/page-id/hp.rulespage" class="udrlinesmall"> Rules of Participation</a>.