• ×
    Information
    Windows update impacting certain printer icons and names. Microsoft is working on a solution.
    Click here to learn more
    Information
    Need Windows 11 help?
    Check documents on compatibility, FAQs, upgrade information and available fixes.
    Windows 11 Support Center.
  • post a message
  • ×
    Information
    Windows update impacting certain printer icons and names. Microsoft is working on a solution.
    Click here to learn more
    Information
    Need Windows 11 help?
    Check documents on compatibility, FAQs, upgrade information and available fixes.
    Windows 11 Support Center.
  • post a message
Guidelines
Do you need the WPS PIN to connect your printer? Click here for tips and tricks!
Check some of the most frequent questions about Instant Ink: HP INSTANT INK, HP+ PLANS: INK AND TONER.


Check out our WINDOWS 11 Support Center info about: OPTIMIZATION, KNOWN ISSUES, FAQs AND MORE.
HP Recommended
hp deskjet ink advantage ultra 4729
Microsoft Windows 10 (32-bit)

my printer is showing the error of paper mismatch again and agian after setting the settings also i think there is any hardware issue

1 REPLY 1
HP Recommended

@guruji1234

Welcome to HP Forums, 

This is a great place to get support, find answers and tips to your technical queries.


This error displays to make sure ink is not wasted when paper settings in the print driver do not match the paper loaded in the printer. 


Let's try the below steps that could resolve the issue.


Step 1: Adjust the paper size setting


Check the paper size setting to make sure it matches the paper you want to print.

note:

Some printers have an option to ignore the error and continue printing. If you choose to ignore the error, the margins on your printout might not be proportional to the edges of the paper.

  1. In the program you want to print from, click File, and then click Print.

  2. Make sure your printer is in the Name or Printers drop-down list box, and then click Properties, Printer Properties or Preferences.

  3. Click the Paper/Quality tab.

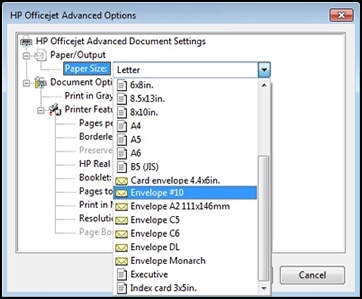
  4. Click Advanced, if necessary, and then click Paper Size.

    Selecting the correct paper size

  5. Select the paper size that matches the size and type of paper loaded in the printer tray, and then click OK. If there are no matching paper sizes, select the size from the list that is closest to the size of the paper loaded in the tray.

  6. Click OK, and then try to print.

    note:

    If you are printing envelopes, you might need to change the mail settings of the program you are printing from in addition to adjusting print settings in the driver. For information on changing envelope settings in Microsoft Word, see How do I adjust the envelope settings in Microsoft Word? in the FAQ section of this document.

If the issue persists, continue to the next step.


Step 2: Check the paper source setting


Remove and reload the paper in the input trays, and then check the paper source setting.

  1. Remove all the paper from all the printer input trays.

  2. Reload the paper, and then adjust the paper width guides so they gently rest against the edge of the paper stack.

  3. In the program you want to print from, click File, and then click Print.

  4. Make sure your printer is in the Name or Printers drop-down list box, and then click Properties, Printer Properties or Preferences.

  5. Click the Paper/Quality tab, and then click Paper Source to select the correct tray.

  6. Click OK, and then try to print.

If the issue persists, continue to the next step.


Step 3: Reset the printer


Reset the printer to clear any hardware issues or error states.

  1. Turn the printer on, if it is not already on.

  2. Wait until the printer is idle and silent before you continue.

  3. With the printer turned on, disconnect the power cord from the rear of the printer.

  4. Unplug the power cord from the wall outlet.

  5. Wait at least 60 seconds.

  6. Plug the power cord back into the wall outlet.

    note:

    HP recommends connecting the printer power cord directly to the wall outlet.

  7. Reconnect the power cord to the rear of the printer.

  8. Turn on the printer, if it does not automatically turn on.

  9. Wait until the printer is idle and silent before you proceed.

Keep me posted, how it goes!

If the information I've provided was helpful, give us some reinforcement by clicking the Accepted Solution and Kudos buttons, that'll help us and others see that we've got the answers!

Have a great day!

Cheers:)

Raj1788
I am an HP Employee 

† The opinions expressed above are the personal opinions of the authors, not of HP. By using this site, you accept the <a href="https://www8.hp.com/us/en/terms-of-use.html" class="udrlinesmall">Terms of Use</a> and <a href="/t5/custom/page/page-id/hp.rulespage" class="udrlinesmall"> Rules of Participation</a>.